

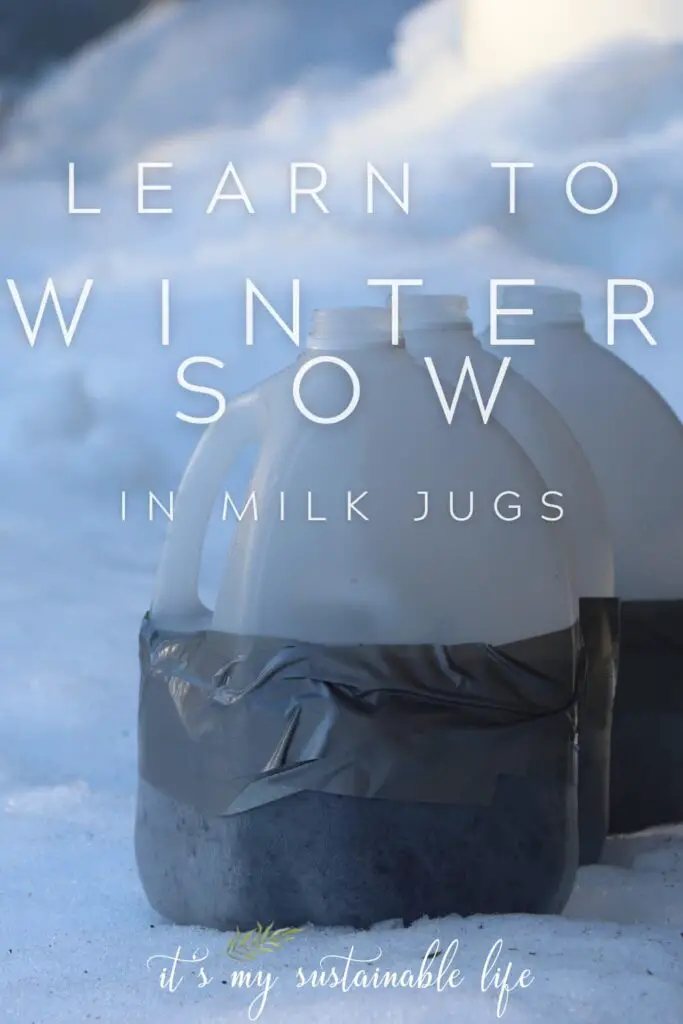
Winter sowing in milk jugs is an easy and economical way to get a head start on your gardening season! Winter sowing garden seeds using milk jugs and other recycled plastic containers by turning them into mini-greenhouses, is a simple way to winter sow seeds successfully outdoors!
HAVE YOU VISITED OUR NEW SHOP?
This post may contain affiliate links at no additional cost to you. By making your purchases through the links on this website, IMSL may make a small percentage at no direct cost to you. IMSL only promotes products we use & truly believe in. Please refer to my Privacy & Disclosures for further information. IMSL thanks you for your support!
Any gardener will tell you. We can’t wait for the end of harvest season, but give us a month of rest, and we are eager to get back at it 😅
Winter sowing in jugs allows me to do just that! Get my hands back into the dirt much earlier than starting seeds indoors even, by using mother nature & milk jugs as seed pots!
Sharing Is Caring ❤️
… and I thank you for it 🙏🏻
When you’re not fortunate (like me) & don’t have access to a greenhouse OR a functional cold frame, the next best thing? Winter sowing in milk jugs!
SOWING SEEDS IN A MILK JUG DEFINED
When your favorite cold frame is no longer functional 😔 like mine this year, sowing seeds in a milk jug is an economical, easy method for growing seedlings from seed with little effort.
Growing onions using my cold frame was always the best way to get a head start on those slow growers here in the N.E.

I took a page from a very intuitive gardener, Trudi Davidoff, who decided to experiment with winter sowing due to lack of space back in the day. Mimicking what occurs in nature, seed exposure to cold temperatures without any additional care. And it paid off.
So much so that Trudi’s method for winter sowing is now termed by the USDA!
So what exactly does it mean to sow seeds in a milk jug?
Winter sowing in milk jugs is just that. A method or way of planting cold-hardy seeds in soil inside a prepared milk jug, or other protected containers which have been properly vented.
It’s defined by the USDA as …
“A propagation method used throughout the winter where temperate climate seeds are sown into protective vented containers and placed outdoors to foster a naturally timed, high percentage germination of climate tolerant seedlings.”
USDA
This method of seed starting allows for a much earlier start, typically anywhere between December and March depending on where you live, by creating a mini-greenhouse environment, allowing the seeds to sprout as they would naturally in nature come springtime.
BENEFITS OF WINTER SOWING
The benefits of winter sowing are many, but here are some I could think of off the top of my head …
- SUCCESS RATE – Most likely the biggest benefit of winter sowing is the germination rate of the seeds sown. We can’t beat Mother Nature no matter how hard we try. Not only successful germination is almost guaranteed, but the seedlings are hardier as well
- NO SPECIAL EQUIPMENT – No heat mats, pots, trays, or lights to grow plants from seed? No worries! Winter sowing requires no special equipment
- COST – For many, the cost of setting up an indoor seed starting area is just out of reach. The beauty of using milk jugs & water jugs is that it is cost-effective. These jugs can be sourced from friends, family, and neighbors at no cost, saving you money AND saving them from entering landfill’s before their time. For the cost of a bit of soil and a packet of seeds, you can find my favorite seed sources here, you too can be growing something green with little money! And did I mention your power bill will thank you for it as well?
- SPACE SAVER – Take a look at my post on Starting Seeds Indoors or Growing Tomatoes From Seed and you’ll get a rough idea of how much space starting seeds can take up in the house. With winter sowing there is no worry there as it all takes place outside
- RECYCLING – Not only are you saving these single use plastics from entering the landfill too soon, they can be re-used for many growing seasons to come
- SAVES PREPARATION – Starting seeds indoors can be, well, laborious to say the least. It’s not just a matter of sprinkling your seeds over soil and that’s it. The prep work BEFORE any actual planting can begin can be a lot. Winter sowing saves the time spent on setting up elaborate seed starting area’s, sterilizing trays and pots and so much more
- GREENHOUSE – Don’t have the coin to build a beautiful greenhouse? Me either. Repurposed jugs act as a mini-greenhouse, trapping the heat and moisture within, which ultimately promotes seed germination naturally
- LET’S NATURE DO IT’S THANG – Winter sowing exposes the seeds to a natural cold stratification process, breaking dormancy, and increases germination rates
- EASE – With little setup time & preparation, once those seeds are planted and placed outdoor’s, nature will take care of the rest
- TIME – Did I mention how easy and fast it is to winter sow? One and done, yes please
- REDUCES FUNGAL DISEASE – Damping off & fungus gnats, are common issues when starting seeds indoors. Fungals disease & fungus gnats are both avoided & are issue’s you can say bye, bye to with winter sowing
- SKIP STEPS – The chore of hardening off seedlings which have been started indoors is no longer an issue when winter sowing as they will already be acclimated to outdoor light and temps, making them even hardier than those started indoors
- STRONGER PLANTS – Winter sowing will result in the plants themselves being stockier, sturdier, less leggy, and just plain stronger than their counterparts which have been started indoors
- EDUCATIONAL – Winter sowing is a great educational project for kids of all ages
- EASY PREP – Using opaque milk & water jugs makes the prep work super easy! These containers are easy to cut through & prepare for use
BEST TIME TO WINTER SOW SEEDS
When is the best time to winter sow seeds? Pretty much, when you want to 😅
I love the fact that winter sowing requires no set schedule. No timing, no looking at last frost dates, no leggy plants to deal with when starting them too early.
There is only one rule when it comes to winter sowing. The ground needs to be frozen and the temperatures below freezing.
Why?
Because when the planted containers are placed outdoors (more on that below) where the seeds are exposed to the colder temperatures, this is what ultimately breaks their dormancy encouraging germination, nature at its finest. All this while being protected within the “greenhouse” from animals, winds, and harsh weather!
This natural process is called cold stratification. It’s the natural occurrence of freezing and thawing until warmer temperatures arrive. During this process the seed coat itself is loosened which in turn prepares the seed for germination.
You can plan on most seeds needing about 8 weeks of this type of cold weather to stimulate the germination instinct.
BEST WINTER SOWING MINI GREENHOUSE CONTAINERS
Yes, these winter sowing containers can certainly be considered greenhouses. Mini greenhouses to be exact.
But which containers are best for creating these winter sowing mini greenhouses? Here are a few suggestions …
- Milk Jugs, yes you can certainly use the white, opaque plastic milk jugs
- Water Jugs
- Clear Juice Jugs
- Food containers with clear plastic tops like those that spinach & greens come in. These containers would work better for those in milder climates than colder ones in my opinion
- 2 Liter Soda Bottles
- Clear plastic bins, use 2 the same size, one flipped on top of the other and secure together preparing them as you would the milk jugs, or one’s that have covers, adding not only drainage holes in the bottom, but also in the top to allow moisture in
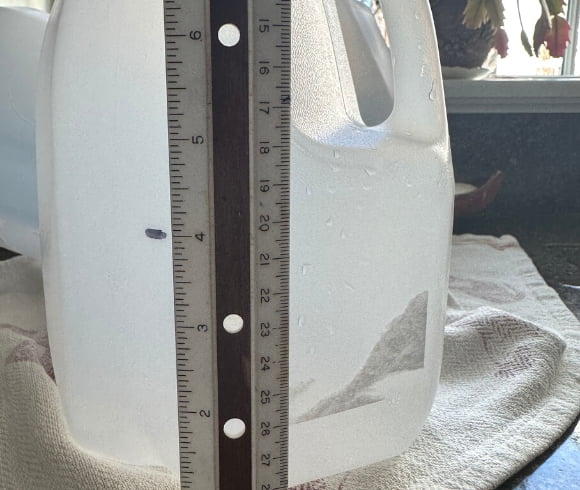
No matter which container you choose, the container should be able to hold at least 3 to 4 inches of soil in the bottom & be tall enough to give the seedlings room to grow.
My favorite of all are the opaque milk jugs and water jugs. They are the perfect size, especially in height, giving the sprouting seedlings plenty of top growth room until it’s time to open the top come spring.
They are readily available and sourced, often without having to purchase them at all!
So source those milk jugs, as many as you like, realizing that although you could plant different varieties within a single jug, it’s really not practical to do so. So I recommend using one jug per seed variety for organizational purposes and ease of transplanting come spring.
WHICH SEEDS ARE BEST TO WINTER SOW
When it comes to which seeds are best to winter sow, remember, winter sowing is for cold weather crops. Those crop varieties which love, well, the cold.
The best seeds to winter sow consist of cold season vegetables & herbs, hardy perennials, hardy annuals, those which require cold stratification or scarification, or hardy native plants within your gardening zone.
Learning how to read seed packets comes in real handy here! Look at the information provided on the seed packet and look for terms like “stratified” (prolonged exposure to cold temps) or “scarified” (the process of manually scaring the hard outer seed coating).
A few other terms or verbage to look for on the seed packet information are “self-sowing”, “pre-chill”, “sow when cool”, “direct sow” and “cold-hardy”.
When considering varieties, look to the name itself which can be very descriptive! Look for descriptives like “polar”, “Siberian” or “artic”. You get the idea. Adjectives that refer to anything cold.
When you notice any of this verbage, you can be pretty sure that these seeds will winter sow successfully.
My favorite seed sources? Look to True Leaf Market, Mary’s Heirloom Seeds, or Botanical Interests. All of these online sources for seed are great options!
Below find a few suggestions for crops & plants to give a go.
EDIBLE COLD CROPS
Cold crops which are edible include …
- brassicas (broccoli, cauliflower, and cabbage)
- greens (leafy greens such as lettuce, kale, bok choy, peas)
- hardy herbs (sage, oregano, dill, parsley, and mint)
- Onions, carrots, radish
FLOWERS
Winter sowing flowers is a great way to fill those flower beds in an economical way!
Think …
- Sweet Pea
- Coneflower (echinacea)
- Marigold
- Morning Glory
- Milkweed
HARDY ANNUALS
There are, surprisingly, a few annuals (plants which complete their lifecycle in 1 year) hardy enough to winter sow.
Consider …
- Snapdragon
- Bee Balm
- Delphinium
- Bachelor Buttons
- Calendula
- Cleome
Although not an exhaustive list, these options should give a good idea of what to winter sow. But what seeds shouldn’t you winter sow?
ARE TOMATOES A GOOD CANDIDATE TO WINTER SOW?
Being the tomato lover that I am and growing a LOT of tomato plants from seed every year, this is one crop that I don’t want to chance failure on. At least for the majority.
Will I try? Probably a few of my heirloom varieties, but will definitely plant in the early to mid spring months which is a lot later than when I start them indoors.
Why aren’t they a good candidate to winter sow?
Tomatoes along with a few other crops like peppers are heat loving plants. In other words, they don’t like the cold 🥶 Typically requiring soil temps of 70°F to 80°F for germination, they like to keep their feet warm.
Once they begin to grow, they still require warmer temps, usually above 50°F in order to thrive. Obviously, in my locale anyway, winter sowing exposes them to temps far below what they require.
SEEDS NOT RECOMMENDED FOR WINTER SOWING
It may have occurred to you that some of your favorite summer varieties are not listed here.
This is due to the fact that many summer crops like tomatoes, eggplant, squash, and peppers need warmth to grow.
Obviously winter sowing would not provide the environment for optimal growth 😅
That being said, they could be sown later, say early spring as an experiment. You never know!
WHEN TO WINTER SOW
Most recommend waiting until after the winter solstice, mid-December for winter sowing. That being said, for most this would be a bit too early, not to mention it’s right in the middle of “the most wonderful time of the year” 😅
The information provided on your seed packets will give you a rough idea as to when the best time to winter sow. And by rough idea, I mean a general one.

When you see information such as “sow after all danger of frost has passed”, “sow outdoors in early autumn”, “can withstand frost” or something similar, you can safely winter sow in late winter (for me zone 5b, that means late Jan/early Feb) or into mid winter. This time frame would include seeds like the hardy perennials and hardy edible categories.
Information such as “start indoors 4 to 6 weeks before average last frost” and the like, plan on winter sowing anytime mid-winter to late winter (here that would mean mid to late February). You could safely plan to winter sow hardy annuals.
“Sow 3 to 4 weeks before the average last frost” would mean a planting during the late winter (late Feb to early March) to early spring months. This time frame would be a good time to plant the more tender annuals & perennials.
Again, these are rough estimates. Experiment, give it a go! I would plant earlier than later when experimenting, especially for those slow growers. What do you have to lose other than a packet of seeds and a bit of soil?
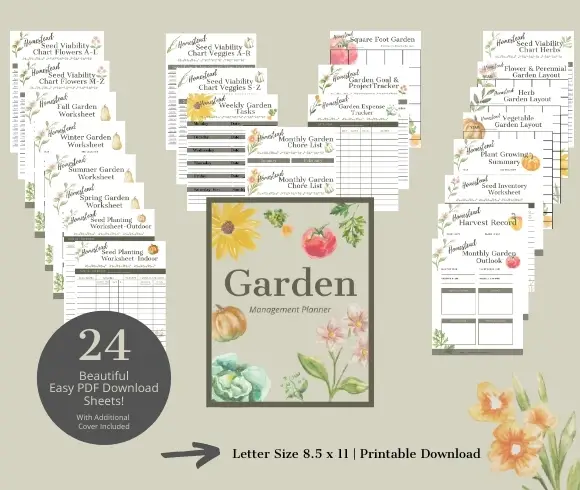
I would recommend keeping records, so any wins & fails will be remembered. I use my Garden Planner pages year-to-year for keeping these records. It’s economical (a one time purchase), reasonable in cost (reuse year-to-year), and did I mention how cute they are 🤗
To grab yours visit my ETSY shop or click the image below.
EXPERIMENTING WHEN TO WINTER SOW
If you are still not convinced as to when to plant certain seeds, experiment! Stagger planting times, say 2 to 4 weeks apart with a seed variety, keep detailed records as to how they did, dates planted, weather, etc, and see what does well when.
After all, there are no gardening mistakes, only gardening lessons to be learned 🤗
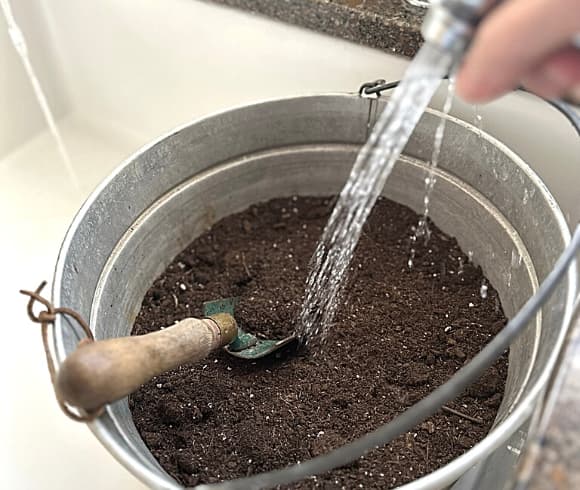
BEST SOIL FOR WINTER SOWING
Choosing the best soil for winter sowing is probably the biggest & most important choice you’ll need to make. Soil is the foundation of any good crop growth.
Although any planting medium will work in a pinch, when it comes to winter sowing, it’s recommended to choose a good potting mix.
That being said, I do a mix of organic inputs to include Organic Pro-Mix, R&M Organic Compost, and a bit of Espoma Land & Sea Compost Mix, with a 2:1:1 ratio for my winter sowing.
Be on the lookout for an in-depth article on soil preparation, but suffice it to say that the above mix will have all the perlite, vermiculite, sphagnum moss and the like to create sufficient air flow, water retention, and nutrients that plants require for optimal growth.
MATERIALS NEEDED FOR WINTER SOWING
Gather the following materials and tools …
- Jugs – Milk & water jugs (handles preferred) or containers of choice
- Cutting Tool – A sharp pair of scissors, snips, X-acto knife, or box cutter for cutting the container in half
- Drill – Drill, hot glue gun, or sharp tool like a like an awl for making bottom drainage holes
- Soil – (see below for the best soil choice)
- Seeds
- Duct tape – my favorite here
- Waterproof marker – garden marker or paint pens work great
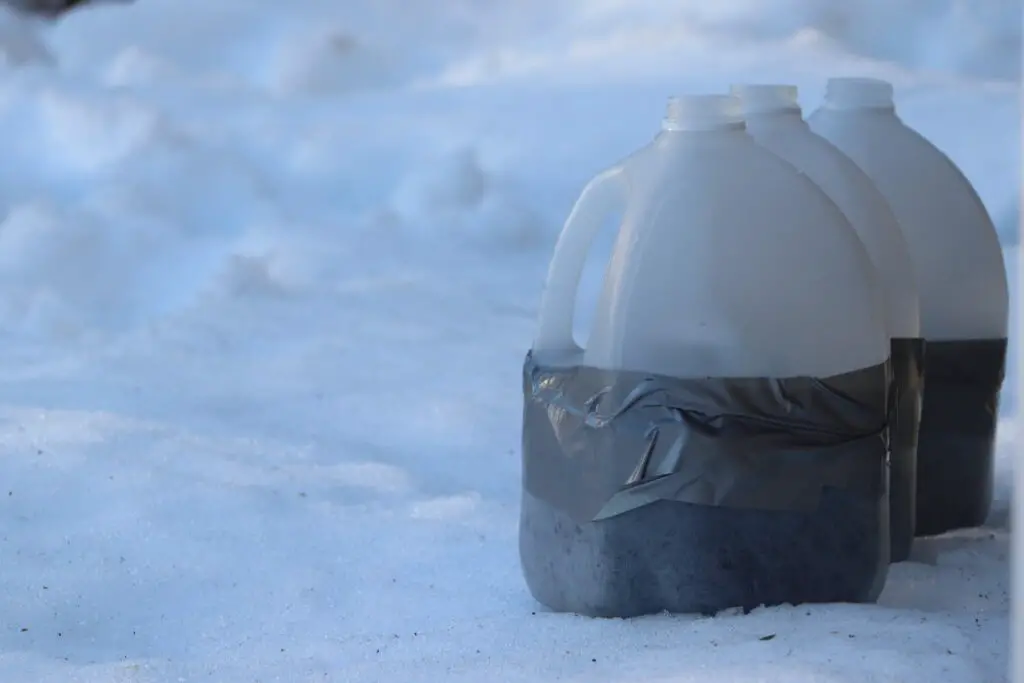
HOW TO PREPARE THE MILK JUGS FOR PLANTING
Preparing the milk jugs for planting is made easy with these steps …
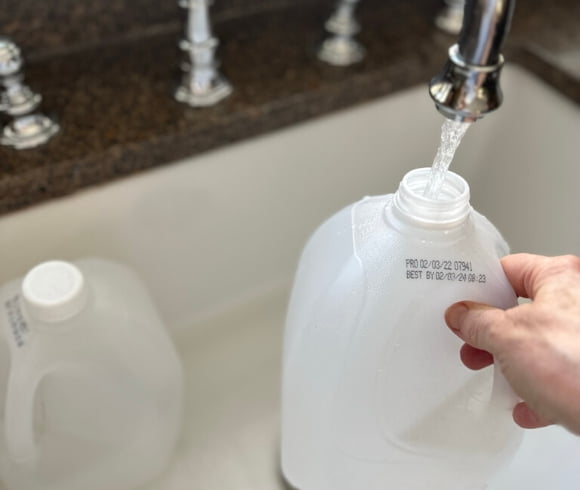
- Gather your milk jugs, discarding the screw tops in the recycle bin
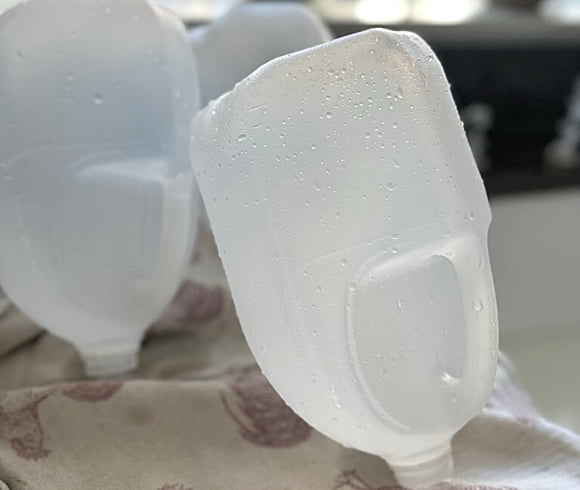
- Thoroughly clean and dry the milk jugs, removing any unwanted labels & residue as best you can. I’m not fussy here, just peel the majority off. Be sure the interior of the jug is completely washed & dried to prevent harmful bacteria or mold growth which can affect seedling growth
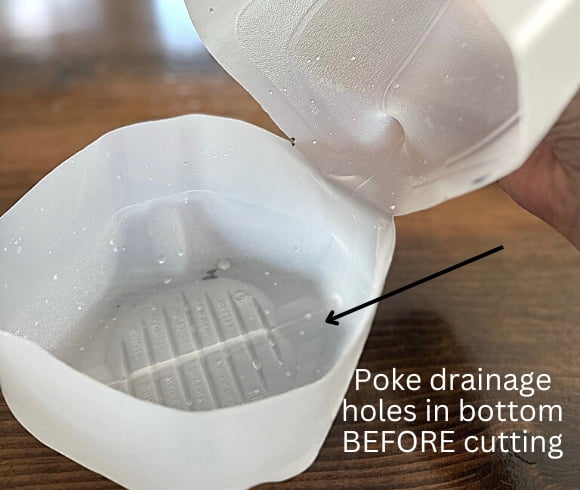
- Create drainage holes in the bottom of the jug. I’ve created 10-12 holes in each using a drill. You can certainly use a sharp awl or melt the holes using a hot glue gun, heated nail or heated screwdriver, but I didn’t want to be breathing the toxic off gasses created by using heated tools. The holes should be large enough to allow excess water to drain, but small enough so the soil doesn’t escape. Why are these holes necessary? Several reasons:
- The interior of the container will overheat during the sunny days come late winter, essentially cooking the seeds to their untimely death
- These holes will actually help regulate the moisture levels without having to check on them routinely
- Allows for proper ventilation and air-flow, both key to growing successfully
- Don’t be like me & forget to drill or make the holes until after filling & sealing 😅 on the first few
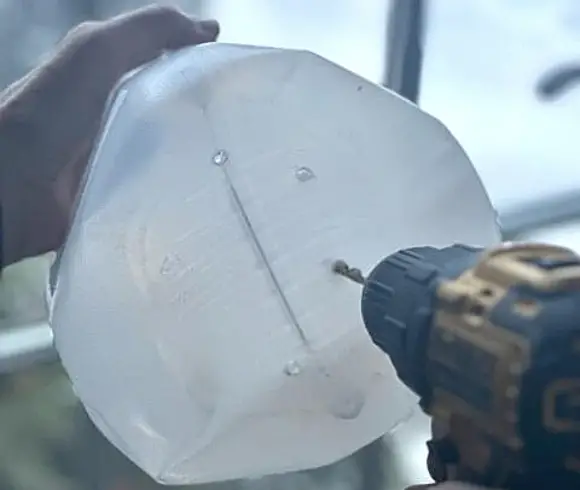
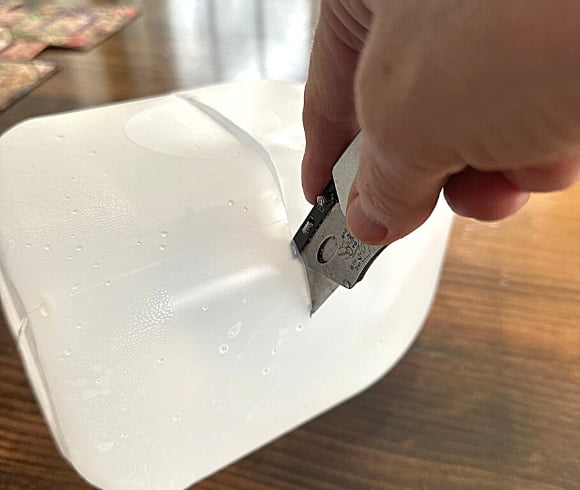
- I found it helpful to create small tic markings around the center of the jug, 4 inches from the bottom of the container. This helped me keep somewhat even around the jug as I cut, unlike the first wonky one I did 😅
- Using a sharp cutting tool, I’ve used a box cutter, cut ¾ + of the way around the jug leaving the handle attached & a good 4”+ left at the bottom. This makes the cut just below where the handle meets the rest of the jug at the bottom, about an inch or so should still be attached. The attached handle makes a good hinge allowing for ease of opening the container
PREPARING TIPS FOR OPTIONAL CONTAINERS
If you are using alternative winter sowing containers, preparing these alternative choices is pretty much the same as for the milk jugs.
Any container will need to be washed & sterilized thoroughly before using, removing labels & residue.
Any container of choice will need to offer easy access to soil by cutting, drainage holes in the bottom, and have some way of securely closing.
For bins with covers, you will need to create holes in both the top of the bin and the bottom to allow moisture to enter and leave the vessel.
Pretty much the same steps.
WINTER SOWING IN MILK JUGS – PLANTING THE SEEDS
STEP 1
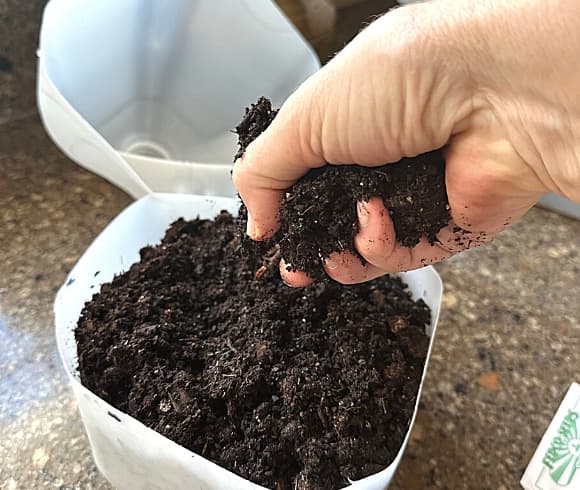
Place the soil(s) into a bucket or container and pre-moisten. The soil should be damp. Not soaking.
I use just enough water that when grabbing a handful, the soil should hold its shape when squeezed, with no dripping water in sight.
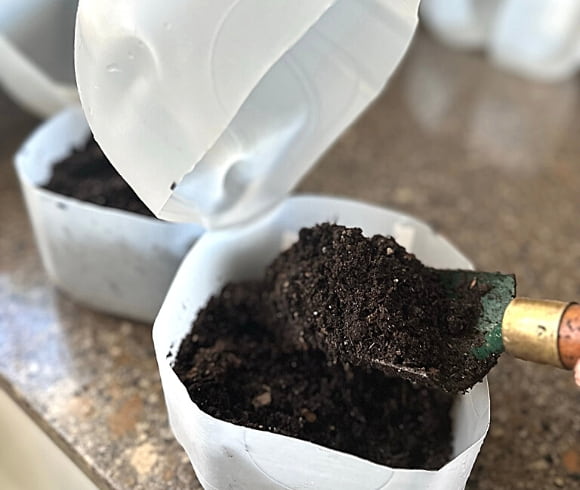
STEP 2
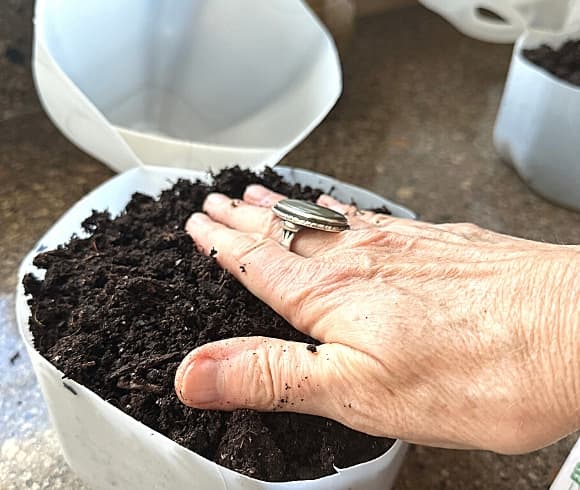
Fill the bottom of the prepared container with 3 to 4 inches of dampened soil, breaking up any clumps that may have formed.
STEP 3
Plant the seeds of choice according to the package instructions, noting the depth of planting.
I recommend planting a bit more densely than what will be said on the seed packet, as I know come time to transplant them into the garden, I will be dividing & soaking them in liquid kelp prior to planting in the garden.
That being said, sprinkle the seeds evenly over the surface of the soil to give them as much room as possible for growth.
Sprinkle a light layer of soil over the seeds unless otherwise directed. Some seeds require light to germinate, if that’s the case, obviously skip the additional soil layer. This information can be found on the seed packet.
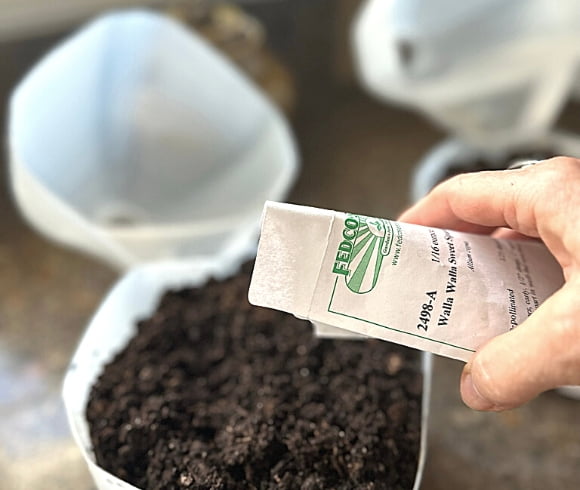
Pat and firm the soil down gently to ensure good seed contact.
STEP 4
Spray water over the top of the planted soil so that the top inch or so of soil is further dampened.
Use a gentle stream here, a spray bottle works well for this as you don’t want your planted seeds disrupted in any way.
This additional watering also encourages good seed to soil contact.
STEP 5
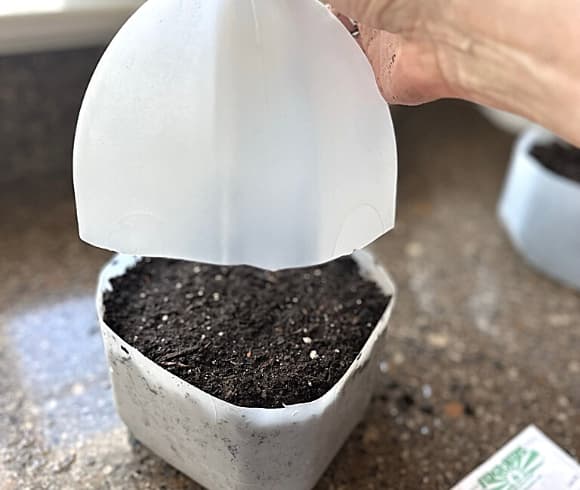
Seal the jug by placing the handled top over the bottom, closing the jug, and securely taping the cut edges together with duct tape or heavy duty tape.
NOTE: You will want the outside of the jug to be dry in order for the tape to adhere fully.
STEP 6
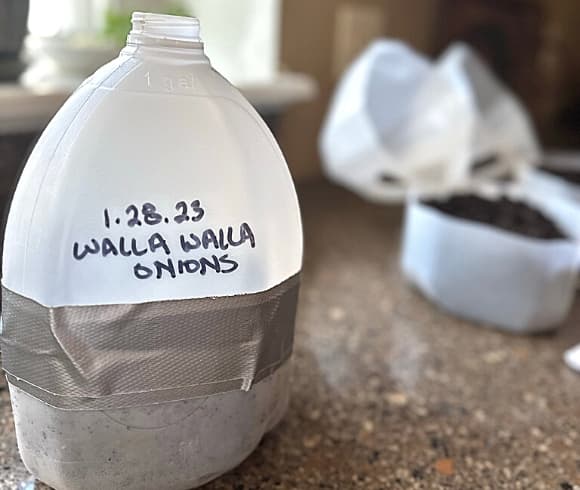
Label each jug planted. Include the date of sowing & the variety of seed used.
I recommend labeling in several areas, the side of the jug as well as the bottom of the jug which is a bit more protected from sun, wind and the elements.
Alternatively or in addition, you could add a plant marker or label inside the jug as well. This is especially helpful when planting multiple varieties within the same container.
Use a waterproof gardening marker or permanent paint pen to label. The sun will fade any other type of marker or pen used.
Proper labeling will help keep track of all the pertinent information needed for plant identification when transplanting into the garden.
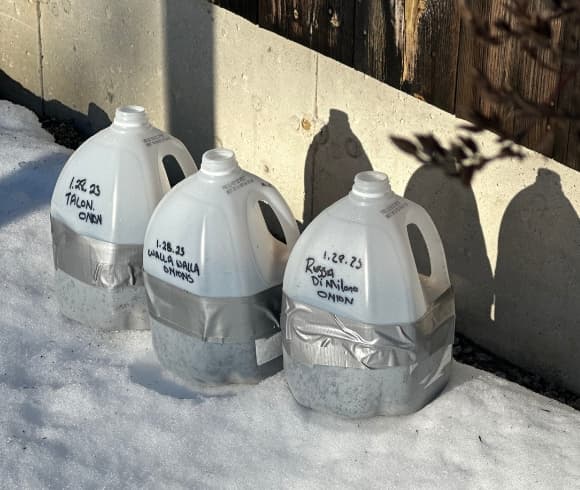
PLACING THE PLANTED MILK JUGS OUTSIDE
The winter sown milk jugs are now ready to go outside! Proper placement of the jugs will determine how successful they will be.
The common thread for proper placement for all locales is they should be in a sunny location that’s protected from high winds and the like, but are exposed to the elements. They should be able to receive rain or snow but not underneath overhangs of any type. You want the jugs to be exposed to rain, snow, and the sun.
What type of exposure depends on your gardening zone.
Those living in the northern, colder climates like my zone 5b, the containers will be placed in a southern exposure, receiving as much sun as possible until the weather warms.
The farther south you reside, adjusting the exposure to south-east, south-west, or south-side with partial sun areas would be more practical. You don’t want overheating of the containers in any way, and certainly don’t want the extra job of having to check on them daily.
MONITORING & CARING FOR WINTER SOWING CONTAINERS
Although this method of sowing is much simpler with less care needed than that of seed starting indoors, it’s not a one and done task. A bit of monitoring & caring for those winter sown milk jugs will go a long way in reaping hardy plants.
If you’ve placed your sown containers in an area that is away from foot traffic, both the 2 legged kind as well as the 4 legged, it’s unlikely they will be disturbed. You can most likely forget about them until later in the process.
If you’ve had to place them where they can be a target for those with any number of legs, you may want to check on them daily to make sure they haven’t been knocked over and that they are still securely taped.
When the temps remain freezing, no additional watering is needed. Once the weather warms, the seeds have sprouted & are developing, they will need to be checked for moisture (you don’t want them drying out) as well as opening the top to allow for better air circulation during the height of the day & closing the top during the colder evening temps.
In warmer climates, keep an eye out for excessive heat. The tender seedlings are very susceptible to heat and can literally bake if not cared for appropriately. You may need to move them out of direct sunlight accordingly.
WINTER SOWN SEED GROWTH EXPECTANCY
Each seed variety will grow when they instinctively know to. Some will germinate earlier than others, often with snow still on the ground. Many will take their time and wait for warmer spring weather to arrive.
The warmer your area, the earlier you will see germination.
All that said, it really is dependent on Mother nature and the weather she offers during the key growing months.
WINTER SOWN SEEDLING CARE
Once the seedlings have grown tall enough that they are reaching & touching the top portion of the jug or container, they will most likely have developed their first true leaves, you will need to remove the lid.
NOTE: Plant material which is touching the sides or top of the container will be susceptible to burning or wilting from the heat of the jug if left. Removing the lid will need to be done to avoid this. Thus, continued monitoring of the growth is needed.
Beware of the dropping temps at night. Cover those tender seedlings if questionable temps are in the forecast, removing once it warms back up in the morning.
You will now need to pay closer attention to monitoring moisture. Seedlings will dry out quickly and watering once a day will not be out of the question.
TRANSPLANTING WINTER SOWN SEEDLINGS
Hopefully through the process listed above, your seedlings will have been exposed to the elements by now.
There are times, however, when the weather doesn’t permit this. If that’s the case for you this year, the winter sown seedlings will need to be “hardened off” prior to transplanting into the garden.
It may mean an extra step, but a step well worth the effort.
HARDENING OFF WINTER SOWN SEEDLINGS
What does it mean to “harden off”, and why is it necessary?
Hardening off is just a term referring to the process of gradually exposing them to the elements; wind, sun, & cooler temps. This process is done slowly over a period of a week or two before transplanting them into the garden.
Why?
Basically, it toughens the tender seedlings up a bit. It helps them adjust to their new reality and greatly prevents transplant shock which can weaken if not kill tender seedlings.
TRANSPLANTING WINTER SOWN SEEDLINGS
Once the seedlings have been hardened off, have developed their true leaves (I like to have at least several sets of leaf growth after the first true leaves before transplanting), it’s time to transplant them into the main gardening area.
Hardy varieties can be transplanted once the garden soil is workable. For me, it means early spring.
To transplant, remove the bundle of seedlings from the milk jug. Have at hand a brown water solution in a bucket or bowl. Although optional, I do this with all my transplants, giving them an added boost of nutrients that reduce any shock and promote healthy growth faster.
Brown water is just a combination of liquid kelp and water. I recommend using room temperature water so as to not shock those babies 😅
No worries about drowning them, they won’t be in there but for a short bit.
The seedlings will benefit from a dunk & soaking in the brown water. You can actually watch the roots of them plump and absorb the beneficial nutrients. Soaking them also allows for easier detangling of their roots for ease of transplanting!
Transplant into the garden as directed on the seed packet instructions for depth & spacing.
WINTER SOWING IN MILK JUGS – FINAL THOUGHTS
Winter sowing in milk jugs offers an economical, fun way to get a head start on your gardening season.
It allows you to start plants from seed without the need to purchase expensive equipment, while increasing the success rate of seed germination.
By following this easy guide to winter sowing in milk jugs, keeping in mind that not all seeds are suitable for winter sowing, but for those that are, using this method of seed starting will result in more robust, healthy seedlings.
All thanks to Mother Nature. Trust her. She won’t steer you wrong.
Be sure to keep an eye out for my winter sowing in milk jugs results here in gardening zone 5b, where I hope to show you my successes and things possibly anything I would do a bit differently!
Will you be giving this winter sowing in milk jugs method a try?
Love, Light, & Laughter ~

SHOP MY FAVORITES
Enjoy this article? Please consider sharing it on your favorite social media channel! Want more? Subscribe below for the occasional update with all the “happenings on the hill”!
MAY BE OF INTEREST
- How To Sanitize Seed Trays
- How Often To Water Tomato Plants
- Winter Sowing In Milk Jugs
- How To Appliqué
- What Food Group Are Eggs In
10 comments
This is the first I am hearing of winter sowing. It is a great concept, and I love how it extends the growing season. I have a question, do the above average temps we are experiencing this winter change anything?
Yes. You would need to keep a closer eye on the moisture, germination, and growth, most likely earlier than normal.
Winter sowing in milk jugs is such a great idea! I want to try this.
I never even knew winter sowing was a thing. I tried indoor sowing many years ago and failed epically. I’ll have to give winter sowing a try.
I love the idea of using milk jugs for winter sow. I would like to start with onions, carrots, and radish.
I love all the steps for winter sowing! It seems like timing is everything!
Winter sowing in milk jugs was entirely new for us. Thank you for sharing.
I lost my sage plants this year. I’m going to plant them now – what a great method.
Winter sowing in jugs is a great idea to get a jumpstart on gardening. Cool that they can become little greenhouses. I think I’ll give this a try!
Lot’s of great information! Thanks for all the helpful tips.