

Learn how to appliqué with me using these simple tips! Appliqué, a creative way to expand and embellish textile designs, is easy and fun! Learning how to appliqué is made easy with this how-to guide.
HAVE YOU VISITED OUR NEW SHOP?
This post may contain affiliate links at no additional cost to you. By making your purchases through the links on this website, IMSL may make a small percentage at no direct cost to you. IMSL only promotes products we use & truly believe in. Please refer to my Privacy & Disclosures for further information. IMSL thanks you for your support!
What do I do in the middle of the winter and am completely bored?
Teach myself how to appliqué 😅
Ok, I know, pretty random, right? If you are like me, getting inventive during my slower months is a great way to keep busy, learn a new skill (first time appliqué ‘r here), and create something cute and useful!
So follow along with me as I teach myself how to appliqué where I share both my triumphs and my “what I would do better next time”. May you learn from my mistakes 😅
APPLIQUÉ DEFINED
Appliqué is a sewing technique which uses decorative fabric shapes or pieces placed on top of a fabric base. These shapes or motifs are then secured with varied methods to the fabric base, often creating an ornamental pattern.
Taking the shapes another step further, color is used in unique ways to contrast in both the fabric choices as well as the thread options.
Sharing Is Caring ❤️
… and I thank you for it 🙏🏻
Utilizing appliqué is an easy way to embellish and personalize fabric projects. Think quilts, potholders, pillows, tea towels, table runners, clothing, tote bags, and so much more!
TYPES OF APPLIQUÉ
The beauty of appliqué is that there are varied types or methods for appliqué with the 3 main one’s being …
- machine appliqué
- hand appliqué
- fused appliqué
More on each individual type of appliqué below.
Under those 3 main methods there are a few variations to explore …
- raw edge appliqué – a technique in which the motifs are applied leaving the edges exposed or raw (not turned under to the back). This technique is ..
- wonderful for complex, involved motifs
- results in a clean, flat look
- can be accomplished either by hand or machine
- easy and quick
- requires a fusible web product
- smooth edge appliqué – just as it sounds, using stitching around the outer raw edges of the shape or motif in such a manner that it creates a smooth finish. Examples of this type of stitching would be a close zig-zag or satin stitch
- reverse appliqué – unlike traditional appliqué where the motif is placed on top of the fabric and sewn, reverse appliqué is where fabric is layered over the top of the motif and cut away to reveal the shape
- decorative appliqué – appliqué fabric is used to create a scene, picture, or pattern often along with some type of needlework
MACHINE APPLIQUÉ
Using a sewing machine to adhere or stitch the motif to the fabric base is considered machine appliqué.
When you are a lazy stitcher, speaking of myself here 😅, machine appliqué is definitely the way to go. The stitch options when using a machine are easy to utilize and create some fun variations, many of which can be found below.

Although I will say, hand appliqué is definitely on my radar. As an embroidery enthusiast, the possibilities of creating some intricate and decorative finishes using embellishments like beads, sequins and more is definitely on my list!
HAND APPLIQUÉ
Can you hand appliqué? Absolutely, YES!
Hand appliqué, a traditional appliqué technique utilized by quilters, is where the motif is sewn by hand to the base fabric.
Although hand appliqué can be laborious, especially if you are not an experienced hand stitcher like myself, the finished product is often worth the effort.
Under the hand appliqué method lies one of the more commonly known appliqué methods, the needle-turn appliqué technique.
Needle-turn appliqué is a technique used to hide the hand sewn stitches by turning the seam allowance edge of the motif fabric under using a needle, allowing the motif to be securely adhered to the base fabric without seeing ANY stitches!
This technique results in a very clean edge, one without any raw edges showing.

You can find one of my favorite needle-turn tutorials with any easy to follow video to familiarize yourself with this technique.
FUSED APPLIQUÉ
A straight-forward, simple appliqué technique that is especially good for beginners like me! Fused appliqué uses a fusible web product which is ironed on, fusing the motif or shape to fabric.
Easily cut out, these motifs are then fused to the background or base fabric and finished either by hand or machine if you like.
This is the technique which I’ve used as a newbie, and will go over 👇🏻👇🏻👇🏻
HOW TO APPLIQUÉ
Again, the following instructions are for how to appliqué using the raw edge fusible web technique.
Before you begin, I highly recommend watching my video below for a visual idea of what you will be doing, or reading through the entire tutorial prior to beginning.
It’s always helpful for first timer’s to practice on some scrap fabric. You can always keep the appliqué for use on other projects if you like them!
There are a few decisions you need to make before beginning your project. First up, source your appliqué motif or design.
WHERE TO SOURCE APPLIQUÉ MOTIFS
Fortunately, it’s amazingly easy to source appliqué motifs, designs, or templates, many of which are free for the taking.
When first beginning, consider the following when choosing your templates…
- Size and shape of the motif. Larger shapes and those with fewer curves or sharp corners (unlike my small round pieces I used the first time out 😳) can make it easier for the beginner stitcher, especially when machine stitching.
- Simple designs. Keeping it simple will allow you to achieve great results with little frustration
- Copyrights. If you are making an item for just yourself, most likely no worries. When making multiples or for sale items, familiarize yourself with any copyrights. When in question, reach out for permission
Look to these suggested places to help source your templates …
- Do a quick search on the web for “appliqué templates free”
- Draw or create your own using template plastic, card stock or even plain index cards
- Coloring books, illustrated books, and the like
- Plastic templates & stencils
- Appliqué Pattern Book
- Appliqué Kits
Once you’ve chosen and printed your appliqué pattern(s), gather the supplies & tools needed to complete your appliqué project.
A NOTE ON PRINTING APPLIQUÉ MOTIFS
It’s important to understand that any motif, pattern, or design you choose will create a mirror image of the template you begin with. A simple line drawing won’t make a difference one way or the other.
However, should you want an exact replica of the template, such as lettering, and not have it come out backwards when printing, be sure to check the “reverse print” option, look at the preview window to make sure it’s reversed and then print.
WHICH STITCH PATTERN TO USE
Appliqué motifs will have a raw edge when using the fusible web. Unless you want the edges to fray (I wanted that look with my design), you will need to use an appropriate stitch pattern around the edge of the motif.
I would recommend basing your stitch pattern on several factors. The size of your appliqué template and the intricacy of that template.

For instance, using a decorative, intricate stitch using a sewing machine such as a blanket stitch around very small circles like mine are near to impossible to complete.
Here are a few stitch choices which are commonly used …
- Straight Stitch
- Zig Zag Stitch
- Blanket Stitch
- Satin Stitch
- Blind Hem Stitch
You may want to give each stitch a go on a plain scrap piece of fabric, marking each stitch with the name and the machine setting number as you go for reference. This will give a good indication if the chosen stitch will work well with your motif pattern.
Should you be hand sewing, decorative embroidery stitches can be used instead.
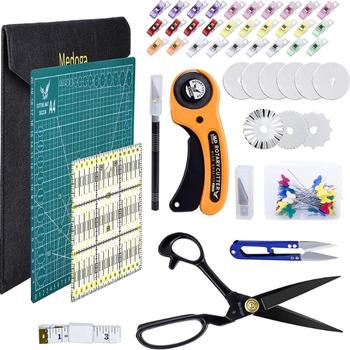
SUPPLIES & TOOLS NEEDED FOR APPLIQUÉ
Gather …
- FABRIC – I used 100% cotton fabrics which I had on hand leftover from a quilting project. Should you not have some on hand or want some pretty unique patterns, you can source some pretty good deals for fabric here.
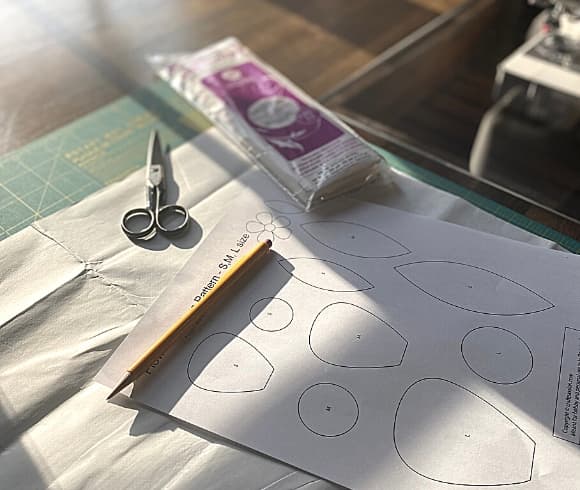
- MOTIF – I printed this free flower appliqué pattern for my first attempt. Other than being small sized for my first appliqué stitching attempt, it’s a great one for a beginner and I love the look of the flowers
- FUSIBLE WEBBING – There are several choices of fusible web which you can choose from with different forms, various weights, and different brands, the most common being Lite Steam a Seam II, Wonder Under, Shades SoftFuse, and the brand I went with Heat n Bond Lite® and was very happy with it
- PENCIL – You will need a writing utensil, a simple pencil works fine, for tracing the template
- SCISSORS – I recommend using a pair of cutting scissors, not your fabric or quilting scissors for cutting the shapes out so as not to dull the good ones
- IRON – I love my Rowenta
- IRONING TABLE – If you don’t have your own pressing station (I made my own out of an antique sideboard table) use a simple ironing board
- THREAD – Thread, color matched to the motif if you like or use a neutral color as I did. I do recommend using quality thread, I love Gutermann thread for all my sewing needs & it didn’t disappoint for my beginner attempt. That being said, when using the hand appliqué technique, you may want to source a 2 ply thread which is a bit thinner for hand work. Embroidery thread is another option that produces a lovely finished edge.
- NOTE: Embroidery thread is NOT the same as embroidery floss. Be sure when machine stitching, you are using the appropriate needle for the thread type & weight you’ve chosen
- SEWING EQUIPMENT – Unless you are using a simple thread and needle to stitch your appliqué, you will be needing a sewing machine. This Janome machine is the perfect choice, a great middle of the road sewing machine
- SEWING TOOLS – When machine appliqué’ing (is that a word?), having the right foot can make all the difference. I recommend using an open toe appliqué foot when possible. This foot is made specifically for appliqué, the center of the foot being open in front of the needle allowing you to clearly see where & what you’re stitching. That being said, I didn’t have this handy foot and used my satin stitch foot with clear plastic and a red arrow pointing my way 🤗 which came with my machine
CREATING THE APPLIQUÉ MOTIF
Using the printed motif template you’ve chosen, it’s time to create your appliqué motifs which will be used to fuse to your material.
TRACING TIPS
To trace your motif templates, place the printed outlines under the fusible web. Paper side up, bumpy glue side down.
Trace the pattern, you should be able to easily see the outline through the fusible web, right on the lines. If you can’t see the outline, place both the printed outline with the fusible web on top onto a brightly lit window or lite box.
Make a mark in the center of the traced outline listing size, name, or any other pertinent information you may need as a referral. This is an important step when making multiple and/or different sizes of the same shapes as I’ve done.
Be sure not to miss any marking such as those indicating where the motif will underlay others. These markings typically use line such as —– and the like.
If you are making multiples of the same shapes AND fabric, trace them all together on the same piece of webbing so they can be adhered in one piece or section and cut out together saving a bit of time.
CUT OUT THE APPLIQUÉ TEMPLATE
Once you’ve traced all the patterns onto the fusible web, cut out the template making sure to leave at least ¼ inch to ½ inch border around the outside of the outline.
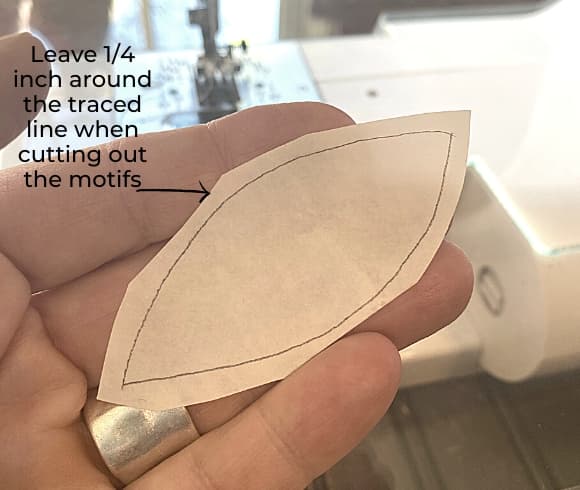
This border allows for easy cutting of the appliqué once it’s been fused to the fabric as you will then be cutting directly on the outline line itself.
ADHERING THE MOTIF FABRIC TO THE FUSIBLE WEB
Don’t rush this step!
Taking a few moments before you secure the fusible web to consider the following will save a lot of “oh I wish I had” moments later 😅
TIPS FOR FABRIC PLACEMENT IN THE MOTIF
I always find the hardest part of any textile project is choosing the fabric. As in choosing the color scheme & patterns.
BEFORE you adhere the cut-out motifs to the fabric, take a good gander at your fabric selections noting any directional patterns or prints & how you want them placed on your final project.
PLACEMENT of the fabric motifs is important when you are working with several different fabric colors within a design, especially if they overlap. Placing dark fabrics on the bottom of a layered design will result in a bleed through of color, as in the dark will show through the upper layers which can distort the lighter coloring.
WORK with your fabric grain. Place the fabric grain so that they run lengthwise (warp) and crosswise (weft) on the cutout or motif to minimize stretch during sewing & handling. This is especially true when using larger motifs.
SECURING THE FUSIBLE WEB TO THE FABRIC
Once you’ve got your fabrics and noted placement, you can begin securing the fusible web to the fabric.
To do so, read through the fusible web of choice manufacturer’s directions. Each brand may have subtle differences in how to do so.
For the Heat n Bond® brand, use an iron on medium heat with NO steam.
Place the fusible web on the WRONG SIDE (back) of the fabric with the bumpy, glue side down (on the fabric back) and the paper side with the traced shape facing upwards toward you. Fuse on top of the paper (traced pattern) side by firmly holding the iron down for 2 seconds.
It’s important to note a couple points when securing the fusible web to the fabric …
- Do not iron back and forth as this may move the fusible bond, instead firmly pressing down and not moving the iron
- Consider using a pressing cloth which is basically a scrap piece of fabric placed over the material you are pressing to reduce risk of glue issues on the iron itself. This is especially a concern when using fabric other than 100% cotton
- Do not exceed the pressing times stated on the fusible web manufacturer’s instruction as this could possibly affect the adhesive of the web
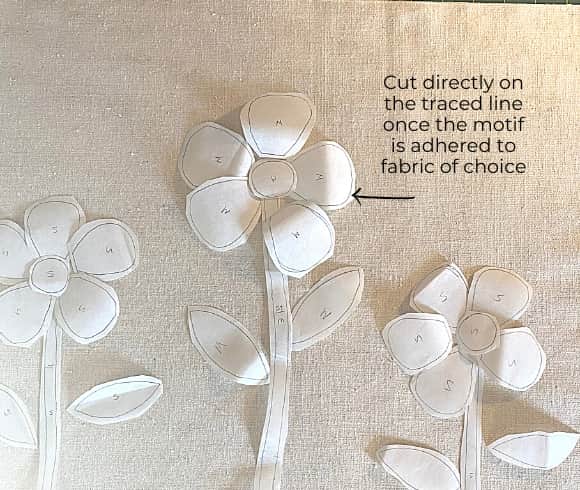
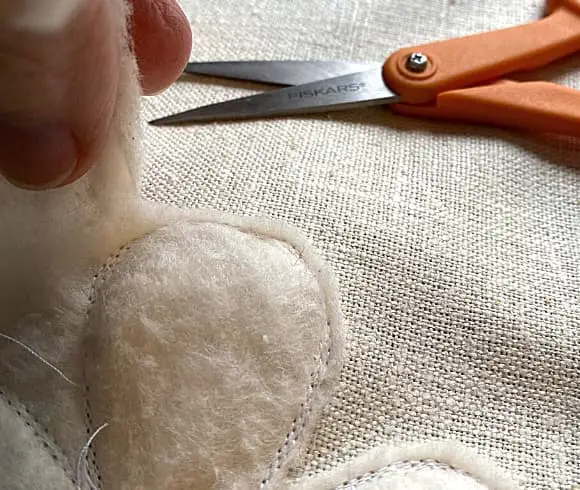
CUTTING OUT THE APPLIQUÉ
Cut the appliqué motif or shape on the line drawn or traced. Take your time, be careful and use a sharp pair of scissors that can really get into those tight areas. These scissors are affordable and made for precision cutting.
This will be the final shape of the motif or appliqué. Take note of any markings you’ve made if the motifs are layered making sure to give yourself the additional ¼ inch needed to do so.
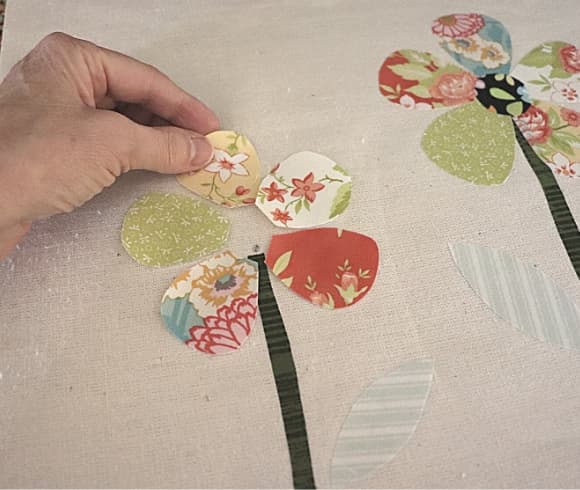
LAYING OUT THE PATTERN
I found it helpful to lay my cut motifs out onto the background or bottom fabric allowing me to position them exactly where I wanted them BEFORE securing them to the background or bottom fabric.
I made tic marks directly underneath each motif which allows them to be secured individually if need be and taking the guesswork out placement once they’ve been moved reducing errors misplacements.
Remember, once they are adhered to the fabric there is no going back 😳
REMOVING PAPER BACKING FROM APPLIQUÉ
Begin removing the paper backing off each motif. One thing you will need during this process is patience 😅
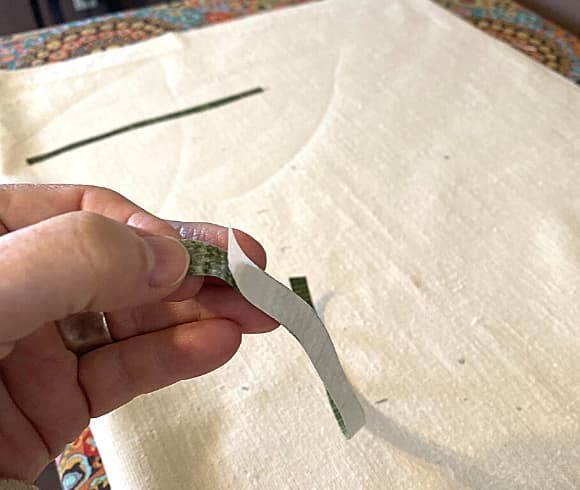
It can be a bit tricky to get started. If you have trouble grabbing the edge, score the center of the paper backing with a pin or tip of scissors to separate the paper from the fabric and peel away.
ADHERE THE APPLIQUÉ TO THE BASE FABRIC
Very carefully place the prepared motifs where you’ve made your tic marks, placing the backside of the fabric where you removed the paper down.
Adhere or fuse the motifs following the manufacturer’s instructions. For the Heat n Bond® press the iron (medium heat/no steam) down on top of the motif for 6 seconds. This will essentially dissolve the bonding agent which will in turn adhere or secure the motif to the backing fabric.
Again, be sure to press down and not slide the iron side to side as this may move the motif, something you don’t want to happen!
Once fused to the background fabric, be sure to draw any accents, think eyes, lines and the like on the front of the shape.
STITCHING THE APPLIQUÉ
Using the predetermined stitch pattern, select an area to begin stitching that is not a focal point.
Take your time, slow is better for beginners (trust me) when stitching around the motifs.
Know that with curves, bends, or corners you will need to gently turn the fabric as you go, often, with the needle down lifting the foot to do so.
You can use matching thread the same color as your motifs, switching as you go, or the same color highlighting the motifs for all.
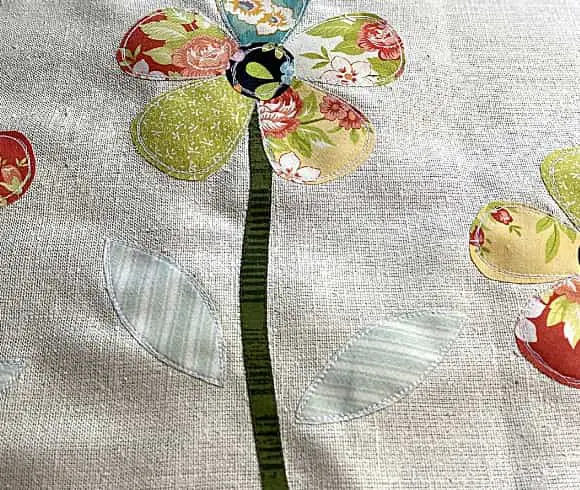
For the flower motif, I began stitching at the bottom of each petal, slowly working my way around, backstitching or lock stitching to secure both ends. I used a straight stitch, and went around each piece 3 times for definition, trying my best to keep that little red arrow going along the edge of the motif.

If you choose to use a decorative stitch, it can be helpful to use a small zig zag stitch (ex: 3.0 W and 1.5 length) to secure the motif first. Then go around and use the decorative stitching.
Once the outline is stitched, fill in those detail lines you may need continuing with the same stitch or switching it up. Your choice.
OPTIONAL: ADDING BATTING TO CREATE A RAISED 3D LOOK
Creating a raised motif, which creates a 3D effect, is simply a matter of layering batting to the backside of all fabric prior to stitching.
This is especially effective when quilting the end product. I’ve gone ahead and done this step even though I’m not quilting it as I had a bunch of scraps which I zig zagged together for the experience.
Prior to stitching the motif to the backing fabric, slide the batting under the entire motif, making sure there is at least ½ inch extending beyond the motif edges. I found it helpful to use my fingers to feel the batting position.
Once your placement is where you like, secure the batting temporarily by pinning it into place. Create a sandwich, motif on top, backing material, and batting on the bottom. This sandwich layering will allow for cutting away the batting around the outer edge of the stitching.
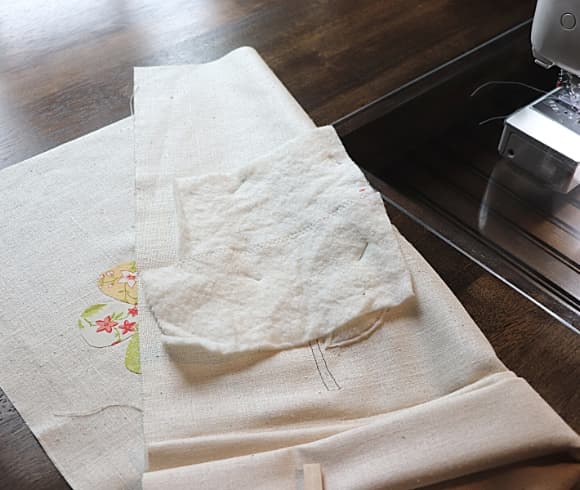
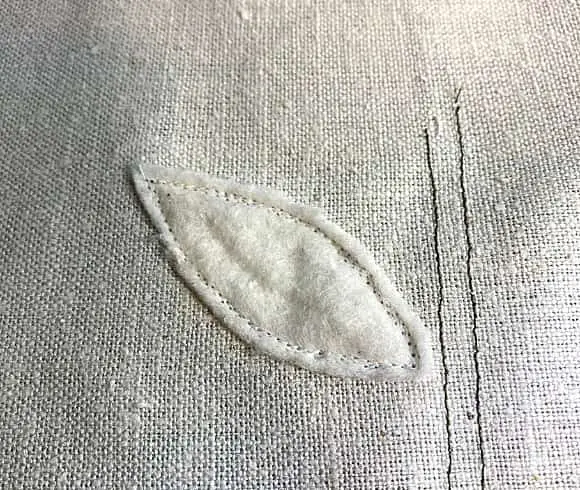
Stitch the outer edges of the motif as per the instructions above. Turn the appliquéd area over, and trim as close to the outside of the stitching being careful not to catch the backing fabric.
APPLIQUÉ EMBELLISHMENTS
My appliqué did not really require any embellishments, but many would benefit from these additions.
Think ribbon, sequins, beads, and the like to add texture and interest to your template. Hand stitching any making sure they are attached securely.
TOP TIPS FOR APPLIQUÉ
- Don’t forget, appliqués are the mirror image of your template. Take advantage of the printer’s “reverse printing” setting or trace the wrong side of the design onto the fusible or template
- Choose easy templates when first beginning. Those with easy curves, few details, and such
- Determine which decorative stitching works best for the design, whether you want matching thread or thread to highlight, when not lining your project choose a bobbin thread the same color as the base or background fabric with top thread matching or highlighting the appliqué
- Use the appropriate foot when machine stitching, purchasing an appliqué foot should you desire
- Have patience, take your time, and remember we all start somewhere. Most importantly, have fun
WHAT I WOULD DO BETTER NEXT TIME 🤗
Here are a few of my take-aways for “what I would do better next time”.
I would definitely practice my straight line curves! Although not terrible, curving small curves while stitching, such as the centers of the flowers, takes some skill to get it right!
I would explore more decorative edge stitching and practice them on small motifs. I figure if I can ace the small stuff the big stuff will be a breeze 😅
I would not be quite the lazy stitcher and choose to change the thread colors for a better contrast on each motif.
I would not be so hard on myself of getting it all just right. Sometimes it’s the imperfections which make the project even more beautiful.
Learning how to appliqué has been fun! Using appliqué opens up an amazing amount of design opportunities, and is a skill well worth learning.
Once you’ve learned how to appliqué, what will your next project be?
Love, Light, & Laughter !

SHOP IMSL’S FAVORITES


Enjoy this article? Please consider sharing it on your favorite social media channel! Want more? Subscribe below for the occasional update with all the “happenings on the hill”!
13 comments
Love this step-by-step guide on how to appliqué. I just purchased some really cool (and expensive) jeans with appliqué. Maybe I can try it myself!
What a great post on how to applique! Lisa’s momma, at times, would applique quilts, and they were so gorgeous! Thank you for sharing the tutorial.
Appliqué is so pretty! My mother in law created many gorgeous appliqué projects. I have some of them.
This post had a lot of great information about applique. My grandma used to hand applique quilts. She made one for every grandbaby, wedding, and then great-grandbabies. I have the wedding one and two for my kids. My mom still has mine. Great momentos for sure!
What beautiful keepsakes! Thank you for sharing such a beautiful gift.
Love your applique. You are spot on with using a press cloth to keep the glue off your iron. I also add a scrap of fabric between the applique piece and the ironing board. Nothing like stray glue on your ironing board cover or your iron — it’s the worst.
Great tip! Thank you for sharing it 🙏🏻
What a great idea for something fun to do during winter! Thanks for sharing all the different methods! I will have to try this out!
Wow, fantasic details. I love the look of applique. I has always caught my attention when I have seen it places. I agree, winter is a great time to learn something new. I have taken up jigsaw puzzles this winter. It is nice to try something new. Have fun!
Gotta keep busy somehow!
I don’t know how to applique, but it looks fun! Maybe one day I’ll try it out.
I loved this tutorial on How to Appliqué! I am not great at being crafty but I love learning all things crafting anyways! My daughter is great with her hands though, so I’ll be showing her this post and hopefully it’ll spark inspiration for her!
Hope this tutorial on how to appliqué helps her along the way 🤗