

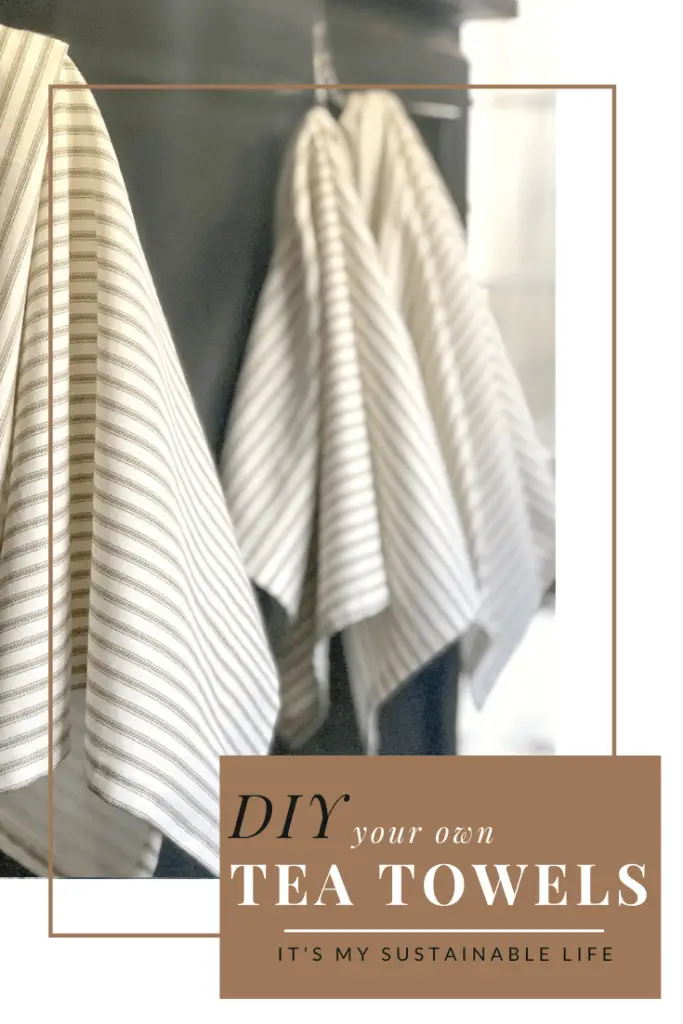
You don’t have to be an expert seamstress to make your own tea towels, aka kitchen towels. This simple DIY kitchen towel tutorial will have you making your own cotton or linen dish towels in no time.
This post may contain affiliate links at no additional cost to you. By making your purchases through the links on this website, IMSL may make a small percentage at no direct cost to you. IMSL only promotes products we use & truly believe in. Please refer to my Privacy & Disclosures for further information. IMSL thanks you for your support!
Kitchen towels, tea towels, or dish towels, no matter what you may call them, are always the last on the list to be replaced when needed here on the hill. The need to replace these towels was put off far too long as the exact fabric pattern for them couldn’t be found anywhere! What’s the saying…”necessity is the mother of invention”?
Necessity definitely was the driving force behind these DIY tea towels. The existing towels were either extremely stained, full of holes, or just plain ratty, it was time…time to take action 🙂 . Time to find the material needed to make replacements. The beauty of this tutorial? They are easy to make, fast results, saves $$$, and can be made using your choice of fabrics & patterns. Holiday gifts anyone?

CHOOSING FABRIC FOR MAKING TEA TOWELS
Probably the most difficult part of making these dish towels is deciding what fabric to use for making them. The options are endless, the designs, colors, and patterns overwhelming. A few tips & considerations to follow when deciding on the fabric for your tea towels are:
- Absorbency – Choose fabrics with natural fibers such as linen or cotton. The tighter the weave of the fabric, the more absorbent they will be.
- Stay Clear Of – Staying clear of fabrics with polyester or other man-made fabric will ensure a good absorbent towel.
- Fabric Pattern – This is likely the toughest decision…there are so many to choose from. Any pattern or color will due, but consideration of what the towel will be used for (hard kitchen chores with lots of stains?), is it a holiday theme? or a gift? will help narrow those choices down.
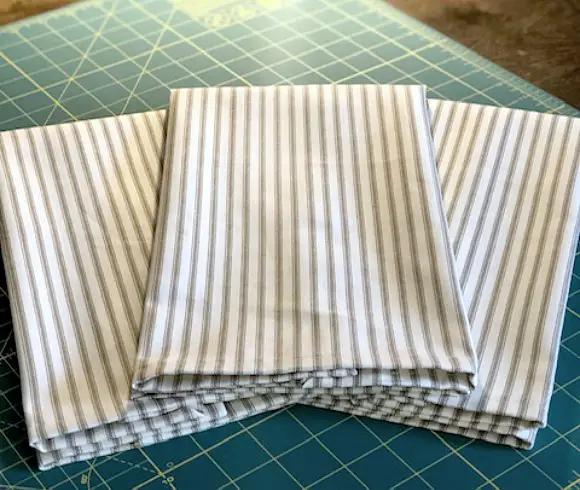
Sourcing fabric can be challenging, I found fabric that can be found very reasonable here. This fabric wash chosen as it was inexpensive and the pattern/color was what was wanted, I’m sure they’re many options out there now.
CHOOSING THE BEST SIZE FOR TEA TOWELS IN INCHES
The standard size for tea towels is 18″ x 28″. This results in a generously sized kitchen towel. When making this size towel, 1 yard of 54″ x 36″ material will render 3 towels.

This being noted, you can play around with any size you like. To increase the number of towels created to 4 from 1 yard of 54″ wide fabric, cut into quarters. Cut four 18″ x 27″ pieces resulting in four towels measuring approximately 16 1/2″ x 24 1/2″ after hemming (size dependent on hem size).
MATERIALS & TOOLS NEEDED TO DIY TEA TOWELS
Gather the following materials for making your own tea or kitchen towels.
- 1 Yard Cotton or Linen Material of your choice (ticking fabric choice can be found here)
- Coordinating thread
- Optional – Grosgrain Ribbon

Gather the following tools for making your own dishtowels.
- Iron
- Sewing Machine
- Needles – for hand stitching when machine is not available
- Fabric Fusion Glue – for making a no-sew version (found here)
- Fabric Fusion Tape – another no-sew option for finishing edges (found here)
HOW TO SEW A DISH TOWEL OR TEA TOWEL
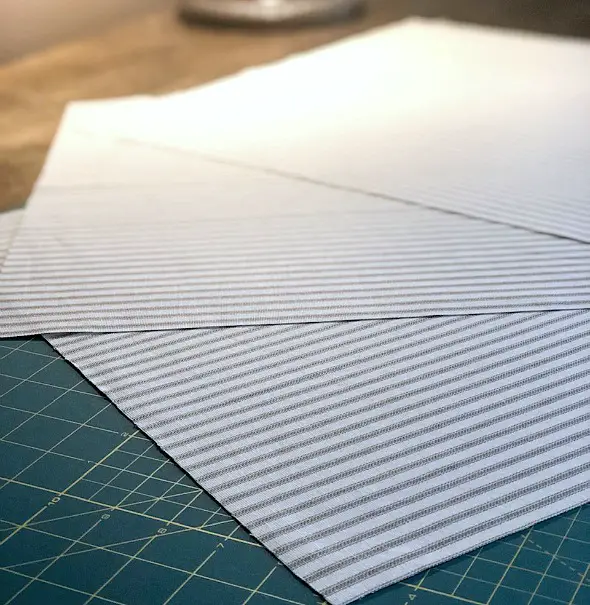
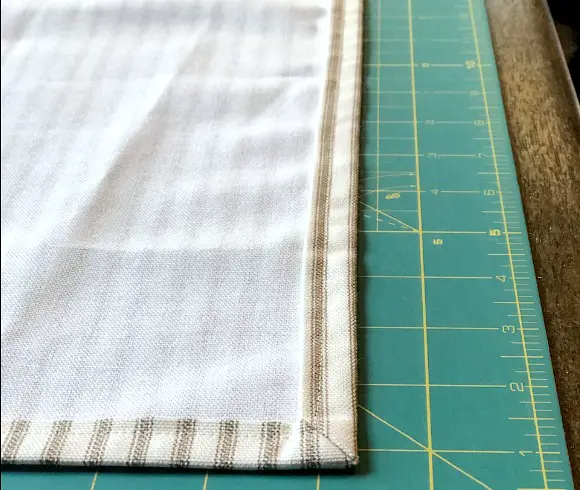
STEP 1 – Cut your yardage according to the measurements you chose. For this tutorial, the fabric was cut into 3 18″ x 27″ rectangles as this was as many towels as were needed.
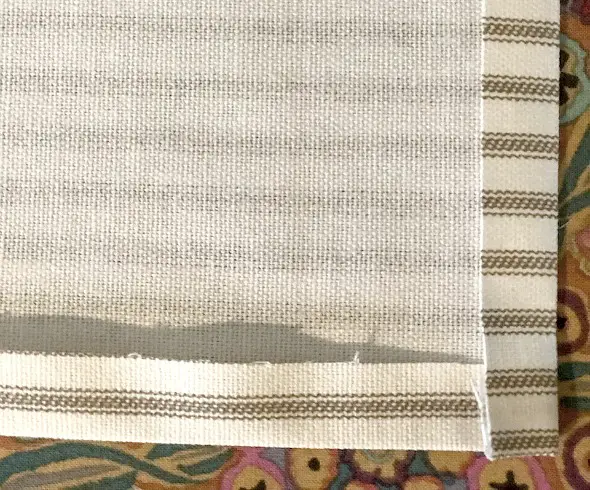
STEP 2 – Press the raw edges over 1/2″ first on the long sides and then the short ends. Your corners will look like below.
STEP 3 – To create a “mitered corner”, at your pressing table, fold one corner over as shown below.
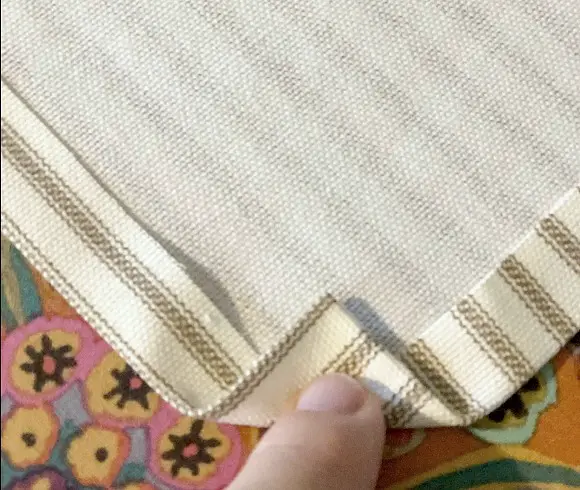
STEP 4 – Trim the tip of the corner off with sharp scissors as shown.
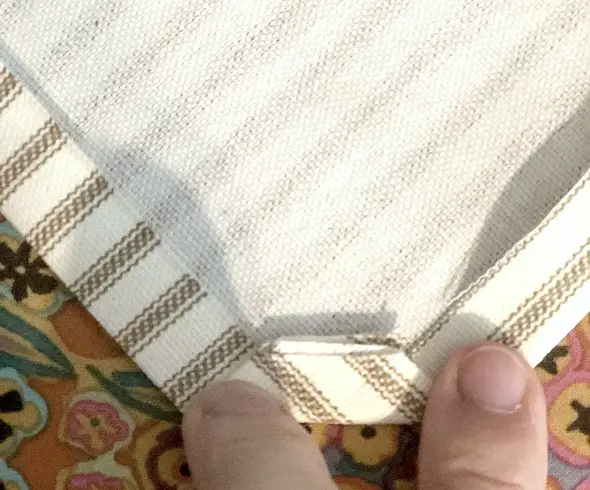
STEP 5 – Fold over the edges again, pressing as you go.
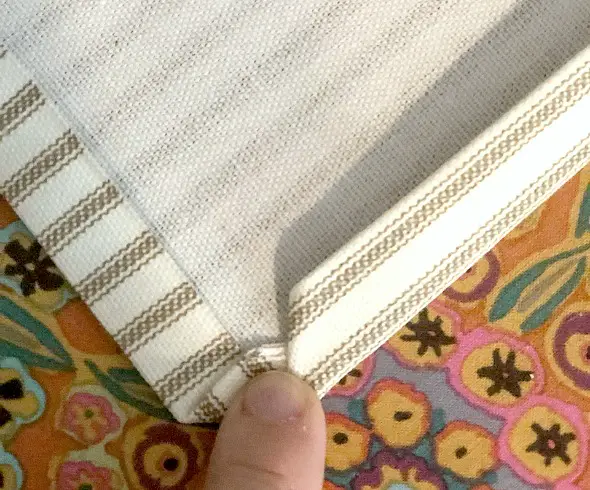
STEP 6 – Create your mitered edges by making sure the corners edges meet diagonally in the center of the corner (mitered corner), pressing as you go.
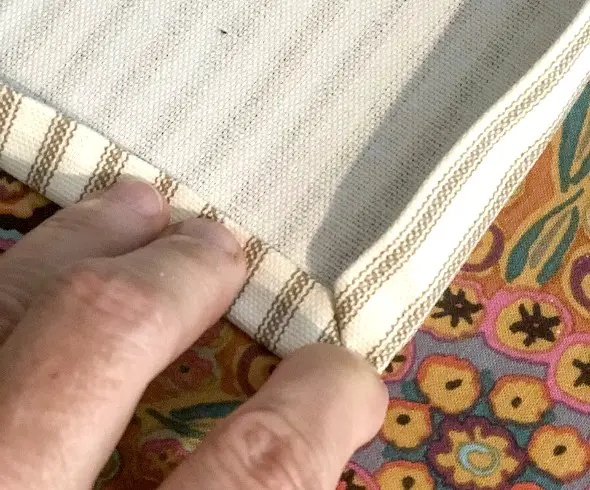
STEP 7 – Pin or use a clip to hold the mitered corners securely. Highly technical sewing clips have been used for this purpose 🙂 .
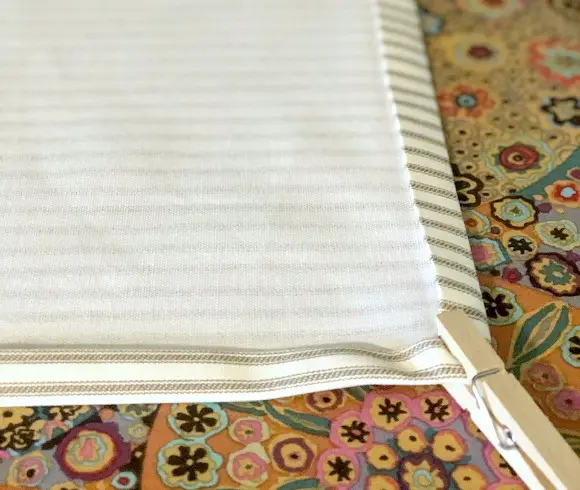
STEP 8 – For the sew method, stitch around the edges, being sure to catch the mitered corners well, using a 1/4″ seam allowance.
NO-SEW METHOD – To use the no-sew method for making your own DIY kitchen towels, the friends over at Instructables has a great tutorial on how to use fabric glue. Although fabric glue or tape will work, it’s best used for those towels that don’t get a lot of wear and tear as the stitching method is by far a sturdier towel.
OPTIONAL – Make your towels complete and add a “hanger”. Simply add a piece of grosgrain or twill ribbon tucked under a corner prior to stitching. As the towels here on the hill are not hung using a hanger, this step was not included.
Sharing Is Caring ❤️
… and I thank you for it 🙏🏻
WHAT ARE TEA TOWELS USED FOR?
Custom tea towels can be used for so many things other than just as a drying dishtowel. A few of our ways to sustainably utilize them to their full use are:
- Cover the bowl of dough rising (think pizza or bread) to keep from drying out…great alternative for those looking to reduce plastic usage.
- Line a basket of rolls, bread, or biscuits when serving
- Line a basket for delivering food goods (think dinner parties, gatherings, those in need)
- Place a dampened tea towel under your cutting board to keep slippage at a minimum
- Use as wrapping for food to it keep warm
- Line your crisper drawer in your refrigerator
- Place between pots or dishes to keep them from being scratched
- Use as extra large napkins or placemats
- Wrap a gift and make it a part of the gift itself
These towels are so quick to make and can be made reflecting any personality or holiday. Give them a try and be sure to come back and share yours with IMSL!
Follow It’s My Sustainable Life and all the happenings here on the hill on all social channels. Happy stitching!
Love, Light, & Laughter ~

69 comments
Thanks so much for a great tutorial. I wanted to make some unbleached muslin towels that I could embroider on. Flour sack towels have gotten so expensive and quality has also suffered. Unbleached muslin gets so nice and soft after a few washes! I washed, and dried in the sun, three times before making the towels and they turned out awesome!
I bet they are beautiful! I appreciate your kind words and reading 🙂
Hello,
This tutorial is very clear and well-written. Do you think that quilting cotton would make good material for this project?
Hi Laura~
It really depends on what you will be using these “towels” for. I think the cotton would make lovely napkins by adjusting the measurements a bit. Hope that helps!
Thank you so much for sharing this! May I have your permission to use your instructions for a class I will be teaching, we are going to make tea towels and napkins? I will give you credit and include a link to this page. I was looking for my notes on mitered corners and could not find my simple one, but this way is even easier. Thanks again for sharing!
Hi Valerie~
So glad you found this tutorial useful! I’ve emailed you directly in regard to your request. Thank you for stopping by!
These are so pretty, Suzan. And I love that you show us how to do those wonderful corners! My mom makes baby blankets the same way, and everyone loves her corners! 😉 Would love to have you link-up at Tuesday Turn About each week! Hope to see you there!
Thank you, Julie! I appreciate your kind words. Have a beautiful day!
Great idea to make your own kitchen towels. Thank you for sharing.
Hugs,
Kippi
These tea towels are so pretty! I hadn’t thought about making my own before…now I want to try it. 🙂 Thanks for sharing on Farm Fresh Tuesdays! Hope to see you again this week!
I love these! Thanks for the tutorial. They will make special gifts.
Believe it or not…. HE’s the one that can sew in our house and I absolutely love these towels… so I’m going to sneak this post into his inbox… He better take the hint if he wants to eat tonight…lol Thanks.
How awesome is that! Hope he takes the “hint” 🙂
Such beautiful towels and so easy to make!
I love making homemade gifts. Finding super cute fabric would make for a fun DIY gift using your tutorial. I appreciate all of the tips you can provide. My sewing skills are beyond basic.
Very insightful as always! And your step by step was clear and easy. Thanks for sharing
These are so pretty! Thanks for sharing this with us at the Homestead Blog Hop!
I’ve been trying to have a more sustainable lifestyle recently and using tea towels instead of paper towels was one of the first changes I made! I like how you included supplies for different methods of construction. Very thoughtful, since not everyone has a sewing machine etc. I also love the highly technical sewing clips!
They truly are exceedingly technical, aren’t they? Thanks so much reading 🙂
These towels look easy to make with your step by step pictures 🙂 I think the sewn ones would be sturdier, too. Wouldn’t the glue get washed out eventually?
Yes, I would recommend using the fabric glue only for ones that get little to no daily use.
I love your beautiful corners, it makes them look so professionally made. If I ever did my sewing machine back out, I will have to make sure that I do this. Thanks for the step by step.
Thank you, Maria! Break that machine out 🙂
Amazing tutorial! Loved the step by step directions and the pictures to show what things should look like. Thank you so much for sharing!
You’re welcome, Lisa! Hope you can give them a try.
love it! I think I’ll do this with my daughter for Christmas. SHe’s making everyone potholders and this will be a nice addition.
Great tutorial! It’s been forever since I’ve pulled out the sewing machine…I’m going to have to make time for it again soon!
Super cute idea!
These are so cute! I love anything that is DIY!
These would be such a great Christmas gift! Thank you for sharing the tutorial!
They certainly do, Cynthia! You are so welcome and I thank you for reading!
These are so adorable, and they seem like a great thing to be able to make. I’ve got to get some supplies, but then I definitely want to try making them. Gives me an excuse to go to one of my favorite stores!
Mine too. Have fun!
Amazing tips and great guide! I’d encourage everyone to lean towards linen fabrics though, as cotton production is so unsustainable and resource-intensive 🙂
Great tutorial. I can’t even sew on a button but I bet I could follow this guide!
I bet you could too, Junell!
These look great! I wish I had the time and energy to make these. A sewing machine is not in my wheelhouse and when I have tried fabric glue in the past, it hasn’t worked for me 🙁 I did pin this for future in case I start!
Thank you for pinning!
I never even THOUGHT of doing this myself, but they are super cute! Great idea!
I want to make these. Thank you for the step by step instruction. I love the idea of using them as a gift. Maybe I will do that for Christmas.
These look great and fairly easy to accomplish with your directions! Thanks for giving us some great ideas on how to use them too!
I need to make some of these so badly. Mine get worn out so fast.
My towels need to be replaced! I wouldn’t have thought to make my own, but you make it look doable! Thanks for the practical step by step!
I love those so cute!
I love this step by step tutorial! It is perfect and so useful!
These towels look so easy to do and very decorative! Thank you for this post!
Love this! Thanks for sharing with us at the To grandma’s house we go link party – I’ll be featuring you on my blog!
Thank you so much! I’m glad you enjoyed it, Tarah Lynn!
What a fun project! I could finally get some towels in my kitchen that look great! Thanks!
I love this! I just busted my sewing machine out to tackle a reupholstering project after not really touching it since middle school. Ha! I would love to make a few of these for holiday gifts now that I have some confidence sewing!
What a great idea, and so easy! Considering I can’t find my sewing machine after moving, the glue option might be best for me. Now I can always have fun tea towels to fit my decor.
These are awesome! I use tea towels for all of my bread baskets and goodies baskets that I make for the holidays! Hs will save me some money and add an extra gift to the basket! Thank you!
Looks interesting! I love posts that list the exact steps and show good pictures to help the not so creative person like me!
I love that you included a no sew method! I could definitely succeed with this project going this route!
You’re welcome! Be aware that the no-sew method is definitely not as durable. I would recommend this as a beginning step to making them and for decorative towels.
What a wonderful idea! And your directions with photos are so clear and easy to follow. This would make an excellent personalized housewarming gift, maybe with a bottle of wine!
Great idea Ramae! Thanks for sharing it.
Very cool tutorial Suzan! I loved learning about the mitered corner!
So glad you found it useful, Christina!
Great idea! I have 5 Swedish dish towels and use them constantly. I need more! Now I have a plan- thank you!
I still have tea towels I received from my engagement gifts and love using them in bread baskets and in the kitchen – so much better than paper towels!
These will make great Christmas gifts 🎁
Thank you for sharing at #ThursdayFavoriteThings. Pinned and shared. Have a lovely week. I hope to see you at next week’s party too!
These are adorable! I may see if my daughter wants to make some for Christmas gifts!
They make wonderful gifts! Love to see yours when your done 🙂
Thanks so much for sharing this wonderful tutorial with us at Encouraging Hearts and Home. Pinned.
Thank you!
Beautiful! I used to sew all the time and haven’t in awhile and these are so simple they make me want to start up again! I saw your post on the wine’d down wednesday party—thanks for sharing!
So glad they’ve inspired you to get back to it! Thank you for reading, Amy!