

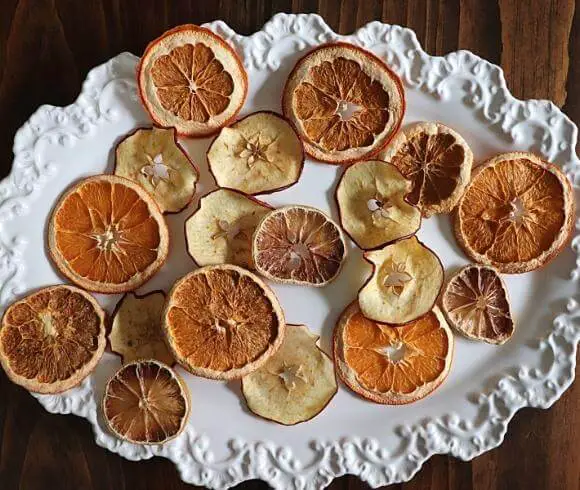
Making dried fruit decorations offer a traditional element that’s festive, fragrant, and beautiful!
This post may contain affiliate links at no additional cost to you. By making your purchases through the links on this website, IMSL may make a small percentage at no direct cost to you. IMSL only promotes products we use & truly believe in. Please refer to my Privacy & Disclosures for further information. IMSL thanks you for your support!
Nothing brings me more joy than to utilize natural, eco-friendly holiday decor. That joy only increases when the end result is as beautiful as dried fruit is 😊
Making your own dried fruit for decking the halls (think garlands, ornaments, wreaths, centerpieces, potpourri & garnishes here!) is a quick & easy DIY winter holiday decor project that’s economical, fun, & aromatic to boot!
When it comes to drying your fruit for decorating there are two simple ways to do it….in the oven or in the dehydrator. I’ll go over each with easy to follow directions, along with a bit of history (you know how I love that 😊), as well as answer some common questions including storage & shelf life suggestions.
HISTORY OF USING DRIED FRUIT FOR DECORATIONS
Once upon a time citrus and many fruits were considered luxuries. Being few and far between, giving or receiving this edible gift was considered the ultimate gift as they were typically imported from faraway, tropical climates.
Interestingly, the first orange tree wasn’t planted until the 16th century by early Spanish explorers here in the Northern hemisphere (most likely Florida).
As time past, hardships such as the Great Depression here in America certainly affected what families could provide. Fresh fruit and nuts a luxury that many could not afford, and as such receiving a fresh orange in your stocking (a direct reference to St Nicholas and his “sacks of gold”) or gift was revered.
Going back even further in time before Christianity (think Druid, Celt, Norse, and Roman civilizations here), utilizing natural elements to decorate and embellish their abodes had meaning.
Greenery such as wreaths and garlands were meant to symbolize eternal life, rosemary a symbol of remembrance, love, happiness, and loyalty, and oranges, an obvious sun symbol, meant to reflect the sun and its return during the shortest day of light all year.
It’s no wonder these natural elements have been used for millennia during winter solstice celebrations around the world.
Sharing Is Caring & I Thank You For It ❤️

BEST KIND OF FRUIT TO DRY FOR MAKING DECORATIONS
The best kinds of fruit to dry for making decorations go from the easiest including apples, citrus (oranges, lemons, limes, and grapefruit) to the more difficult such as berries (cranberries/blueberries). You can even dry exotic fruit such as star fruit or whole pomegranates.
As far as choosing the best individual fruit selection, be just that…selective. Choose fresh, uniformly shaped fruits that will hold up under the drying methods described below.
When it comes to oranges, stick with the classics: navel (less juicy) or Valencia (juicy), as they have uniform shape with thick rinds. Choose firm ones as they are the easiest to slice and those with deeply colored rinds for a vibrant end result.
These recommendations extend to blood oranges and grapefruit or any other citrus choice you may be making.
Steer clear of thin rind, small citrus such as tangerines and mandarins as you may find the end result not to your liking.
MAKING DRIED FRUIT DECORATIONS – TO BROWN OR NOT TO BROWN
Oh, the browning great debate. Whether you want your dried oranges or citrus to remain a bright color or want them a bit browned, is really a personal choice, and one that’s really all in the timing.
Brightly colored citrus is dried less than that of browned ones. If you are looking to retain the fruits bright color, best to dry on the absolute lowest temperature possible, keeping in mind that the lower the temp the longer it takes no matter which method of drying you choose.
Should you have the luxury of a great dehydrator (mine is ancient and without a temperature control) like the Excalibur models, you can be sure your citrus remains brilliantly colored.
The beauty of the Excalibur dehydrators is that they are USA made, free of BPA and work like a charm! You can be sure when I need to replace my old faithful it will be with one of these models.
Good thing for me that I actually prefer a bit of browning 😊 in the meantime!
HOW TO MAKE DRIED FRUIT DECORATIONS
Fortunately, you need few supplies and equipment for making dried fruit decorations.
MAKING DRIED FRUIT DECORATIONS – SUPPLIES NEEDED
- Fruit
- Sharp Knife
- Cutting Board
- Baking sheet lined with parchment paper for use in oven method
- Food dehydrator
- Paper towel or lint-free kitchen towel

MAKING DRIED FRUIT DECORATIONS – PREPARE THE FRUIT
STEP 1 – PREHEAT OVEN
If you will be making your dried fruit using the oven method, pre-heat your oven to 200° F to 225° F.
STEP 2 – SLICE THE FRUIT
When slicing your fruit for drying, aim for thin. A 1/8″ to 1/4″ inch thickness is ideal, keeping them uniform as best as you can. If like me, you aren’t so good at keeping everything even, be aware your thinner slices will likely need to be removed earlier than the thicker ones.
The thinner you slice them, the quicker they will dry using any method.
Optionally, you can use a toothpick and drill a hole into the fruit where you will be threading twine, wire, or ribbon through. I skipped this step and found it unnecessary.
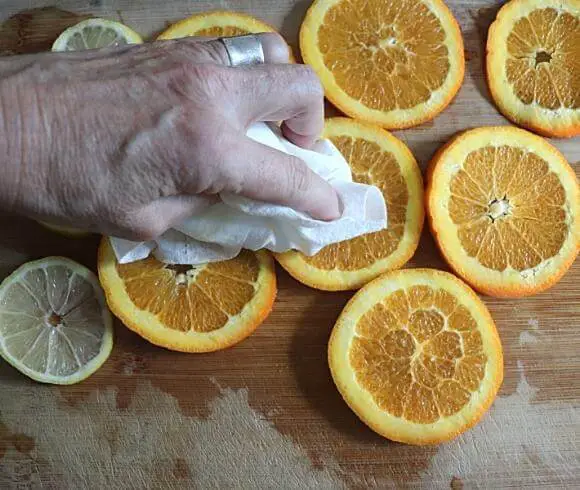
STEP 3 – BLOT
For juicy citrus and other fruits, blot with a clean paper towel or lint-free kitchen towel to remove as much of the excess juice. Be sure to not press too hard as this will injure some of the membranes of the fruit. The aim here is to remove any excess juice only.
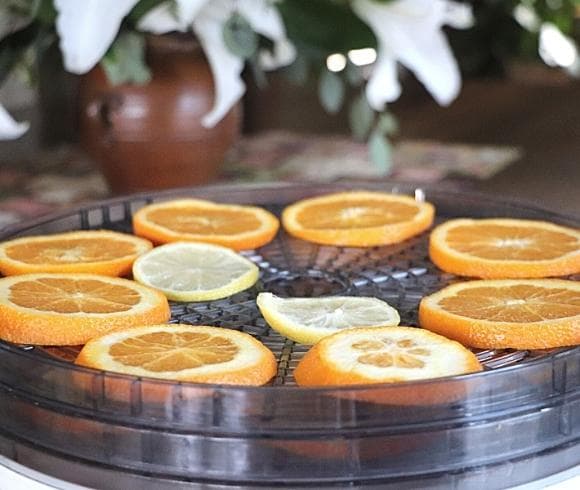
STEP 4 – PLACEMENT
Place your prepared fruit onto either a baking tray lined with parchment paper or your dehydrator trays.
They should be uniformly placed, being sure that they are in a single layer only and not overlapping in any way.
DRYING FRUIT OPTIONS
As stated there are two methods for you can opt for when making dried fruit decorations. Oven method or dehydrator.
MAKING DRIED FRUIT DECORATIONS – OVEN METHOD
Should you be utilizing this method of drying, you should already have your oven pre-temp’d at 200° F to 225° F. If not, pre-heat now.
- Place your trays of fruit slices into the oven and dry until fully dry*
- Plan on at least 3 to 5 hours drying time. This is largely dependent on your ovens settings
- Approximately 1 to 2 hours into the drying time, turn your slices over, return to the oven for further drying
- Transfer the dried fruit slices to a cooling rack once completely dried.
*Ovens vary greatly in their temperatures. My oven tends to run hotter than most and typically will take less time with most recipes. You may need to adjust your oven temperature accordingly.
MAKING DRIED FRUIT DECORATIONS – DEHYDRATOR METHOD
To dry your fruit using a dehydrator be sure to follow your brand’s directions as each can vary slightly. Time will be dependent on the brand you are using and whether your model’s temperature can be pre-set.
- Set your thermostat to 130° F to 135°F if possible.
- For those with models with no precise temperature control, choose the fruit or medium heat setting*
- Rotate trays after several hours to promote even drying when your model’s fan is located either in the top or bottom
*When lacking in heat control settings (like me!), plan on checking the fruit every hour or so until they are dried to your liking.
Once your fruit is dry to the touch & not tacky feeling, your fruit is considered fully dry. Note they will continue to dry somewhat after this process and continue to harden.
DECORATING IDEA’S FOR DRIED FRUIT
Your dried fruit can be used in so many ways! From decorating, potpourri’s, to culinary uses, dried fruit is just that. Dried and ready to use!
When you’re feeling a bit crafty, however, that’s where the fun begins. Well, for me anyway ….
- Make dried fruit ornaments. Make a small hole near the top of the fruit slice and thread decorative string, raffia, twine, or wire through. Wrap around the rind for extra strength if you like. Alternatively, most fruit will have a center hole already provided by nature if you prefer 😊. Hang individually or group your dried fruit with cinnamon sticks & sprigs of greenery.
- Make a garland. String together by themselves or group with rosemary sprigs, pinecones, or other greenery to create a beautiful garland. Get creative! Add popcorn, cranberries, wooden beads, or jingle bells to your garland!
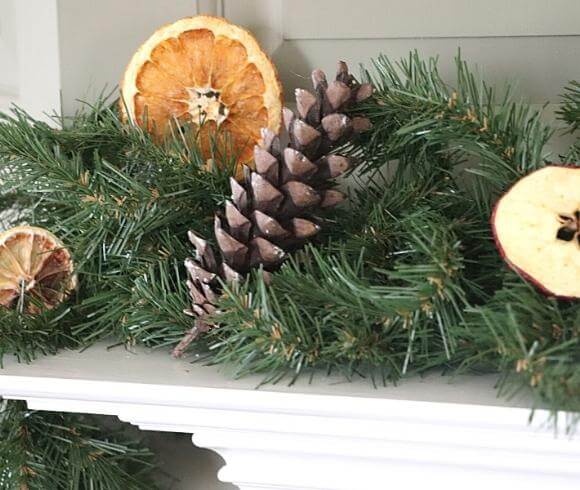
- Attach to wreaths & greenery. Liven up a plain wreath or greenery by placing or attaching your dried fruit
- Create a scented potpourri bowl. Fill a bowl with dried fruit, add cinnamon stick, cloves, and star anise along with a few foraged pinecones for a festively scented bowl.
- Create a festive centerpiece. Take a wooden bowl, tray, or even a hollowed out log, add greenery, rosemary, pinecones, and other natural elements to design an amazing centerpiece fit for any decorative table!
- Create a dried fruit jar. With the open shelf trend popular today in many kitchens, it’s becoming commonplace to display food in jars. Dried fruit in jars displayed on these shelves will brighten any kitchen!
- Add dried fruit to your charcuterie boards. Decorate your next charcuterie board with your beautiful dried fruit.
- Make festive gift topper. Add your dried fruit as a topper to your next gift by attaching a few pieces along with a cinnamon stick with twine in lieu of ribbon.
- Save your dried fruit! Let your dried fruit decorations do double duty! Save them in a jar and add to your favorite cocktail or mocktail as a gorgeous embellishment, add to homemade granola by reconstituting or use as is, or add to your favorite winter tea!
DRYING FRUIT DECORATION ECO-FRIENDLY ALTERNATIVES
When it comes to the actual drying techniques, the above mentioned are considered the quick methods. Below are a few drying alternatives that are more eco-friendly.
- Radiator Drying Method – If you have radiators in your home, especially cast iron one’s like we have, along with a bit of extra time, put them to good use when drying your fruit! Prepare as you would for using the oven method and place your trays on top of your radiator! Obviously this method will likely take MUCH longer but the end result will be dried fruit AND energy saving!
- Cook Stove/Wood Stove – Again, use what you have already running, especially when you are being frugal and eco-conscious! Prepare as though for oven drying and place your trays near your running stove. Placing them on top or even in the oven will most likely be too hot a temperature, so adjust away from the heat source as needed.
- Air dry. Plan on it taking days for them to completely dry, depending your your climate. Those who live in a more humid environment will likely not have success air drying fruit. You could try a solar method of air drying, however, for those like me who live in a very dry climate with colder temps and the heat running, air drying may be a viable option. Although they may turn out a bit curled and not quite as flat, air-drying makes for a wonderful alternative.
MAKING DRIED FRUIT DECORATIONS – COMMONLY ASKED QUESTIONS ANSWERED
As with most things in life, especially when it’s a DIY, there are always a few commonly asked questions. Here are a few you may be wondering in regard to making dried fruit decorations.

MAKING DRIED FRUIT DECORATIONS – HOW LONG DO THEY LAST?
The beauty of dried food of any kind is that it lasts. A. Long. Time. When it comes to dried fruit, the length of time it remains useable is typically about 1 to 2 years.
This does not mean its still not useable in some form though! Just realize that the older the dried fruit, the browner it becomes and may not be as beautiful or fresh looking.
Should your dry fruit reach this stage & you not want to use for decorating any longer, consider adding them to a scented stovetop potpourri before adding them to your compost.
WILL YOUR DRIED FRUIT MOLD?
Any dehydrated or dried fruit that has been properly processed should not mold. Only those slices which retain some moisture have the potential of developing mold.
Once properly dried, your fruit will continue to dry being exposed to air, further protecting them against mold development.
Should you reside in an area with high humidity the potential is there, however.
MAKING DRIED FRUIT DECORATIONS – STORING RECOMMENDATIONS
When it comes to storing your dried fruit that have been made into decorations, store as you would your other decorations. Wrap in a protective wrapping (think tissue paper or newsprint) and place into your storage container with other decorative items.
MAKING DRIED FRUIT DECORATIONS – CAN YOU MODGE PODGE DRIED FRUIT?
Yes, using Mod Podge or other type of varnish or lacquer to your dried fruit will keep your fruit slices a bit more flexible and create a shine to them. However, their uses are limited thereafter.
Do not add treated dried fruit slices to your potpourri’s, compost, or use for any culinary purpose!
MAKING DRIED FRUIT DECORATIONS – DOES THE SCENT REMAIN?
The fruit will release a beautiful scent during the drying process. However, once fully dried there pretty much is no scent.
That is, unless you add to a stovetop simmering pot. Then they once again shine 😊
Making your own dried fruit decorations is easy, quick, and a lovely addition to any decorative effort.
Will you be making dried fruit decorations this year?
Love, Light, & Laughter ~

Enjoy this article? Please consider sharing it on your favorite social media channel! Want more? Subscribe below for the occasional update with all the “happenings on the hill”!
May Be Of Interest
Handmade And Homemade Gift Idea’s From The Heart
4 comments
I made them for the first time last year as Christmas decoration and made garlands with them. I liked them a lot, and I also discovered they didn’t only look good, but also tasted good! I planned of making some to dip in some melted chocolate but I forgot . Maybe I try it this year. But I’m in doubt because I have a gas oven and with the price for gas these days in our country ….
They do indeed! Make them in advance and use the power of the sun instead of oven drying & save some $$$ in the process 🤗
What a lovely way to display dried oranges! You have so many lovely ideas on your blog! We would love it if you would share at Tuesday Turn About, via My Wee Abode. We open on Tuesday at 5pm CST. Hope to see you there! Pinned your post!
This is a great idea! I hadn’t thought about all of the uses for dried fruit before reading this post. I also didn’t realize the history behind getting an orange in your stocking at Christmastime! I love to use dried fruits in a simmering stovetop potpourri – my house smells amazing when I do it and now thanks to your post I am going to make my own to stash away for another day!