

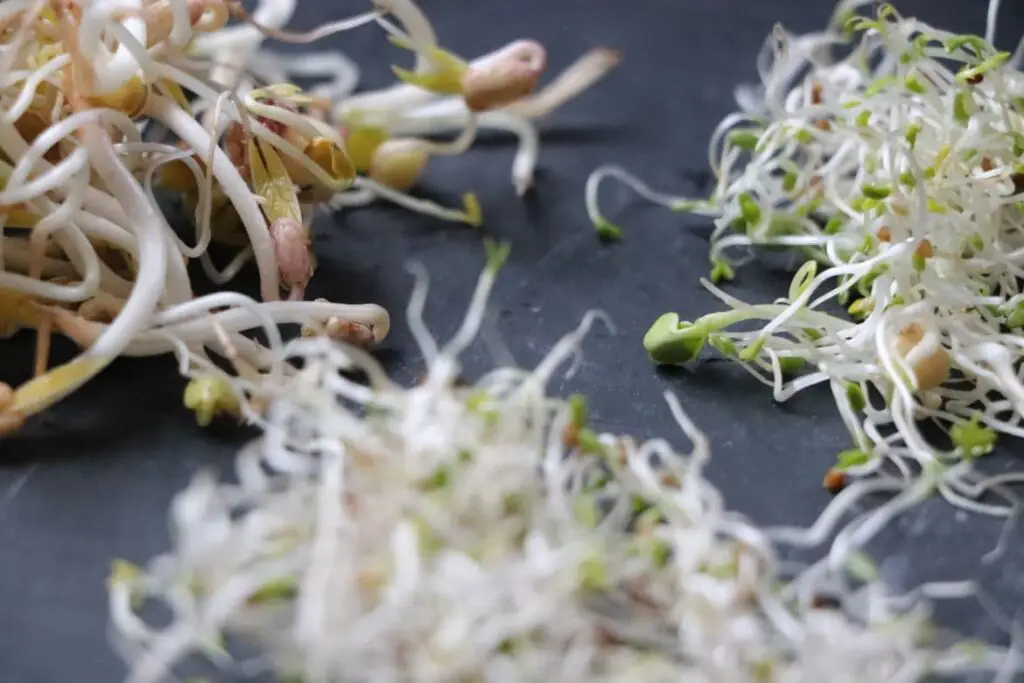
Learn how to grow sprouts indoors and have this nutrient rich, superfood available any time of the year! With no special equipment or experience needed, growing sprouts indoors from seed is a quick and economical way to add healthy greens to your diet.
Have You Visited Our New Shop?
This post may contain affiliate links at no additional cost to you. By making your purchases through the links on this website, IMSL may make a small percentage at no direct cost to you. IMSL only promotes products we use & truly believe in. Please refer to my Privacy & Disclosures for further information. IMSL thanks you for your support!
Growing your own organic foods right in your kitchen? No special equipment, lights, space or experience needed? Any time of the year?
Sign me up!
Learning how to grow sprouts indoors any time of the year was something I taught myself how to do WAAAYYYYYY back in the day 😅
After all, it’s cost-effective (pennies on the dollar) for some pretty tasty, highly nutritional, organic food! AND it’s something anyone can grow. So fun for the kiddo’s too as they are fast growing and take little care.
No, you don’t need a green thumb to grow sprouts. In fact, a simple jar and a dark cupboard or dark corner of the kitchen counter will do. Although you can invest in some pretty spiffy sprouting equipment if you like 😊
And who doesn’t love to see something green growing while the wind & snow is blowing? Or any time of year for that matter.
WHAT EXACTLY ARE SPROUTS?
Sprouts are basically seeds doing their thang! Grow!
Sprouts are seeds which are in the beginning phase of growing, aka germination. These tiny sprouted seeds are at the growing stage just prior to becoming seedlings.
When seeds are exposed to the right combination of moisture & temperature, voila! Sprouts!
It’s this germination process which activates and increases the bioavailability of the beneficial active compounds. But I get ahead of myself. More on the benefits below.
ARE SPROUTS THE SAME AS MICROGREENS?
Nope. Sprouts and microgreens are not the same in any way.
Sprouts are very young germinated seeds which are grown using water. Microgreens are grown in soil or other growing mediums.
Sprouts require no special lighting to grow. In fact, they grow superbly right in a convenient place under my sink in the dark! Microgreens, on the other hand, require sunlight to grow.
Sprouts are typically harvested between 5 to 7 days of growth. Microgreens take longer, typically between 1 to 6 weeks until their first fully developed leaves and stems are mature enough to be harvested.
Both are highly nutritious. Both offer amazing flavor. Sprouts are just easier & faster all around to grow!
BENEFITS OF GROWING SPROUTS AT HOME
You may be wondering, “why do I need to learn how to grow sprouts at home when I can easily purchase them”?
Well, with the economy heading south, the biggest reason may be the coin you save by growing your own!
GROWING SPROUTS AT HOME SAVES MONEY
For pennies on the dollar, you can grow a wide variety of sprouts for way less money than that of store-purchased!
And I mean pennies! Considering a purchased 4 oz container of alfalfa sprouts is roughly $5.00. When I grow sprouts I use a quart size jar, equalling 32 ounces, 8 times more sprouts per jar than that of purchased.
To sprout a quart size mason jar takes just 1 ½ to 2 Tablespoons of seed equalling roughly 1 ounce of seed.
Alfalfa seed from True Leaf Market (my favorite sprouting seed source), although comes in various sizes, is presently $5.50 for a 4 ounce bag!
That means I can sprout 128 ounces of alfalfa sprouts for about 4 cents per ounce. I’m no mathematician, but that’s a LOT of saved pennies!
GROWING SPROUTS AT HOME OFFERS MORE VARIETY
When’s the last time you found a variety of sprouts available for purchase in your local market? Certainly not here in our neck of the woods.

Growing your own will open up a wild world of options to choose from!
You can not only choose from some pretty boutique sounding varieties of sprouting seed, ever heard of Triticale?, but you can create your own favorite mixes to boot!
This is especially helpful when looking to fulfill any special flavor requests, or dietary & nutritional needs.
Read on to find a few favorite sprout varieties below along with a few of their important nutrients.
SPROUTING AT HOME CREATES SUSTAINABLE FOOD
Interested in a zero food mile diet? Concerned with eating a bit more sustainably? Here you go! Can’t get any closer than your kitchen counter when it comes to reducing your food miles!
Every soul on this planet deserves access to healthy food. Food that uses the least amount of earth’s resources to grow. Any effort on our part to reduce the miles our food travels is a win when it comes to sustainable eating.
In addition, by growing them yourself you know the conditions of which they were grown in, & are able to consume them immediately upon harvesting, which ultimately increases the nutritional value immensely over food which has traveled.
Sharing Is Caring ❤️
Think of the plastic which will be saved from not purchasing! For me, sustainability begins with NOT having to purchase and consume in the first place.
As sprouts are such nutritional powerhouses, their value is only increased than that of their fully matured counterparts per unit of production cost. Not only does this conserve the energy & resources needed to harvest fully developed foods in their mature state, but also saves processing, packaging, storage, and transport costs.
Growing your own sprouts is pretty sustainable all the way around!
SPROUTING AT HOME TAKES LITTLE ROOM
You can grow sprouts in as large or small amounts as you like. That means the space required to grow your own sprouts at home takes up minimal space.
You can even grow sprouts on the dashboard of your car, camper, and even a backpack. Keep in mind, however, that you will need access to fresh, clean water in order to grow them under these conditions.
For me, I grow my sprouts in quart size mason jars and leave them either under my sink or in an unused corner of my kitchen counter.
Little to no room required!
SPROUTING IS A GREAT WAY TO ADD ORGANICS TO YOUR DIET
As sprouts typically are sold under the organic umbrella, growing this cost-effective and inexpensive crop is a great way to add fresh, highly nutritious & organic foods to your diet.
You may find sprouts which have been grown organically in your local market, but as we discussed earlier, you will be saving tons of $$$ by growing your own.
THE MANY HEALTH BENEFITS OF SPROUTS
As the world’s attention has turned toward creating and supporting the best immune system possible, the focus has turned to eating real, whole foods which have been produced and grown organically.
Finally! Can I get a hallelujah?
With the positive health impact sprouts offer, the low cost of growing this superfood, and the ease of which we can quickly grow them, sprouts do just that. Aid & support the immune system and more!
First and foremost, let’s get this little disclaimer out of the way …
DISCLAIMER
Recommendations and or suggestions made by this blog regarding husbandry and or herbal remedies etc. are not meant to replace solid advice from qualified professionals. None of the information on this blog has been evaluated by the FDA. Products or remedies mentioned are not intended to diagnose, treat, cure or prevent disease. Please do your due diligence. Research, talk to qualified professionals and proceed at your own risk.
SPROUTS ARE A LIVE FOOD
Sprouts are considered a “live food”. What does that mean? It means they are a nutrient dense food which remains in its original, raw form. Nature’s gifts to us!
Foods which have not been cooked or altered in any way. Foods such as fruits, vegetables, nuts, seeds, sprouted grains & legumes, seaweed, spirulina & chlorella (microalgae), fresh juices, and yes, sprouts.
Consuming live foods ensures you are on the receiving end of the highest levels of vitamins, minerals, and living enzymes from this food as possible. In fact, sprouts boast 10 to 50 times more of all mentioned than that of fully matured vegetables!!
This all translates to healthier immune support, increased energy in the body, and great digestion.
SPROUTS AID DIGESTION
The germination process when growing sprouts, coaxes the release of enzymes which help to improve digestion of carbohydrates & proteins. This process does not change in any way the nutritional structure of the plant, but instead simply encourages the release of beneficial compounds.
These enzymes & beneficial compounds help the body process and bind nutrients which would have previously been lost or not absorbed.
According to this abstract, the germination process …
“activates enzymes in a dormant seed and triggers various enzymatic activities leading to the breakdown of stored proteins, carbohydrates, and lipids into simpler forms”
NCBI
Got gas? Consuming sprouts aid in reducing gastric distress, aka, gas. A welcomed relief to not only the poor soul dealing with gas, but dare I say, for those around them as well 😅
In addition to making some pretty amazing nutrients bioavailable, sprouts are filled with roughage/fiber. All aiding in supporting & creating a healthy gut microbiome and intestinal tract.
SPROUT NUTRIENTS & MORE
I keep on about the high beneficial nutrients which sprouts offer. But what exactly are they?
Although the nutrients available depend on which type of sprout you are growing, the following can generally be found in most.
Here you go …
- ANTIOXIDANTS
- ANTIVIRAL
- CYTOTOXIC ACTIVITY – Studies are now looking toward plant sprouts in combating high exposure to toxins
- ANTI-DIABETIC ACTIVITY – The same study as listed above has shown that the enzymes found within sprouts may “reduce the accumulation of sugar” in the body, thus assisting with blood sugar control
- MAY AID THOSE WITH HIGH CHOLESTEROL – Largely due to the organic compounds, saponins, found within
- VITAMIN A – Essential for epithelial tissue (the protective layer internally lining vessels, digestive tracts, organs & more) health in the body. Naturally occuring Vitamin A is ultimately one of the best sources of antioxidants & immune supporting vitamins
- VITAMIN B COMPLEX – Responsible for aiding energy, eyesight, digestion, & overall healthy cell metabolism, Vitamin B Complex is essential to healthy living
- VITAMIN C – Known for neutralizing and detoxifying over 50 known chemical toxins, Vitamin C supports immune function and increases production of disease fighting lymphocytes while offering antiviral properties as well
- VITAMIN E – An essential vitamin for blood & circulatory health, sprouting wheat, clover, or alfalfa satisfies the daily recommended amounts
- LOW IN CALORIES
- HIGH IN PROTEIN
- IRON, MANGANESE, AND MAGNESIUM
- LOW IN FAT
- HIGH IN ESSENTIAL AMINO ACIDS & TRACE ELEMENTS
- CHLOROPHYLL – While chlorophyll is not a mineral or vitamin, it is a potent antioxidant and blood purifier. You’ll find the highest amounts of chlorophyll when sprouting cereal grasses
- CALCIUM – Responsible for the health of bone, kidney, nerve function, blood clotting and more, its important to supplement, as calcium is not naturally produced in the body
- HIGH IN MINERALS
- SOURCE OF FIBER
- OMEGA 3 FATTY ACIDS
- PHOSPHORUS, PROTEIN, AND POTASSIUM
- ZINC
- A GREAT SOURCE OF CARBOHYDRATES
Again, the nutrient content depends upon which you are growing. For example, Lentil sprouts offer 26% protein, whereas sunflower sprouts have 25%. Not much of a difference there, but still some.
Should you be looking for specific nutrient content in what you are growing, I recommend researching each variety individually, a few of which will be covered below.
SPROUTS SUPPORT THE IMMUNE SYSTEM
Sprouts nutrient dense makeup offer the vital support our immune systems crave.
With Vitamin(s) C & A, both filled with antioxidants, being at the forefront of most sprouting seeds, our immune systems can do a little happy dance.
Regardless, the health benefits of sprouts are definitely in the superfood category. When consumed with regularity, they can certainly assist with aiding a myriad of health issues. In fact, many use them as supplements for health.
SPROUTS ARE A LOW FAT SUPERFOOD
What more could one want from an easy to grow any time of the year food? High nutrients AND low fat!!
Averaging only 10 to 25 calories per serving of raw sprouts, largely depending on which variety you grow (beans and legumes will be higher due to their protein rich nutrients), sprouts are generally much lower in calories than their mature vegetable counterparts.
SPROUTING CAUTIONS
The biggest drawback, especially when purchasing sprouts which you have not grown yourself, is the risk of e-coli & other food borne illnesses.
Although extremely rare, it has happened.
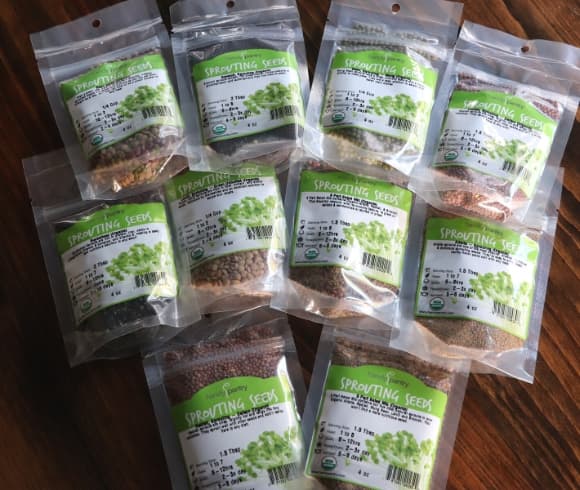
Purchasing your sprouting seeds from a source you trust is imperative to reducing any risk of food borne illness.
WHY CHOOSING “SPROUTING SEEDS” IS IMPORTANT
Seeds which are specifically labeled as “sprouting seeds” are the only seeds which should be used for sprouting.
Why not just use good ‘ole garden seed? For safety. Period.
CHOOSE SPROUTING SEEDS FOR SAFETY
Sprouting seeds typically come exclusively as organic, although there are always exceptions to that rule.
Sticking with organic sprouting seed, you can be sure you will be growing organic sprouts!
Good ‘ole garden seeds which are intended for use outside in the garden are often treated, coated, and/or pelleted, allowing them to germinate under harsh spring conditions.
Purchasing seed for the sole purpose of sprouting is especially important when sprouting soy. Keep in mind that soy may be the most controversially grown crop in the world, as the majority is grown using genetically modified (GMO) seed stock.
Umm, no thanks. Always confirm you are purchasing organic soy sprouting seed only in my humble opinion.
When it comes to choosing seeds to sprout, trust in the experience of the industry, stick with organic choices, and only choose sprouting seeds labeled as such.
SOURCING THE BEST SPROUTING SEEDS
I highly recommend and use myself, these sprouting seeds from True Leaf Market. Knowledgeable, trusted, and tested, these sprouting seeds come with a seal of approval from all here on the hill.
According to TLM’s site, their organic sprouting seeds are “all microbial tested for germination rate and pathogens” to ensure all seeds are safe for sprouting.
Taking this precaution one step further, not only purchasing tested seed stock, but also sterilizing both the sprouting containers & equipment, AND the seed itself may help reduce any contaminations.
To sterilize, according to True Leaf Market, simply following the steps below…
- Purchase Pathogen-tested seed.
- Treat seed for five minutes in a solution of 3% hydrogen peroxide (available at most drug stores) or vinegar in water. Small seed volumes used for home sprouting can easily be contained in a small mesh strainer and immersed directly into the peroxide solution. Swirl the strainer at one minute intervals to achieve uniform treatment. Always discard the peroxide or vinegar solution after each seed batch as its effectiveness will rapidly decline.
- Rinse the seed in running tap water for 1 minute. In addition, we recommend that you place the rinsed seed in a container with enough tap water to cover the seed plus one inch. Then carefully skim off all floating seed, seed coat fragments, and other debris and dispose of them. Although skimming can be a tedious process, research has tied most contamination to these materials.
- Sprout the seed in clean, sanitized containers, well away from areas of food preparation, pets, and high household traffic. To sanitize sprouting containers: Follow the directions on the bleach container (use plain, not scented laundry bleach) for sanitizing kitchen surfaces. Use 3/4 cup of bleach per gallon of water (3 tablespoons per quart) and soak the container for at least 5 minutes. Then rinse with clean water.
Following these simple guidelines when sprouting my own has kept me safe for the last 30+ years.
COMMON SEED CHOICES FOR SPROUTING
Unsure about what seeds you want to sprout? Below find the most common seeds for sprouting, the nutrient benefits, and of course consider flavor along with some suggested uses. AND, why just stick with one seed?
SPROUTING SEEDS PLUS THEIR NUTRIENTS
You can pretty much sprout any seed, legume, bean, grain or nut seeds, but there are those that are more popular than others.
Although not an exhaustive list, the following will give you a pretty good idea of sprouting options as well as some of their nutrient properties.
| SEED NAME | SEED NUTRIENTS |
| Alfalfa | Vitamin A, B’s, C, K, Thiamin, Riboflavin, Niacin, Folate, Fiber |
| Chia | Calcium, Iron, Potassium, Protein, Carbs, Fiber, Fats (Omega 3’s) and Antioxidants |
| Clover | Protein, Carbs, Fiber, Vitamin A, B, C, E, and K, Calcium, Iron, Potassium Magnesium, Phosphorus, Potassium, Zinc, Manganese |
| Fenugreek | Carbs, Fiber, Protein, Iron, Calcium, Potassium, Choline, Vitamins A, B1, B2, B6, C, and K, Thiamin, Folic Acid, Riboflavin, Niacin, Minerals |
| Flax | Boron, Iron, Manganese, Zinc, Protein, Fiber, Omega 3 Fatty Acids |
| Leek | Vitamins, A, B6, C, and K, Iron, Magnesium, Folate |
| Mustard | Copper, Calcium, Iron, Magnesium Phosphorus, Potassium, Sodium,Zinc, Manganese, Selenium, Vitamins B6, C, and K, Thiamin, Riboflavin, Folic Acid |
| Radish | Calcium, Iron, Magnesium, Phosphorus, Potassium, Zinc, Copper, Thiamin, Riboflavin, Niacin, Vitamins A, B6, B12, Folate |
| Sesame | Vitamins B, C, and E, Calcium, Iron, Magnesium, Pantothenic Acid, Phosphorus, Amino Acids, Protein |
| Sunflower | Vitamins A, B, C, and E, Calcium, Iron, Magnesium, Niacin, Phosphorus, Potassium, Protein |
| GRAINS | GRAIN NUTRIENTS |
| Barley | Vitamins B, C, and E, Calcium, Iron, Magnesium, Phosphorus, Amino Acids, Protein |
| Buckwheat | Vitamins A, B, C, and E, Calcium, Iron, Magnesium, Niacin, Phosphorus, Potassium, Protein, Amino Acids |
| Corn | Vitamins A, B, C, and E, Calcium, Iron, Phosphorus, Amino Acids, Protein |
| Kamut | Vitamins B, C, and E, Calcium, Iron, Magnesium, Pantothenic Acid, |
| Millet | Vitamins B, C, and E, Calcium, Iron, Magnesium, Pantothenic Acid, Phosphorus, Amino Acids, Protein |
| Oat | Vitamins B, C, and E, Calcium, Iron, Magnesium, Niacin, Phosphorus, Potassium, Amino Acids, Protein |
| Quinoa | Vitamins A, B, C, and E, Calcium, Iron, Magnesium, Niacin, Phosphorus, Potassium, All Amino Acids, Protein |
| Rye | Vitamins B, C, and E, Calcium, Iron, Magnesium, Pantothenic Acid, Phosphorus, Amino Acids, Protein |
| Spelt | Vitamins B, C, and E, Calcium, Iron, Magnesium, Pantothenic Acid, Phosphorus, Amino Acids, Protein |
| Wheat | Vitamins B, C, and E, Calcium, Iron, Magnesium, Pantothenic Acid, Phosphorus, Amino Acids, Protein |
| BEANS (LEGUMES) & LENTIL | BEAN, LEGUMES, & LENTIL NUTRIENTS |
| Aduki (Adzuki) | Vitamins A, B, C, and E, Calcium, Iron, Niacin, All Amino Acid (sans Tryptophan), Protein |
| Chickpea | Vitamins B, C, D, Calcium, Potassium, Magnesium, Protein |
| Lentil | Vitamins B, C, Magnesium, Potassium, Iron, Calcium, Protein |
| Pea | Vitamins A, C, K, Carbs, Fiber, Protein, Thiamine, Folate, Iron, Manganese, Phosphorus |
| Mung | Vitamins B, C, Potassium, Protein, Magnesium, Iron, Calcium |
| Pinto | Vitamins B and C, Iron, Calcium, Potassium, Protein, Magnesium |
| Soy (Soya) | Vitamin K1, Folate, Copper, Manganese, Riboflavin, Copper, Phosphorus, Thiamine, Protein |
SPROUT COMBINATION SUGGESTIONS
Mix it up! Create your own unique sprouted blend (think broccoli, fenugreek, and radish), or purchase an already made-for-you assortment.
Craving a Bean Salad Mix high in proteins and more? Think aduki, mung, lentil, mixing your own ratios or purchasing already made for you seed mixes such as the one mentioned.
Or possibly you are craving a bit of spice? Then either creating your own or purchasing the Kick Mix blend will definitely do the trick. A great combo consisting of clover, radish, and brown mustard seed, it’s a mix to satisfy.
You get the idea. Get creative. Look at which nutrients you are wanting and mix it up!
The more you sprout, the more likely it is that you begin to find your favorites and mix them together.
DO SPROUTS REQUIRE LIGHT TO GROW?
No, sprouts don’t need light to, well, sprout.
In fact, most sprouting seeds germinate better when placed in the dark.
Although light does play an important part when sprouting smaller seeds in that salad type sprouts will benefit from 12 to 24 hours of light exposure to enhance the development of chlorophyll.
HOW TO GROW SPROUTS INDOORS ANY TIME OF YEAR
With a few requirements for growing sprouts indoors any time of year, following these simple guidelines will have you enjoying fresh, organic live food in no time flat.
While you can easily use supplies you may already have around the house, a simple jar with a cheesecloth covering secured with a rubber band works great initially, should you want to grow sprouts consistently, you may want to make a small investment in sprouting equipment made for the job.
Although there are many methods for sprouting seeds indoors in addition to the mason jar or tray method (think bag, terra cotta or vertical methods), these are my favorite two ways to sprout and the methods which will be covered below.
BEGIN WITH CLEAN AND/OR STERILIZED SUPPLIES
It’s imperative to growing safe sprouts that you begin with thoroughly cleaned equipment from the beginning. I personally do not go the added step of sterilizing my supplies each and every time, but instead use hot soapy water and clean everything thoroughly.
Should you like, you can add a bit of unscented bleach (3 Tbl per quart of water) to the soapy water only when cleaning glass, not plastic. Bleach may soak into any plastics over time and alter flavor.
When cleaning & sterilizing plastic trays and the like, I suggest using a spritz of food grade 3% hydrogen peroxide, white vinegar, or citric acid concentrate. Allow them to soak for 10 to 20 minutes and wash with hot soapy water thoroughly thereafter.
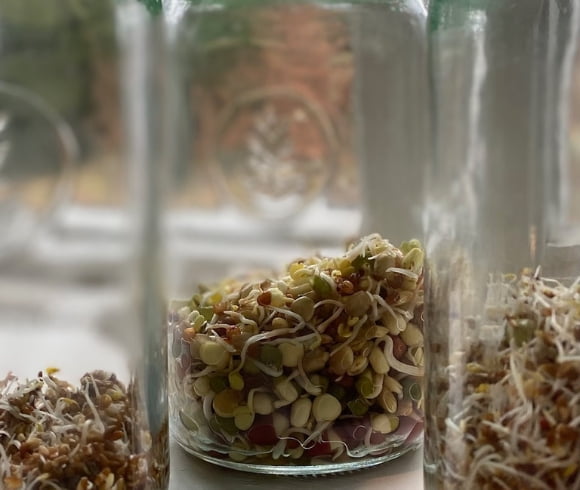
GROWING SPROUTS IN MASON JARS VS SPROUT GARDEN
You have a couple options of how to grow sprouts indoors at home.
- Using Mason Jars (or any glass jars of choice) – Great for a low cost (if no cost) way of growing sprouts, using very little counter space (inches). The Mason Jar Sprouting Kit is the kit which I love and use, easy to clean, easy to use, and no special equipment to store while not in use, and which create an incubating effect when sprouting which helps speed germination
- Using a Sprout Garden System – A Sprout Garden is a stackable tray sprouting system, one which you will need to purchase. This system uses trays which stack upon one another allowing you to grow several crops simultaneously, or use only one tray at a time. This system, although is BPA free, is plastic (we all know how I feel about plastics), is dishwasher safe and made in the USA. Although it does take more counter space to use this system, about 1 square foot, it does stack and does allow for a larger crop of sprouts to grow at the same time. With this system, you won’t have to worry about covering or creating proper airflow. All is done for you
No matter which system you choose, both will work with no problem.
GROWING SPROUTS IN JARS
To grow sprouts using the mason jars or glass jars of your choice, gather the following or simply utilize the Mason Jar Sprouting Kit like I’ve done.
GATHER
- Jars
- Sprouting Covers like these which are created for use on wide mouth mason jars
- Or cheesecloth & rubber bands
- Sprouting Seeds like this amazing sampler set
The steps for growing sprouts in jars…
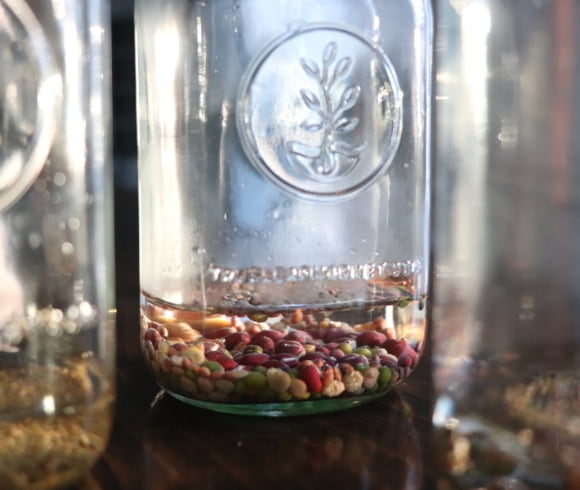
- Add the suggested amount of sprouting seeds into a clean jar of choice, sterilized if you like. Typically they will list the recommended amount of seed to use on the sprouting seed packet.
- Soak the seeds according to the directions on each seed packet using cool water. Be sure the seeds are covered 3 times the depth of the seeds. Cover the jar with the sprouting lid and place in the dark area you’ve decided to use. I typically place the jar under my sink as it’s close to a water source and dark.
- After the pre-soak, drain the water from the seeds completely. Should you not be using the convenient sprouting lids, use a fine mesh strainer like this set to drain the seeds, replacing them into the jar once drained. When covering the jar with cheesecloth and a rubber band, no need to remove the seeds or covering from the jar. Simply strain by tipping the jar upside down over the sink and allow the water to drain.
- Rinse the seeds by filling the jar ½ to ¾ way full with fresh water, swishing the water around the seeds, and allow the jar to thoroughly drain once again.
- In a large bowl, place the jars upside down into the bowl on an angle, allowing good airflow. This will encourage further drainage as well. Place the jar back into the dark area you’ve designated. I like to loosely cover this bowl/jars with a kitchen towel to further darken the area in which they will be sprouting or simply place the bowl/jars back under the sink.
- Repeat steps 4 & 5 by rinsing the seeds 2 to 3 times per day for 5 to 7 days depending on the variety of seed you are sprouting. This process aids in the removal of metabolic wastes, carbon dioxide, and any natural decomposition from the germination process.
- Some seeds will benefit from exposing them to light for 12 to 24 hours before harvesting. Smaller seeds especially, like salad sprouts or alfalfa, will boost chlorophyll development within the sprouts through this light exposure period.
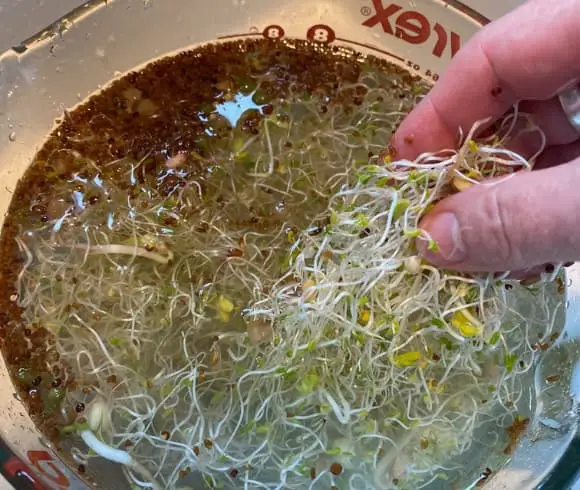
- To harvest the sprouted seeds from the jar, I like to empty them into a clean bowl and submerge them in cool water, giving them a good swish around to loosen any debris, husks, or hulls. These tiny bits-n-pieces will float to the top where they can easily be poured off.
- Place the processed sprouts into a colander and allow to drain for a bit before laying them out onto a kitchen towel to dry. Alternatively, you can place them into a salad spinner like this one, give it a whirl, and then lay them out to dry a bit before storing.
GROWING SPROUTS USING THE SPROUT GARDEN SYSTEM
As much as I love utilizing mason jars for sprouting, the Sprout Garden method just makes sense for those with larger families.
GATHER
- The Sprout Garden which comes with a 3 tier tray system which is stackable
- Sprouting Seeds like this super sampler set
The steps for growing sprouts using a Sprout Garden…
- Take a clean base tray and turn it over. Place a sprouting tray inside the turned over base.
- Place the sprouting seeds of choice, approximately ½ cup of seed, into the tray, spreading them evenly about.
- Cover the seeds with cool water to soak for the predetermined time listed on the seed packet. I usually just let them soak overnight. Place another lid over the soaking seeds or cover with a clean kitchen towel creating a dark environment.
- Drain the seeds which have been soaking by simply pulling the sprouting tray up and running your fingers along the bottom where the holes are located to break the water tension, allowing them to fully drain.
- Place the sprouting tray with the rinsed seeds on a base (right side up this time).
- Place another base over the top of the rinsed seeds. This creates not only the lid for the rinsed seeds to begin sprouting, but also another layer for additional sprouting trays.
- Rinse the sprouts within each tray with cool water 1-2 times per day, running your fingers along the holes in the bottom as you did prior. Replace and cover the trays as you go.
- When fully sprouted, smaller seeds will benefit from light exposure by simply setting the sprouting trays in indirect light without covers for 12 to 24 hours. This will promote the development of chlorophyll & carotenes.
- Give the sprouts a final rinse to remove any unwanted hulls & debris by emptying them into a clean bowl and submerging them in cool water, giving them a good swish around. These tiny bits-n-pieces will float to the top where they can easily be poured off.
- Place the processed sprouts into a colander and allow to drain for a bit before laying them out onto a kitchen towel to dry. Alternatively, you can place them into a salad spinner like this one, give it a whirl, and then lay them out to dry a bit before storing.
- Wash the sprouting garden thoroughly, using a scrub brush like this one if needed before storing.
HOW TO BEST STORE SPROUTS
Moisture is the sprouts worst enemy. They should never be stored while damp or wet. Do so and you will soon be the proud owner of a slimy mass of what once was sprouts 😅
I have found that by making sure the sprouts are completely dry prior to storing helps with longevity.
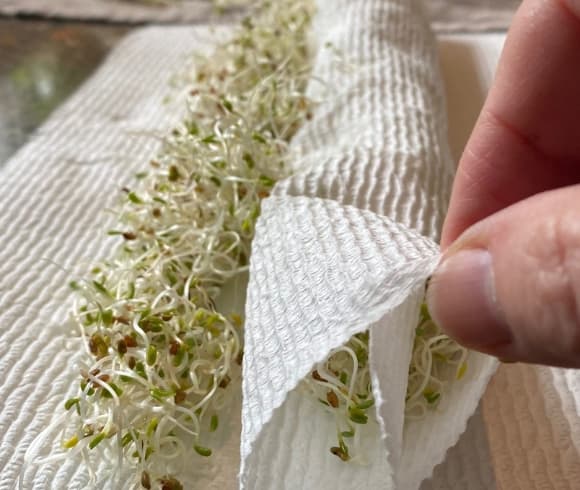
Lay the harvested sprouts out on a clean kitchen towel and patting dry with either a piece of muslin or paper towel does the trick.
I then lay them in as single a layer as possible on a paper towel, stacking layer upon layer until I have about 3 layers in all. Roll the layers into a rolled shape, place the rolled sprouts into a plastic baggy or sealed container until needed.
By taking this added step, my sprouts typically last at least a week or longer.
DELICIOUS WAYS TO USE SPROUTS
With a little creativity, one can come up with some pretty delicious ways to use sprouts.
They are in fact a vegetable & can certainly be used as you would any vegetable. I would highly recommend utilizing your sprouts in their UNCOOKED, raw form, especially when using them as a supplement or for their amazing nutrients.
IDEAS FOR USING SPROUTS RAW
Here are a few delicious ideas for using sprouts raw …
- Top a fresh green salad
- Add to prepared salads like my Ultimate Potato Salad
- Add to coleslaw
- Smoothies
- Use as a crunch to tuna salad
- Top a sandwich
- Avocado toast topper
- Use as the crunch on a burger
- Add to veggie wraps
- Add to homemade hummus
- Grind up in pesto
- Top a favorite soup
- Add to scrambled eggs
- Mix with rice pilaf
- Create your own sprouted bean salad
- Sprouted pea dip
- Use as a garnish to any charcuterie board
- Snack by the handful
IDEAS FOR USING SPROUTS IN COOKED DISHES
Elevate a few cooked meals by adding sprouts …
- Add to egg dishes. Think frittata, omelets, and even fried eggs
- Stir Fries
- Add to my One Pot Thai Beef Curry
- Chili
- Sprouted Lentil Curry
- Homemade muffins
- Baked Beans
- Sprouted Wheat Berry Bread
- Pizza
Should you want to add them to cooked dishes, add them at the very end of the cooking process so they remain as nutritious as possible.
THE GOLDEN RULES OF SPROUTING
By following a few simple guidelines, keeping in mind these golden rules of sprouting, you’re sure to be enjoying fresh sprouts in as little as 3 to 5 days!
- CLEANLINESS – Always begin the sprouting process with clean, if not sterilized, supplies and equipment
- RINSE – Don’t forget to rinse at least 2x a day if not 3. Without proper moisture and rinsing, you run the risk of the seeds not germinating and removing the natural wastes created resulting in mold
- DRAIN – That being said, too much moisture can be as deadly as too little. The sprouts should be moist not wet
- TEMPERATURE MATTERS – Any germination enjoys stable temperatures. If at all possible, a consistent temperature of about 72°F is idea. However, my house in the winter NEVER reaches that warmth and they do just fine
- ROOM – As in breathing room. Don’t overcrowd the seeds as they will not receive the proper air-flow they need to remain healthy
- DARKNESS – Provide a sense of darkness by using either a dark cupboard or covering
- SEEDS MATTER – Remember to use only seeds which are specifically created for sprouting
- STORAGE – Following the above tip for storing dried sprouts in rolled paper towels in an air-tight container in the refrigerator will extend the shelf life exponentially
Learning how to grow sprouts indoors any time of the year is a great way to add organic, highly nutritious food in an amazingly economical way!
Will you grow sprouts indoors this year?
Love, Light, & Laughter ~

Enjoy this article? Please consider sharing it on your favorite social media channel! Want more? Subscribe below for the occasional update with all the “happenings on the hill”!
SHOP THIS POST
5 comments
So much fantastic information on growing sprouts indoors. Thank you for sharing.
This is a great educational tool about how to grow sprouts! I was amazed at the long list of foods where sprouts can be added! The teacher in me loves all the information!
Thanks for the information on growing sprouts at home! I keep meaning to try this. I love sprouts in salads.
I didn’t know you shouldn’t use garden planting seeds for growing sprouts indoors. Makes sense.
Thank you for this wonderful reminder of how healthy and nutritious sprouts are! I love them in salads and sandwiches and it’s great to learn how to grow sprouts indoors any time of year! I love learning new ways to be more independent with my food sources especially now that food prices are skyrocketing! Thank you for sharing!