

Growing microgreens may be one of the easiest and fastest-growing crops you can grow. Is there a difference between growing hydroponically vs soil?
This post may contain affiliate links at no additional cost to you. By making your purchases through the links on this website, IMSL may make a small percentage at no direct cost to you. IMSL only promotes products we use & truly believe in. Please refer to my Privacy & Disclosures for further information. IMSL thanks you for your support!
Thank you True Leaf Market for sponsoring this blog post. This post contains shared product for review. All opinions are my own.
When presented with a microgreens growing kit that included two growing options, hydroponic and soil, creating a mini-comparison between the two was in order. Which grow media was best? More importantly, was there a taste difference between growing microgreens in hydroponics vs. soil?
Learning to grow microgreens has been on our radar for a while now. When True Leaf Market generously shared a complete growing kit which included two growing options, hydroponic and soil, it was time to give growing them a whirl!

MICROGREENS – WHAT ARE THEY
Microgreens are tiny, edible green seedlings, not specific to any one plant, typically from vegetables & herbs and even some flowering plants, that pack an amazing nutritional punch. Harvested at a ripe young age, normally when they reach between 1-3 inches tall, just prior to their cotyledon (first true leaves) appear. For an in depth look at the anatomy of plants, be sure to check out our article on Seed Viability!
These baby plants are aromatic with an intense flavor due to their young age and contain high nutrient levels in comparison to their size.
As the average suggested intake of vegetables range between 1-4 cups per day, depending on gender, and with only 9.3% of Americans actually eating any fresh vegetables according to the CDC, microgreens are now being studied as they provide high nutrient value without the need to consume large amounts.
Because microgreens are rich in nutrients, smaller amounts may provide similar nutritional effects compared to larger quantities of mature vegetables.
NCBI
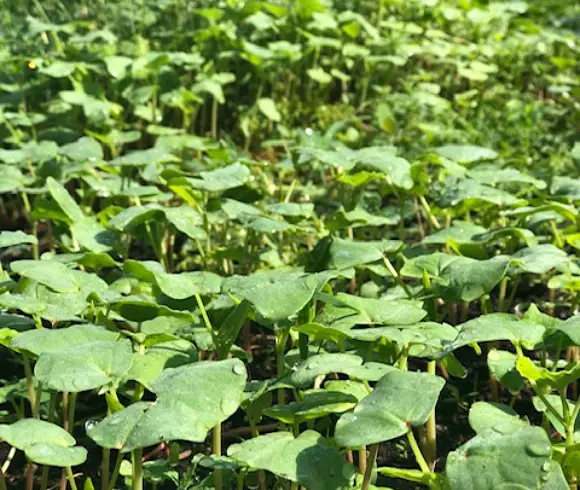
Landing somewhere between a sprout (having no leaves) and baby greens (much larger in size) as shown below, microgreens leaves and tender stems are edible.
Microgreens short germination & growing times, harvested typically anywhere between 7 and 21 days after germination, make this crop a viable & much sought after one by health enthusiasts and restaurants alike.
NUTRITIONAL BENEFITS OF CONSUMING MICRGREENS
Depending on variety grown, most are high in potassium, iron, zinc, copper, and manganese, & magnesium. As their nutrient content is concentrated, it is believed that the level of vitamins, minerals, and antioxidants are higher than that of the same quantity of traditional mature greens.

In addition, microgreens nutrient levels include higher levels of polyphenols known to possibly “improve digestion, brain function, and blood sugar levels, as well as protect against blood clots, heart disease, and certain cancers”, than more mature plants.
The results showed that the Brassica species microgreens tended to have more complex polyphenols profiles and to contain more varieties of polyphenols compared to their mature plant counterpart.
NCBI
HEALTH BENEFITS OF CONSUMING MICROGREENS
It’s well known that eating your daily recommended amounts of fresh fruits & vegetables can greatly reduce the risk of many diseases. Due to microgreens concentrated nutrient content, they may pack a powerful punch when it comes to reducing risk of certain diseases.
- Alzheimers – Microgreens, as stated, contain complex polyphenols, “known to attenuate the progression of the disease by showing strong potential to tackle the alterations and reduce the risk of AD by reversing the cognitive deficits”.
- Heart Disease – Risk of CVD, cardiovascular disease, a leading cause of death in the US, maybe reduced through the consumption of microgreens due to high levels of polyphenols, antioxidants, as well as vitamins & nutrients by lowering tri-glycerides & cholesterol levels.
These data suggest that microgreens can modulate weight gain and cholesterol metabolism and may protect against CVD by preventing hypercholesterolemia.
NCBI
- Certain Cancers – Once again, polyphenols come to the rescue in preventing certain types of cancers along with microgreens antioxidant and anti-inflammatory components.
“the vast majority of laboratory studies supported anticancer activities of natural polyphenols, such as anthocyanins, EGCG, resveratrol and curcumin”
NCBI
- Diabetes – Studies have shown that a greater intake of green leafy vegetables reduced the overall risk of Type 2 diabetes by a whopping 14%! Largely due to the antioxidant properties contained within.
WHICH MICROGREENS ARE MOST NUTRITIOUS?
“Due to their favourable contents in micronutrients and bioactive compounds, microgreens have been proposed as “super foods” and are considered highly nutritious. But are there certain varieties of microgreens that are more nutritious than others?
All microgreens are highly nutritious. Packed with all of the above mentioned nutrients, when added to sandwiches, salads, and sides, you end up with a meal filled with health-packed, mega-nutrient goodness. Here are some of the favorites and what you can expect nutrient wise.
- Basil – Contains macronutrients such as Vitamin K and calcium, as well as a variety of antioxidants.
- Arugula – Containing Thiamin, Vit B6, Vitamins A, C, and K, Folate, Iron, Magnesium and Potassium to name just a few its nutrient benefits.
- Broccoli – Boasting a higher protein level than most other vegetables, broccoli is also packed with fiber, Vitamins C & K, iron, and potassium.
- Chia – Chia offers large amounts of fiber, omega-3 fatty acids, lots of high-quality protein in addition to essential minerals and antioxidants.
- Pea – In addition to the high content of Vitamins C, E, and A, pea also offers levels of potassium, phosphorus, & are a good source of dietary fiber. Pea also is one of those microgreens that offers the first line of defense against the development of diabetes.
- Sunflower – A great source of Vitamins A, B, C, D, and E, high in fiber and offer a source of calcium and iron to your diet.
- Buckwheat – High in fiber, manganese, zinc, magnesium and copper all known to support the immune system. Another microgreen that has been shown to slow the rate of glucose absorption after eating, making it a wonderful choice for those dealing with diabetes.
WHAT ARE THE BEST MICROGREENS TO GROW?
Any microgreen is a good one to grow! They are all highly nutritious and most importantly in our humble opinion, delicious.
The most popular microgreens tend to be Buckwheat (contrary to the name, not actually a wheat grain but instead a seed making it a good gluten-free option), Alfalfa, Beet, Clover, Collards, Kale, Kohlrabi, and Pea.
WHICH IS THE FASTEST GROWING MICROGREEN?
Looking for a fast-growing microgreen? Then look to Broccoli, Cress, Mustard, and Radish varieties. Fast germination & growth rates across the board.
SELECTING THE BEST MEDIA TO GROW MICROGREENS
There are many options when choosing which media to use while growing microgreens. And with as many options, there are just as many opinions as to the pros and cons of each. A few of the media options are…
- Soil
- Hydroponic
- Coconut Coir
- Burlap
- Hemp Mats
- Vermiculite
- Rock Wool
As only the first two options have been tried here on the hill, soil and hydroponic, we will only be addressing these in further discussion.
SOIL VS HYDROPONIC FOR GROWING MICROGREENS
Depending on who you speak with, many believe soil is the media of choice for growing microgreens. Soil produces a wonderful crop, high yields, and is easy to work with, sustainable, and reasonable in cost.
This is the media we were most drawn to as we are firmly rooted in growing organically. Common sense tells us that the beneficial microbe found in soil would be of added benefit when growing microgreens not only in growth rates but in taste as well. Read on to see if our instincts were correct in this assumption!
Utilizing soil will also allow us to feed the remains of the harvest to our critters, or re-use the soil by creating a mini-compost of the remains to be re-utilized in growing further microgreens. Thus, saving money and product when growing more.
On the opposite end of the spectrum, is growing microgreens without using any soil. Instead, utilizing growing mats. There are micro mats available that are OMRI certified and can be found at True Leaf Market (click the banner for direct access). These mats were not supplied with the kit received and therefore, we cannot give our opinion on them.
Growing mats from Biostrate were supplied to us for this comparison. These synthetic growing mats are a lightweight textile, claimed to be pH balanced, that absorbs & retains water creating an inert growing environment for the microgreens. They claim they are biodegradable but only for industrial composting sites and are not recommended for backyard composting.
Other concerns using these particular growing mats include the expense and sustainability issues. These synthetic mats are a one time use with an average cost between 85 cents per sheet to $1.91 per sheet depending on the amount purchased. That can get pricey pretty quickly.
LIGHT SCHEDULE FOR GROWING MICROGREENS
When growing anything, light is one of the main factors in the success or failure of your crop. Microgreens are no different.
Sunlight is the easiest, and the most cost-effective way to grow microgreens. When growing with the use of this full spectrum lighting source 🙂 plan on exposing your microgreens to approximately 6-10 hours of light.
If you live in a colder climate or an area with a lot of cloud cover and sunlight is not a reliable source for growing, indoor lighting will need to be implemented. When using fluorescent lighting sources for growing, plan on exposing your greens to at least 12-18 hours of light. Many will maintain a 24-hour cycle of lighting (as we have done).
MICROGREEN GROWING KIT
The deluxe microgreen growing kit generously supplied to us by True Leaf Market consists of everything you will need to begin growing microgreens either using the soil method or hydroponically.
This listing, taken directly from True Leaf Market, describes what Each Deluxe Microgreens Kit Includes:
- 10 – 21”x10” Growing Trays – These re-usable trays double as both growing tray and black-out dome. Our growing approach doesn’t require drain holes in the trays, so no water concerns for countertop gardening. Enough trays to run 5 crops at once. You can easily section your trays and run multiple varieties at once.
- 10 – 21”x10” Hydroponic Grow Pads – These pads fit perfectly in the growing trays and are the best way we have found to grow microgreens. Enough to grow 10 trays worth of microgreens. Extra grow pads are available.
- 2 – 5 Quart Bags of Soil – Compostable . Enough to grow 6 trays worth of microgreens. Extra soil is available.
- pH Test Strip Kit – Microgreens are sensitive to the pH of your water. This pH Testing Kit will easily walk you through the process of testing the pH of your water, and adjusting it (if necessary) using household products like lemon juice.
- Spray Bottle – For the first 4 days, your germinating microgreens should be misted. This spray bottle is the perfect tool.
- Assortment of Hydroponic Microgreens Seeds – Enough microgreens seeds in resealing bags up to two dozen plantings!
- Basic Salad Mix – 8 Oz. (two 4 Oz. Bags) – The perfect blend of microgreens seeds: Broccoli, Kale, Purple Vienna Kohlrabi, Arugula, Red Acre Cabbage & Cauliflower.
- Spicy Sprouting Mix – 4 Oz. Bag – Same as the basic salad mix, but with some added southern giant mustard for additional color and spice.
- Purple Radish – 4 Oz. Bag – Sharp tasting and a stunning, deep purple in color. A great addition to any microgreen salad. Add to traditional salads instead of sliced radish for an exciting change.
- Red Acre Cabbage – 4 Oz. Bag – One of our favorites. Great tasting, colorful and easy to grow.
- Purple Vienna Kohlrabi – 4oz Another favorite for its color, taste, and reliability.
- TatSoi – 4oz A very easy to grow crop with a mild, fresh taste.
- Basil – 4oz Micro basil is perfect in salads, Italian sauces, in pesto and anywhere you would use regular basil.
- Assortment of Soil Based Microgreens Seeds – Enough microgreens seeds in resealing bags for 8 trays of greens!
- Sunflower – 45 Oz. (five 9 Oz. Pre-measured Bags) – Our all-time favorite microgreen. Crunchy, nutty and a perfect base for any microgreens salad. Organic seeds were received.
- Buckwheat – 16 Oz. Bag – A tangy, exciting new taste. Excellent when mixed with sunflower. Organic seeds were received.
- Dun Pea – 16 Oz. Bag – Another of our favorites! Fresh, sweet and crunchy. Organic seeds were received.
- Cilantro – 4 Oz. Bag – Fresh cilantro for salads, seasonings and salsa. Imagine never paying grocery store prices for fresh cilantro again.
- Detroit Red Beet – 4 Oz. Bag – Another soil-loving microgreen. One of the most colorful microgreens you can find. A great choice as a garnish and to enliven any microgreens salad.
- Growing Instructions – Our basic illustrated growing instructions are meant to help you get started and are intended to be used in conjunction with information found on the website.

As we received 3 organic seed varieties, Sunflower, Buckwheat, and Dun Pea, these were the varieties we chose to utilize for our testing (and most likely the cause of such low germination rates using the mats).
Having never grown microgreens prior, the quick-start guides supplied, one each for growing with the soil method or the hydroponic method, came in very useful.
HOW TO GROW MICROGREENS IN SOIL
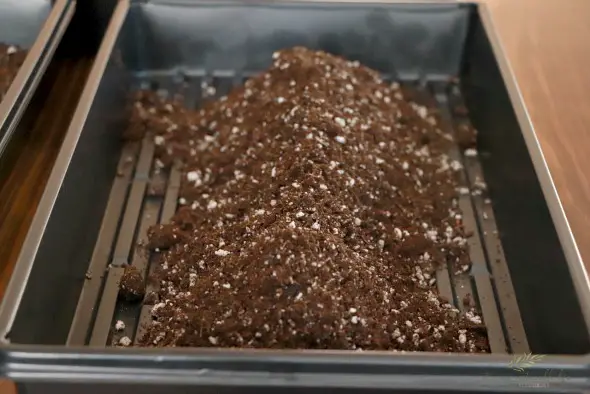
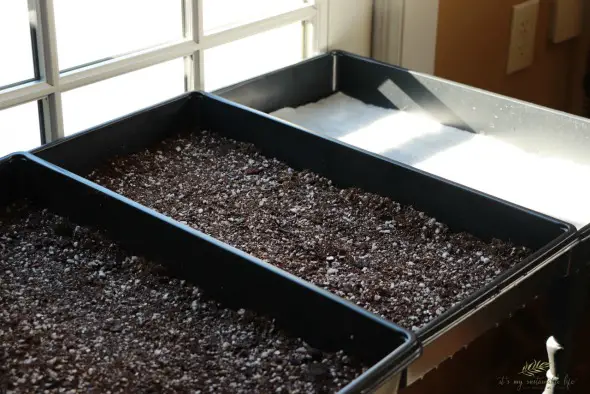
When using the soil method of growing your microgreens simply take one supplied tray (without holes) and fill with the supplied soil to a depth of 1-2 inches.
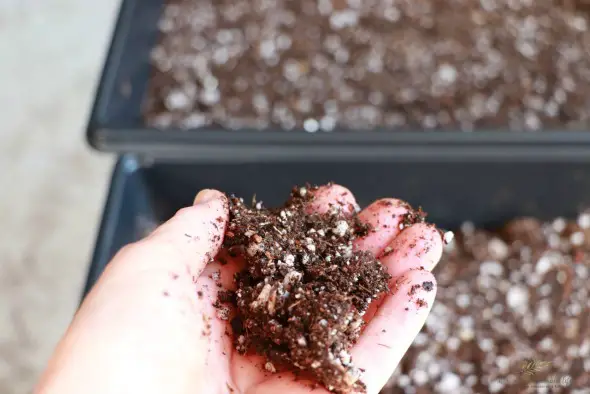
Moisten the soil until it easily holds together, moist but not soggy as shown below and pat the soil so it’s firm but not compacted.
Evenly spread 2-3 Tbs (next round we would use more like 4 Tbs) of your selected seed over the soil. Gently pat the seeds ensuring a good connection with the soil (seeds should be in a single layer and not stacked upon one another) but not pushed deep into the soil.
Thoroughly mist the seeds and cover with an additional tray to create the dark they require to germinate. Place the trays in an area at room temperature to germinate.

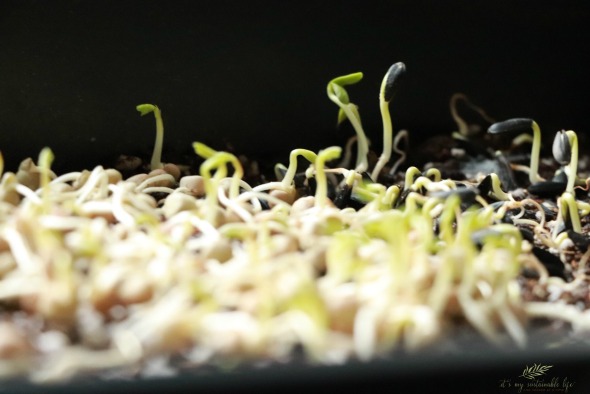
Mist the seeds while covered 1-2 times per day to keep moist. Once the seeds have sprouted (for us it was 3 days, but should your area be warmer, germination maybe sooner) and the sprouts have begun to set their roots into the soil (this will be visibly seen), remove the top tray and expose to light.
Continue watering as needed (we began to water from the base of the roots at this point) in order to keep moist.
Many find it beneficial to utilize a fan for airflow. We did not do this as there was sufficient airflow in the area we grew in.
HOW TO GROW MICROGREENS HYDROPONICALLY
Pour one cup of water into one tray (should have no holes) supplied with the kit and place one mat in it allowing it to absorb the water fully. We needed to add a bit more water to moisten the entire mat. As shown below, we chose to utilize only one hydroponic mat for this test, again as our preference is to raise all we can organically.
Spread in a single layer 2-3 Tbl of seed over the mat. Again, we would recommend adding much more seed for a denser crop. Thoroughly mist the seeds and cover with another tray, placing it in an area at room temperature.
The same process is now followed as with the growing with soil method. Mist the seeds 1-2 times per day until germination has occurred. Once the sprouts have taken root, the cover may be removed and the microgreens exposed to light. Continue to water to moisten.
HOW TO HARVEST MICROGREENS
Your microgreens are ready to harvest once the first true leaves have appeared. Typically, this can fall anywhere between 7-14 days of growth time. This time frame is totally personal, however. Some enjoy the greens a bit more mature and allow them to grow for a longer length of time. Our recommendation is to taste test as they grow and harvest when you feel it’s appropriate & the flavor is as you would enjoy!
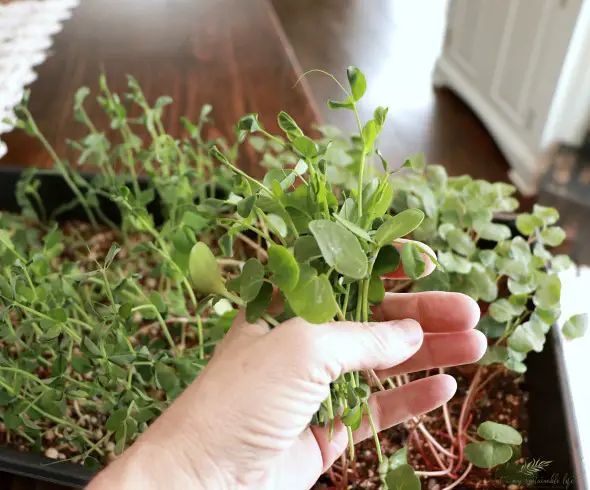
Harvesting is a simple matter of taking a sharp knife (an electric knife works very well) or pair of scissors and cutting above the soil/mat line. There are a few tips & tricks, however, that you may want to review.
REMOVING DIRT & HULLS
Harvesting large amounts of microgreens can be time-consuming. If you have a lot of trays being harvested at once, most will simply cut the greens and let them fall back onto themselves, removing the cuttings by sweeping them into a container. The drawback of this method is the dirt and hulls. They too will be swept into the container.
The microgreens will then need to be washed, spun, and dried thoroughly for storage. Although many will want to complete this process anyway, small-time growers such as myself tend to prefer not to complete this step, especially when growing organically.
So what is the answer? First, to remove the majority of the hulls, prior to cutting, simply take your hand and gently sweep it along the top edge of the tray lengthwise back and forth over the greens to loosen the hulls, letting them fall off the green themselves.
Next, we used one hand to grab the greens and then cut at the soil line with a sharp knife, lifting the harvested greens without letting them fall back into the soil or onto themselves. No soil contacted the cut greens and for us we’re good to go!
Obviously, if we were selling these greens the added step of washing & drying thoroughly would be instituted.
HOW TO STORE HARVESTED MICROGREENS
To store microgreens is a simple matter. It is a method that we utilized during our harvests of fresh lettuce as well. Simply take several layers of paper towel that has been slightly moistened. Layer your microgreens on the paper towel and roll. Place the rolled microgreens into a zip baggy and store in your refrigerator for up to one week.
Using this method, the microgreens will remain crisp and fresh. No other method has worked as well for storing fresh microgreens.
Sharing Is Caring ❤️
GROWING MICROGREENS COMPARISON RESULTS HYDROPONIC VS SOIL
Which is the better growing media for microgreens? For us, soil bar far. We found that the soil method had a much higher (by at least 1/2) and faster (by one day) germination rate than that of the synthetic mat. This may have been largely due to the fact that we are accustomed to using soil when growing anything as well as they seed we chose to grow. Therefore, we are more familiar with the moisture levels needed to create a successful crop.
In addition, the growth rate of the soil planted microgreens far surpassed that of the growing mat. Both methods were approached in the exact same manner with lighting and watering.
HYDROPONICS VS SOIL – TASTE TEST
Again, the soil growing method worked far better than the soil growing method for taste in our opinion. Largely, this may have been due to the fact that our mat grown microgreens did not fair as well or grow as well as the soil grown. The soil grown microgreens we found to be much more tender and richer in depth of flavor as the mat grown.
Unfortunately, an accurate comparison was not able to be determined due to the “failure” of the mat grown crop. With only one trial complete, additional trials are needed. As the mat method will not be our choice for growing medium in the future…well, there you go 🙂
TRUE LEAF MARKET DELUXE MICROGREEN GROWING KIT REVIEW
True Leaf Markets Deluxe Microgreen Growing Kit is as it’s described. A complete, comprehensive kit which includes all the supplies one would need to grow in either soil or hydroponically.
The supplies (trays, sprayer, etc) were of good quality and we found their seeds supplied to be of generous amounts.
The only downside in our opinion in ordering this kit is there is no room for substitutions. True Leaf Market responded to our inquiry about substitutions (only organic or OMRI certified micro mats instead of the Biostrate) with the following statement.
“Sorry, the kits are pre-built, we cannot customize them”
True Leaf Market
In our humble opinion, these wonderful kits would only be made better is they were a bit more flexible in the customization options.
Growing microgreens is an easy way to enjoy fresh, live, nutrient-dense food year-round no matter where you live. Eating healthy has never been easier.
Do you grow your own microgreens yet? What method of growing do you prefer? Be sure to stay up-to-date by subscribing to our monthly newsletter “happenings on the hill”!
Love, Light, & Laughter ~

MAY BE OF FURTHER INTEREST
- “When Life Hands You Heirloom Seeds – Just Plant ‘Em!
- “How To Test Seeds For Viability & Seed Viability Chart”
- “Alternative DIY Seed Planting Pots On The Cheap”
42 comments
CONGRATS! Your post is FEATURED at my #UnlimitedMonthlyLinkParty 10, open March 1 to 26.
Thank you so much for the feature, Dee!
Sorry I am late! I have been running behind this making memories! Thank you for sharing at #OverTheMoon. Pinned and shared. Have a lovely week. I hope to see you at next week’s party too! Come party with us at Over The Moon! Catapult your content Over The Moon! @marilyn_lesniak @EclecticRedBarn
Great article. We tried to grow some basil but didn’t do a very good job. We will have to give it another shot soon.
Wow I love that they are so easy to make and super healthy! I’ve grown sprouts before and they were fairly easy and very nutritious.
It makes so much sense that their nutritional impact is concentrated, but I had no idea!
I am very interested in starting my own garden when I get a bigger space. I’ll definitely be referring back to your post when I’m ready to grow some microgreens. I had no idea how good they were for you!
This is great! I always want to do this in my home, and I hope to try it soon. Thank you!
Great information! I would love to look back into this when my house is built and I have room for it!
An interesting post on microgreens.
Very unique and informative post. We learned a lot! Thank you for sharing.
Your post is so detailed and informative. You are truly a master of what you do. I always enjoy your posts and it inspires me so much. Thanks again for another great post.
Thank you for your kind words, Lina! I’m so happy you find them of use.
I love micro greens and they have them at our local farmers market. I’m so intrigued about growing my own.
Thanks for all the great information!
We want to start growing our own food and this is great info.
This was great information. I’m really considering doing this with my boys!
How exciting!! Be sure to check out all True Leaf Markets supplies & seeds. Their quality is highly recommended!
I must admit I thought these were just young plants and then I saw a package of microgreens seeds today. Lol
This is so cool! I wish I had the space to do this – might have to find a way to make some more room!
I just came in from my garden. You are inspiring me to go with soil!
Good to know. Saving this for another day.
Wow!! This is a lot of really good information, not only did I learned all the details about growing microgreens, but also the important of eating them, even if I don’t get to grow them myself 🙂 We specially love Basil, Arugula and peas and I did not know they were superfoods!!
I love this tutorial. It makes it so visual and I love that!
This is pretty cool! I don’t know a lot about plants, but this looks fun. I do need to incorporate more greens into my life!
wow, I had no idea basil was one of the most nutritionist microbeans! I only eat it on my margherita pizzas 😂 I need to eat this more often!
Thank you Suzan for this great post. It was filled with great information and I learned a ton!
Great info! I’m definitely interested in growing micro-greens so this is an awesome resource to get started! Thanks!
Awesome! Be sure to check out True Leaf Markets supplies & seeds, they are amazing. Let me know if you have any questions!
We do chia and basil every year. We are lucky to have a big yard by California suburbia standards.
Awesome article Suzan! Growing Microgreens is tops on my list this year too, looking at hydroponic systems currently. Thank you for all the great information and inspiration!
How wonderful! Be sure to check out True Leaf Markets options. They truly are a wonderful company with great products & seeds! Let me know if we can answer any questions. Thanks so much for the read, Angela!
I have been hearing a lot about microgreens lately. I have never even tried them. I will have to do so soon.
wow! you really know your stuff!! I’d love to grow microgreens as well, for healthier add-ons to meals! thanks for the inspiration
Thank you, but really it’s trial & error all the way 🙂 Hope you can give them a try yourself!
Very interesting concept but I am afraid I really like my fresh veggies the way I am currently eating them.
As do we, Christina! Microgreens are a great addition to any that you are currently eating and a wonderful way further add to your nutritional diet. Thanks for the read!
Good to know which method would grow best and taste the best. Lots of great info! Thanks so much for linking up with me at my #UnlimitedMonthlyLinkParty 9 where I comment on and share on social media if share option is available, open February 1 to 26.
Wow – such a detailed article so full of useful information! We’ve grown mixed mustard greens, alfalfa greens and broccoli sprouts indoors and love them – all go very well with egg salad, lol! We’ve tried them in soil in pots, as well as in an Aerogarden (hydroponics) and found the Aerogarden worked really well – it has a built-in light system. We’ll continue to experiment. Found you through the Homestead Blog Hop!
Hi Sarita~
So glad you found the article useful! I will have to look at this hydroponic system. Thank you for sharing your experiences (and the egg salad does sound yummy) with growing microgreens. I’m munching on them as we speak 🙂
I love what you do with your garden and growing. I enjoy microgreens – buy them. No space to really grow them but enjoy watching others for sure. I can smell the soil when I read your post. Thanks.
Thank you, Beth, for your kind words. I’m so glad you are enjoying the information!