

By using our seed viability chart(s) and learning how to test your old garden seeds for viability is an easy way to ensure success in your gardening efforts. These two easy seed viability tests take little time & reap great, well, green results!
This post may contain affiliate links at no additional cost to you. By making your purchases through the links on this website, IMSL may make a small percentage at no direct cost to you. IMSL only promotes products we use & truly believe in. Please refer to my Privacy & Disclosures for further information. IMSL thanks you for your support!
There is nothing any worse than putting the sweat equity into the garden, getting your seeds planted, and then…nothing. Nada. No little sprouts pushing themselves into this world. No green shoots making their debut.
A few years ago, this exact thing happened here on the hill. It had been my hope to use up some older (age was unknown as no seed organization plan was being used….my bad) “Provider” string bean seeds. Waiting & hoping to see something happen, some sort of life spring forth was doomed from the start.
With a germination rate of less than 10%, let’s just say, it was not such a great idea. Not only had time & effort been wasted, there were no early string beans to enjoy!
A futile attempt is not the end…
Unknown
One thing about life here on the hill, we learn from our mistakes. Time to take control of our seeds. Time to realize that not all seeds are created equal and they don’t last forever. By taking the time to sort through, organize, & test for seed viability, the likelihood that we would experience crop failure was greatly reduced. Happy to announce it has not happened since 🙂
WHAT IS SEED VIABILITY
According to the Oxford Dictionary, the exact definition of “viability” when used with biology in mind is the…
ability to survive or live successfully.
“pregnancy depends on the viability of the sperm and egg”
Oxford
THE ANATOMY OF A SEED
The term “seed” generally refers to anything that can be sown & grown. Including “seed” potatoes, which are re-grown from the sprouting seed potato and not actually from a small seed, as well as fruit pits etc. For the purpose of this article, we will be discussing actual seeds…the small nuggets that create a plethora of results.
The anatomy of seed is simple and yet so complex in what it produces. Arizona State University, Ask A Biologist, has some amazing closeup photos of seed and breakdown the anatomy.
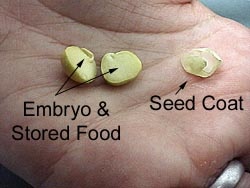
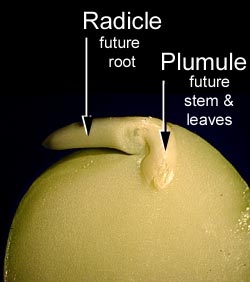
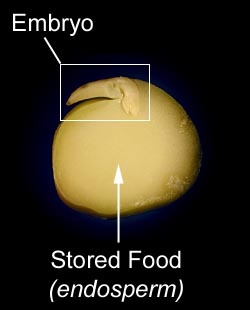
Without getting too scientific here, there are three primary parts that make up a seed. The “embryo” (a young, multicellular organism/prior to emerging from the seedling), the “endosperm” (comprised of food source typically starches), and the “seed coat” (layers of protection that surround the seed itself).
WHY SOME SEEDS REMAIN VIABLE & OTHERS NOT
There are many determining factors in whether a seed will germinate (sprout) or not. Most important are environment (light, water, temperature all need to be aligned), age (seeds lose their vigor with age), and moisture (creating the right amount of “humidity” or moisture is key).
A viable seed is one that will germinate when the right conditions or environments are created.
SEED VIABILITY SEED VIGOR & SEED GERMINATION
Seed viability, as previously stated, is the ability of the seed to germinate under certain conditions. It grows when the right environment is created.
Seed vigor, on the other hand, according to Oregon State University, is comprised not only of the percentage of viable seed in a lot but also…
reflects the ability of those seeds to produce normal seedlings under less than optimum or adverse growing conditions similar to those which may occur in the field
oREGON STATE UNIVERSITY
Seed Germination is the actual process of seeds growing into plants. Most commonly known as sprouting.
WHAT IS A SEED VIABILITY TEST?
It’s easy to determine seed viability by performing a seed viability test. A seed viability test is simply a test to determine the percentage of viability of seeds that remain active and alive, if you will, after storing for a length of time.
There are several ways to perform or determine the percentage of your seed viability. Soil is the most common…simply plant your seed in soil according to the packet instructions and see what grows. Quicker tests include a sprouting test (we will go over in detail below) and a water test (in detail below).
SEED VIABILITY TEST VARIATIONS
In addition to the above viability testing methods, there are variations that may need to be considered depending on the seed type.
Seed such as chamomile, lemon balm, and some flowering seed types, need light in order to germinate. If this is the case, you can use a sealed “greenhouse”, clear Tupperware with sealing lid, or a recycled clear plastic container with a tight-fitting lid.
GREENHOUSE SEED VIABILITY TEST
To perform the “greenhouse” seed viability test, simply lay wet paper towel in the bottom of the container & lay your seed on top of the wet towels. Seal the lid & keep in a warm place making sure it remains moist until your seed has germinated.
Other seeds such as echinacea & salsify perform better after being exposed to a period of moist cold (stratification). For these types of seeds, a test can be performed in your refrigerator to test for seed viability.
STRATIFICATION SEED VIABILITY TEST
Create a small “greenhouse” and place in the refrigerator for the length of time determined with the variety of seed you are testing (use the same length of time for stratification as is recommended for germination on the package). After the determined length of time, remove and place in a warm spot for germination.
Further, some seeds, gourds for example, call for scarification in order to assist in germination. Scarification is the process of the seed being rubbed by a rough material to penetrate the outer lining of the seed.
SCARIFICATION SEED VIABILITY TEST
One method of scarification is to line a jar with a cover with sandpaper, place your seed in the jar, close, and shake the jar for a minute or so. There are many methods over and above the jar method. You can also simply nick the seed with a knife, file it with a metal file, or cracked open by gently “hammering” the seed to name just a few.
Scarification allows an opening in the seed which in turn allows air & moisture to enter the seed. Once a seed is “scarified”, it needs to be planted or germinated quickly as they do not store well.
There are a few seeds that require access to potassium nitrate (saltpeter) in order to germinate. Saltpeter is found in soil.
POTASSIUM NITRATE (SALTPETER) ADDITION
A few seeds such as tomatoes, peppers, and certain flowers require the addition of potassium nitrate to mimic soil’s nutrient base. Adding 2 g of saltpeter to 1 quart of water and then misting your paper towels with this solutions prior to adding your seed will do the trick.
TESTING OLD GARDEN SEEDS FOR VIABILITY – TWO WAYS
For the purpose of this post, we have tested our seed viability in two ways. The paper towel method and the water method.
TESTING OLD SEEDS FOR VIABILITY – THE PAPER TOWEL METHOD
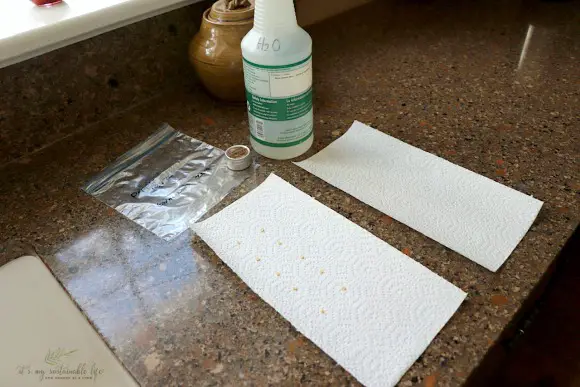
To test seed viability using the paper towel method (our preferred method), gather the following supplies:
- Seeds – Gather any seeds in questions of being needed to be tested
- Paper Towels – You will need 2 paper towel sheets for each variety of seed needing viability testing
- Re-Sealable Plastic Bag – One resealable plastic bag will be needed (this is a stickler for many wishing to reduce the use of plastics. Unfortunately, nothing we have tried to utilize works as well in this test method)
- Mister – A water mister for dampening
- Sharpie – A black sharpie for marking your plastic bag
We recommend using separate bags for each seed variety in order to keep them organized during testing.
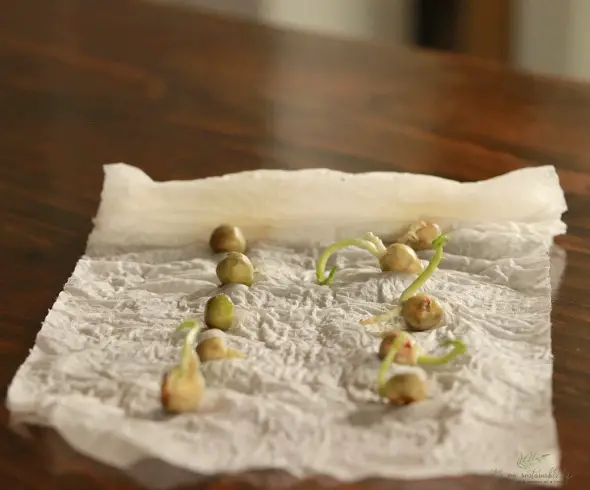
Take two paper towels and lay them on your counter. Place ten seeds evenly spread on one of the paper towels. With your mister filled with water, mist the seeds and the paper towel until wet (not soggy).
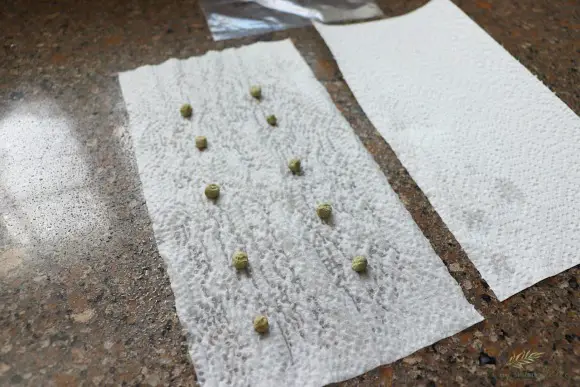
Lay the second paper towel on top of the seeds. Mist until wet (not soggy).
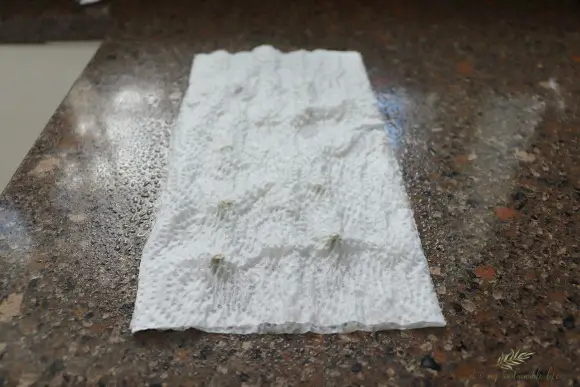
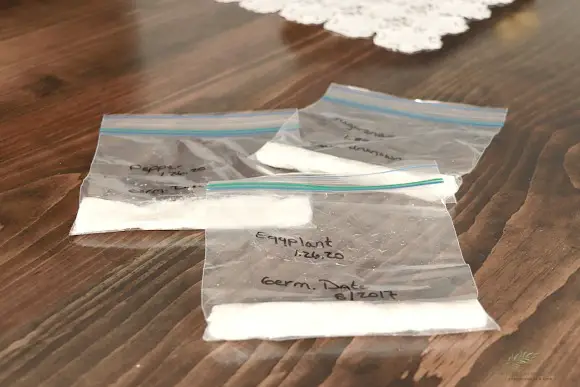
Carefully roll the seeds in the paper towel into a tootsie roll or mini burrito.
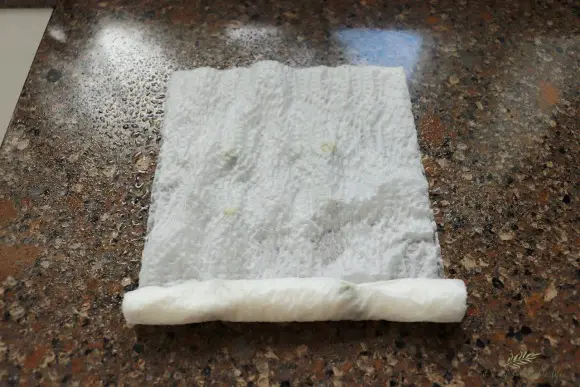
Mark your plastic bag with the seed variety, date, and germination date (when the seed was initially tested) stamped on your seed packet to keep them well organized.
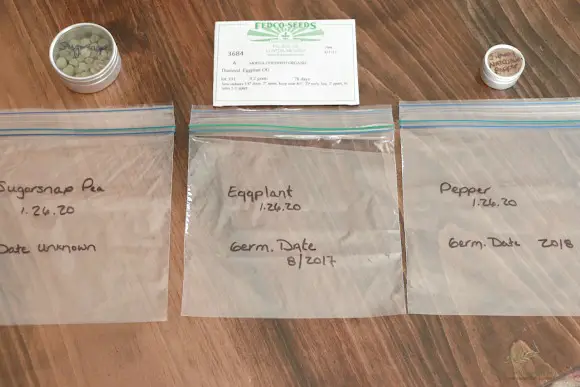
Place your mini burrito in the plastic bag that you have labeled, seal closed, and place it in a warm area to germinate.
Depending on the seed variety it will take between 2 to 14 days to see any germination or sprouting. To determine the percentage rate of successful germination use the following guide from “Organizing & Storing Leftover Garden Seeds”
1 seed = 10% germination success
5 seeds = 50% germination success
10 seeds = 100% germination success
IMSL
SEED VIABILITY TEST RESULTS
The three seed varieties that were tested here on the hill were Sugarsnap Peas (saved 3 years ago from our garden), Peppers (a germination date of 2018 on the pkg), and Eggplant (a germination date of 2017 on the pkg).
The results are finally in with the following germination percentages…
- Sugarsnap – 90% germination rate! These are good to go and will be planted this spring 🙂
- Eggplant – 50% germination rate. Most likely we will plant double if not triple the amount in each planting cell when we begin our seedlings
- Pepper – 80% germination rate! We will trust that these are set and will be viable come seedling time
TESTING OLD SEEDS FOR VIABILITY – THE WATER METHOD
To complete water testing for seed viability, simply place your seeds in water. Let them sit for at least 15 minutes. If the seed floats to the top, it’s a good indication that the seed is no longer viable or no good and that the seed is now sterile (containing no embryo). The seed that sinks, a good indication they are still viable and are good to go.
WHAT TO DO WITH SEED THAT DOES NOT GERMINATE
With our typical homesteading attitude of “waste not, want not”, any seeds that don’t germinate we certainly don’t just throw away! Here are some great tips from IMSL’s “Organizing & Storing Leftover Garden Seeds” for ways to put them to good use!
Don’t throw the old seed away! You can do several things with expired seed…broadcast them in an area that you are not growing anything presently and see what you can get from them, feed them to your chickens if you keep them, or feed them to nature, something will find them and have a feast
IMSL
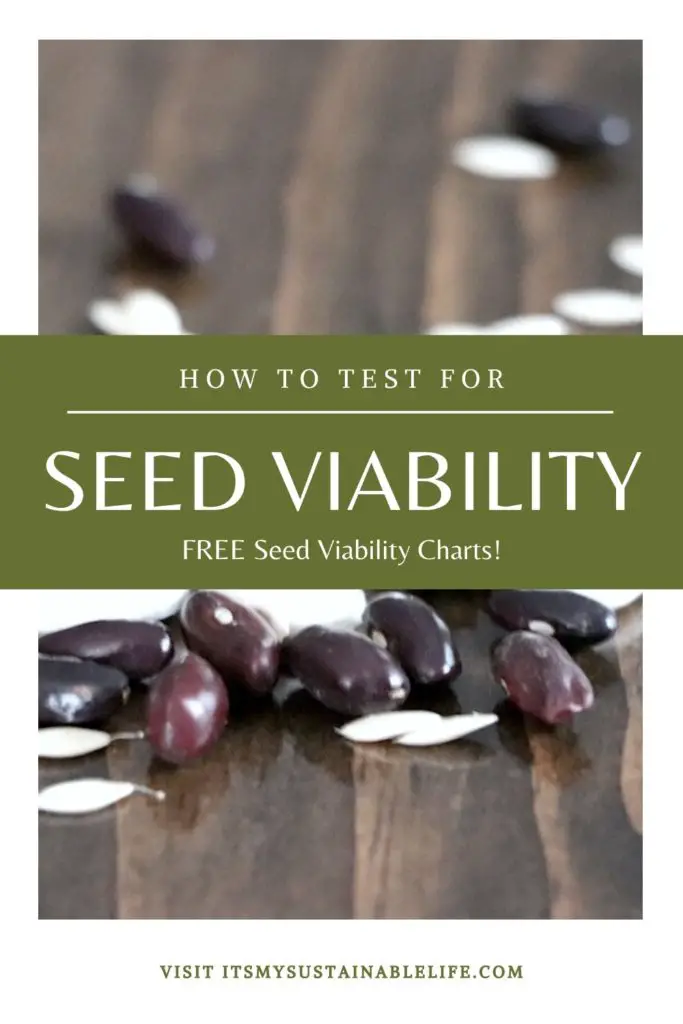
SEED VIABILITY SHELF LIFE TABLE (CHART)
Most seed will remain viable in storage anywhere between 1 to 5 years when stored properly. Optimal conditions for seed storage is an environment with low humidity. A simple formula for optimal temperature/humidity levels is the sum of both should equal less than 100. Many recommend storing seed in glass jars in your refrigerator (include a desiccant/silica gel pack in your jar).
Personally, we are not that fussy here on the hill. With our proper storage suggestions, we simply place our seed storage bucket in our cellar (where the temperature remains typically around 45 F to 50 F during the winter months. We have had great success with storing all our leftover garden seeds using this method for many years.
NOTE: Pelleted seed does not make for good storage and should be used within the same year. The pelleting process will reduce the longevity of the seed greatly.
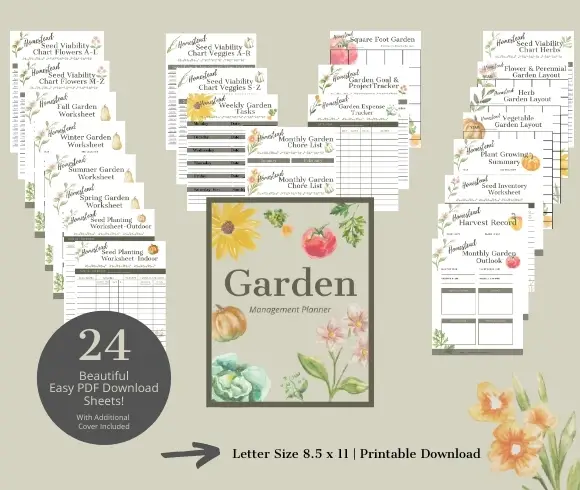
Arming yourself with a base knowledge of how long each variety will typically be viable is a very useful tool when gardening. We have taken some of the guesswork out of keeping track of your seed with our Garden Management Planner now available in our Esty Shop.
And did we mention how beautiful they are?
Testing your leftover garden seeds for viability is not difficult to do, but is an important step to ensure success in your garden. Reduce your chances of a bed growing a big fat nothing. Test those seeds.
DO YOU TEST SEEDS FOR VIABILITY?
Love, Light, & Laughter ~

OTHER GARDENING TIPS
- “Cover Crops – The Best Green Manure For Your Garden”
- “Alternatives For DIY Seed Planting Pots On The Cheap”
- “Vegetable & Herb Seeds – Know The Differences”
- “It’s My Favorite Time Of Year! Buying Heirloom Seeds”
- “Spring Garden! It’s All About The Preparation”
- “When Life Hands You Heirloom Seeds Just Plant ‘Em!”
42 comments
Thanks for the great information and for sharing at Charming Homes and Gardens Suzan! Pinned.
Hi Suzan, Great article as usual! You always put such good detail into your posts. Thanks for consistently posting on the Simple Homestead Blog Hop! I learn so much from you & am inspired! I have been meaning to test some older seeds that someone gave me. Also I have been wanting to sell/exchange some seed so this is a good test to do! I don’t want to send someone weak seeds. Thanks;)
Blessings, Dash
How interesting! I am constantly learning something new on your site! Thanks.
Wow… that was an amazing read. I learned sooo much. I have some seeds I wanted to plant this Spring, but wasn’t sure how to check them without wasting time planting. I’ve made that mistake before. This will be so helpful… Thanks for the charts too.
Glad you found it all informative & useful! Happy planting!
Interesting information. Thanks for sharing.
This is fantastic information for those who are into gardening. I’m not, but still found the science in it intriguing. You are a wealth of knowledge, Suzan!!
I appreciate you reading! Never know when you may have the urge to garden a bit 🙂
neat idea. I would love to have a garden at our house again. We have not had one in years
Wow! I learned so much reading this. I always just planted my seeds and hoped for the best. I’d like to try the paper towel trick to really get more successful results. Thank you! This was very well written.
Thank you, Brianna! I’m so glad you found it useful!
I didn’t even know this was something to be aware of!!
You really do break the science down to a layman’s level and I do appreciate your work. You make it look easy!
Thank you, Vanessa. I appreciate your kind words & for reading!
I might try to sprout some seeds for my boys this Spring. Thanks for all of the tips. I hope to have a garden someday.
Hope you can! Gardening on any level is so rewarding!
I was just wondering about this exact thing the other day while I was staring at my box of seeds! Thank you so much for sharing!
I go through this every year, wandering if my seeds are still good or what! THANK YOU for this!
Interesting post on testing seeds.
Oh, this makes me want to get my seeds out and start dreaming of spring!
I know, right? Happy planting!!
So much information!! It’s amazing all of the stuff I don’t know about seeds and gardening.
very detailed and cool information!
Wow, I feel like I have so much to learn when it comes to gardening. It is nice to know these tips for less waste.
As we all do, Heather. Thanks so much for stopping by and reading!
There is a lot of great information here for every level of gardener!
This is great information! I love learning this tips and tricks!
I relly need these tips. I am bookmarking it for later. I inevitably always have gardening “opportunities”
Been there as well for sure, Tricia! Thanks for reading!
I don’t test my seeds for viability, but this article explains so much! I understand so much more now as to why a plant may not have thrived. You really have a great way of teaching about gardening. Thanks so much for sharing.
Thank you, Kareena! I’m glad you found it useful!!
This helps, we have some favas that may need to be checked.
Suzan, this is so interesting. I’m sharing this with a friend that just built a greenhouse to augment her summer gardens.
Ohhhh, a bit jealous of that greenhouse 🙂 Thanks so much for sharing Maria!
Wow, I had no idea about this! This is incredibly useful, thank you! Pinning for later! 🙂
This is great info! We hope to have a garden one day.
I bet your gardens are beautiful without sparce spots!
Oh, I have some spots for sure 🙂 It is my special place tho’ 🙂
I had no idea – this explains a lot for my seedling each year – cannot wait to put this info into use this spring!
Great post! So important for the success of our gardens!
I always have old extra seeds because my garden is so small. Thanks for the viability chart and testing methods. I hate to waste. – Margy
So happy you found them useful! Happy gardening 🙂