
 (2) (1)")
Learning how to save tomato seeds is not difficult. Saving tomato seeds is one of the easiest crops to gather and save seeds from, making them a wonderful option for beginner seed-savers. By following a few guidelines, worry no more of where you will be able to source your tomato seed stock!
This post may contain affiliate links at no additional cost to you. By making your purchases through the links on this website, IMSL may make a small percentage at no direct cost to you. IMSL only promotes products we use & truly believe in. Please refer to my Privacy & Disclosures for further information. IMSL thanks you for your support!
All tomato lovers look forward to savoring their favorite tomato during the height of the growing season. If you are familiar with me, you know that I am no different. Growing tomatoes, and a LOT of them each year for use in salsa and sauces has this homestead kitchen hopping, blanching, preparing, and canning them every growing season.
I have to admit, when my garden lacks in its production of this favorite crop from disease, soil conditions, or drought like we’ve experienced this year (my tomato plants were sad & stunted to say the least) or any of the other many ailments that nature can offer us gardeners, it’s a sad, sad state of affairs here on the hill 🙂
Growing this many tomato plants from seed (typically between 100 to 150) each year is a labor of love for me. That’s a LOT of seed to purchase, never mind sourcing when supplies dwindle! Not to mention tomato crops are a fickle lot to say the least.

CAN YOU SAVE TOMATO SEEDS TO PLANT
The good news? Yes you can save tomato seeds. Plus, saving your own homegrown tomato seeds may be one of the easiest crops to save. Following a few guidelines, experienced & new gardeners alike can be sure of having a continuous supply of seed stock for planting year to year.
As with most gardening chores, you have a few options. Saving tomato seeds are no different. Choosing what works best for you is a matter of experimentation. I do love a good experiment 🙂
3 WAYS TO SAVE TOMATO SEEDS
When saving your own tomato seeds you have options, 3 to be exact. Throughout the years, I have experimented using all 3 methods. Below are the findings from my highly scientific attempts 😉
FERMENTING TOMATO SEEDS
The fermentation process of saving tomato seed is by far my favorite method for several reasons. But I get ahead of myself & need to take a moment to dissect & get a little “sciencey” here.
Each individual tomato seed is surrounded & coated with a protective gelatinous sac. This protective gel works great in nature (containing the chemicals the seed needs to inhibit germination until connection is made with soil), but can be problematic for seed storage (providing the perfect environment for soil and seed borne disease to remain).
If you want to get really “sciencey” this article has a great breakdown of the anatomy of a tomato seed.
“Flowering plants (including tomatoes) make more of themselves by producing seeds. The job of the tiny plant that is inside every seed is to break out and continue growing into a mature plant. The tiny plant is called an embryonic plant; embryonic means it is at an early stage in development. The embryonic plant has an embryonic root called a radicle and one or two embryonic leaves called cotyledons. The immature plant also has a plumule, which will develop into the shoot“
Parts of a tomato seed
When saving seed for long-term storage, the fermentation process is by far the gold standard for saving seed for a few reasons.
- NATURE’S WAY – Fermenting seeds mimic natures natural progression of tomato seed. Just notice ones that have dropped from the vine and begin to age & rot….natural fermentation process happening right before your eyes
- INCREASED GERMINATION RATES – The natural outer gel coat has been removed through the fermenation process, increasing germination rates. Also, during the process you will see that some seed will float to the top (not viable) and some will sink (viable). This separates the good, viable seed from seed from those that are not, allowing for greater germination rates come planting time
- REDUCED DISEASE TRANFERENCE – As the process removes the gelatinous protective coating from each seed, the risk of un-wanted bacteria & disease showing up during planting time is reduced
- LONGER LASTING SEED STOCK – When tomato seeds have gone through the fermentation process for saving them, the seed can remain viable for many years. When trading seeds amongst gardeners, many will only accept seed that has been saved through the fermentation process
The fermentation method of saving tomato seeds is one I have had great success with & will continue to utilize & use. Read on for a full tutorial on how to ferment your tomato seeds to save.
DRYING TOMATO SEEDS
Simply drying the tomato seed without the use of the fermentation process is an option. Especially for those who will be saving seed every year.
However, in my opinion, skipping the fermenation process comes with a cost. The cost of reduced germination rates in your stored seed, the possibility of disease & bacteria transference, and greatly reduced storage times from many years to only 1-2.

To dry you seeds withouth fermentation, many gardeners simply squeeze the seeds from the tomato onto a paper towel, separate the seed best you can, and allow to completely dry. The drying process will vary & is largely dependent on where you live. To store, the paper towel can simply be folded and stored in a dry, dark area.
VOLUNTEER PLANNED PLANTING
Should you grow your own tomatoes, you will no doubt have found the following year a few unexpected plants popping up around your gardening beds. These volunteer plants are a sure sign that with a little planning, tomato seeds can be save right in your garden space.
The option of “planting” ahead for next spring is simply a matter of finding an area that tomatoes have not been grown in for the last several years, squeezing the seeds from a tomato & planting the whole kit and kaboodle in 2 inches of soil covered with mulch.
In the spring, once the threat of frost has passed, remove the mulch. You should then see these planned plants popping up. Once again, there is a cost in my opinion for this method of saving seeds from your tomatoes.
I have found the actual fruit of the tomato is a bit tough when allowing volunteer plants to come to fruition. If this is not a factor for you, then by all means, give this method a go!
CAN YOU SAVE HEIRLOOM TOMATO SEEDS
Can you save heirloom tomato seeds? YES, YES, & YES! If you are not familiar with heirloom seeds or the differences between seed types, be sure to visit the topic of your choice by simply clicking the highlighted text.
As heirloom seeds are an open-pollinated variety of seed, they are perfect for saving & storing. By saving heirloom seed, you are that much closer to maintaining the integrity of the seed variety. Especially when saving heirloom seed from plants that have been a bit isolated from other varieties of tomatoes.
So what does “open-pollinated” actually mean? In my article, “Buying Heirloom Seeds”, open-pollinated are…
“seeds are open-pollinated, meaning that the flower of the plant is pollinated naturally by bee’s, insects, and even the wind. The resulting seed will reproduce a plant with the same characteristics as its parent.”
IMSL
Interestingly, open-pollinated plants become known as “heirlooms” once they have successfully been planted for 50 years! That’s a lot of experiments, just sayin’ 😉
CAN HYBRID TOMATO SEEDS BE SAVED
First, what does “hybrid” seed mean? When a seed is labeled as a hybrid seed, the seed has been cross-pollinated with another variety in hopes of capturing both of the varieties best traits. Are they good options for saving seed? Not really.
“hybridized seed is not the most reliable seed to use for saving. Although they will germinate, the rate of germination is much lower than that of rare seeds & heirlooms.”
IMSL
When it comes to saving seed, stick to open-pollinated, heirloom varieties.
CAN YOU GROW TOMATOES FROM STORE BOUGHT TOMATOES
There really is no definitive answer. Would yes, you can, and possibly not both work? In short you can try to plant the seeds you acquire from store bought tomatoes, but there is no guarantee that they will germinate as often many are considered sterile.
In my humble opinion, why take the chance. Grow your tomatoes from a reliable, open-pollinated or heirloom stock and then save from there.
HOW TO SAVE TOMATO SEEDS BY FERMENTATION
Learning how to save tomato seeds does not have to be involved. Should you be a seed saving afficionado, the process can become quite involved. True seed savers acquire the knowledge of which plants will cross pollinate with others as well as how far apart these plants would need to be planted in order to prevent this from happening, or staggering bloom times so that pollination does not occur at the same time.
Being the lazy gardener that I am, no thank you. That sounds like way too much work. By sticking to saving only open pollinated & heirloom varieties, I can be sure that my variety will remain true. Of course, being the experimentor that I am, giving some others a go once in a while is always interesting.
This years experiment? Sungold & Black Cherry, our favorite F1 hybrid cherry tomatoes. We shall see!!
Need to source organic heirloom varieties? One of my favorite sources is True Leaf Market. I have found their germination rates are amazing & reliable. Tell them IMSL sent you 😉
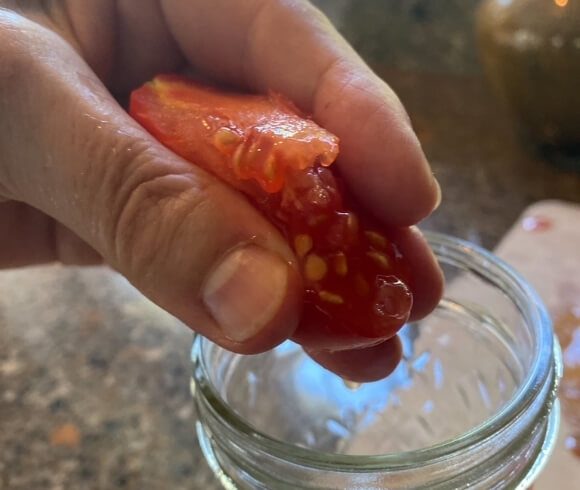
STEP 1 – To begin the process of fermentation to save your tomato seed, choose wisely. As in, choose the ripest, healthiest, best looking tomatoes from the lot.
Tomatoes are at their ripest when they are ready to eat. Using under-ripe tomatoes may end with very low germination rates. Should you have under-ripe tomatoes, simply leave them out on a counter and allow to ripen naturally.
STEP 2 – Slice the tomato in half and squeeze the tomato seeds, pulp, and juice into a re-useable mason jar. There is no need to add additional water unless the juice or liquid squeezed from the tomato dries before the fermentation process is complete.
Should that happen, add a small amount of unchlorinated, fresh or distilled water to the jar.
STEP 3 – Label the mason jar using a sharpie pen and writing on the outside of the jar the name of your variety when saving multiple varieties at the same time.
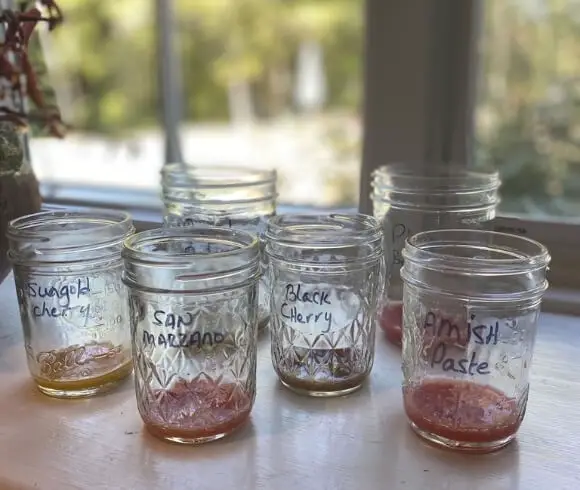
*By using a sharpie, once you are finished with the fermenting process, the writing can easily be washed off the jar.
STEP 4 – Loosely (allow for air circulation to occur) cover the jar(s) with a clean towel, cheese cloth, or some other form of covering. Allow to set for only 1-3 days to ferment, checking the jars daily and giving them a slight swirl.
**There is much discussion about how long to ferment the seeds for. In my research, this is what I’ve found in regard to these issues.
I discovered many are recommending allowing the fermentation process to last anywhere from 3-5 days and a few sites even mentioned longer. In a study conducted at the Seed Services Institute in Zimbabwe regarding just this topic, the following was determined…
“The results showed that seeds can be fermented for up to three days without affecting their viability. Longer fermentation has negative effects on tomato seed viability as measured by the germination rate, number of dead seeds, and the development of abnormal seedlings.”
SSIZ
Additionally it was found in this same experiment that seeds fermented just 1-3 days had a much higher germination rate, roughly 96.5%, than those fermented for four days with only a 74% germination rate! 1-3 days tops is our recommended fermentation time, and will largely depend on air temperature, humidity levels, and ripeness of the fruit used.
STEP 5 – Once the fermentation process has completed, there may be a cloudy layer on top, or even mold. This is ok.
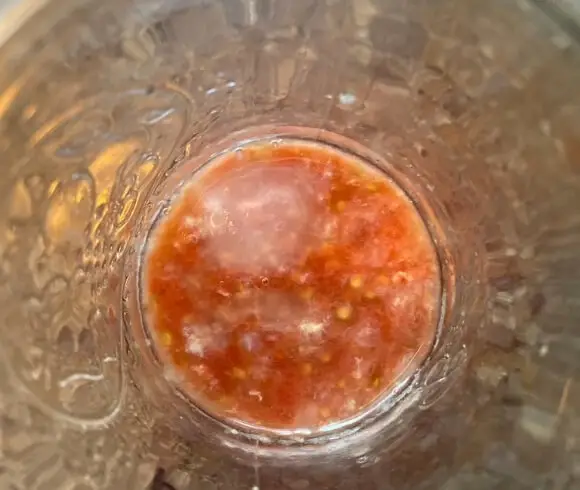
STEP 6 – Pour un-chlorinated, fresh or distilled water into the jar. Gently swirl the contents to mix thoroughly. As you gently swirl, some seeds, pulp, and the gelatonous goo from the seeds may float to the top.
Slowly pour the floating seeds, fluid & residue off from the seeds on the bottom. It is the seeds remaining at the bottom (the ones that sunk) we are after as they are viable. This process of adding water and draining may take a few times to remove as much residue as possible.
STEP 7 – Add a bit of water one more time to release the seeds from the bottom of the jar and strain through a fine mesh sieve.
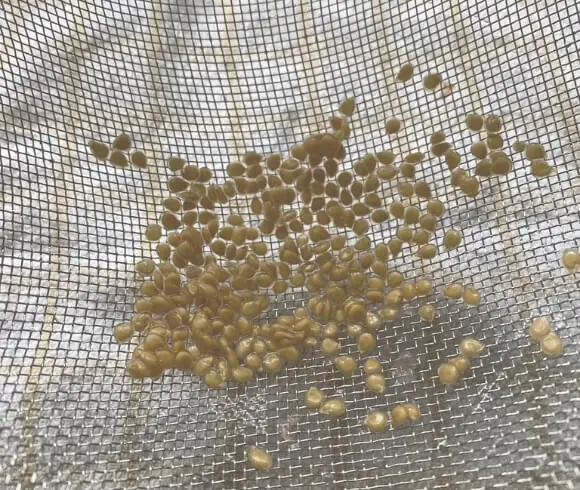
Rinse as many times while the seeds remain in the sieve to remove any residual goo left behind. I use my finger to gently move the seeds in the sieve while under running water to accomplish this.
STEP 8 – Tap the seeds out onto parchment paper, a paper plate, or even a coffee filter that has been labeled with your seed variety name.
NOTE: Refrain from using paper towel or newsprint to dry your seeds as the wet seeds will stick to the paper.
STEP 9 – Place in a warm area with a lot of ventilation and allow to dry for 2-4 weeks. I recommend going with the motto “dryer is better” here.
STEP 10 – Store the dried seeds in a container of your choice. Refer to “Organizing & Storing Leftover Garden Seeds” for storing options, many of which are free and won’t break the bank. I also offer a in this post a FREE Seed Inventory Tracker sheet which can be downloaded & printed to track all your seed saving information. Trust me, keeping good records of your experiments right from the start is not overrated 😉
No matter what your storage container of choice is, store the container in a cool, dark area that remains dry.
There you have it! In ten steps you can create basically FREE food for next year’s crop! Sounds good to me. May all our “experiments” result in a tomato-ey, juicy fruit.
What seeds will you be saving this year?
Love, Light, & Laughter ~

27 comments
What great information! I had no idea!
This is great info. My dad grows tomatoes every year…
This is fantastic! I absolutely LOVE 😍 tomatoes and knew you could save the seeds I just didn’t really take the time to find out or figure out. Now you’ve given me no reason why I shouldn’t for next year and not only that but other types of seeds to grow. This was great, thank you for sharing! 👍🏼
Wow! I never even thought to try drying my own seeds! We usually just pick up seedlings every year. But then again… you can hardly call my postage stamp sized strip of earth a garden!
What a way to take gardening to the next level! Certainly going to give this some thought for next year!
What an interesting idea! Very good read! Very motivating!
I may have to try this! Can’t pass up free food 😀
I’ve saved wildflower seeds before but never tomato seeds. And I don’t know why not. I love cooking with them! Thanks or the tips!
Now if I could get the tomatoes to grow in the first place…
LOL! That would be a good first step 😉
This is so cool! I tried saving seeds once, but all I did was rinse them and dry them. Needless to say, it did not work. I’ll have to try this method!
Great information! I would have never thought about saving tomato seeds. Thanks for sharing how to do so!!
Thanks for teaching how to do this. Will pin!
I don’t think you are a lazy Gardner at all. It is so fascinating all the information you give. You really know your stuff!
We would love to try this when we have enough space to grow a lot of tomato plants. And I remember learning all the parts of the seeds with my kids in homeschool. It’s amazing the complexity of one little seed!
I’d never thought to do this, but why not? It’s gotta be great to know exactly where your tomatoes come from. Thanks for posting!
I’ve saved seeds in the past, but not this carefully. Nice to know that the fermentation process keeps down bacteria and increases yields.
Such a great post! Pinned for later, since we want to have multiple varieties of tomatoes in our garden next year. Thank you for sharing this info!
Can’t wait to see what germinates next year from the tomato seeds I saved!
I grew my first tomato plant this year, so loved this post. As a brand new tomato plant grower, this was so helpful.
Another great guide! You always have great gardening how to’s! Thank you for sharing.
Oh, I would love to do more seed saving! I have never saved tomato seeds, but you have really simplified it here! Thank you as always for sharing your high-quality posts with us at Embracing Home and Family!
I love your blog. I’m doing the same program and yours came out great!
Thank you, Debbie! I appreciate the kind words!!
Hello Susan
It was nice to see you featured as part of the Friendship Friday feature on Create With Joy. I usually don’t save tomato seeds as I live right up against the Colorado foothills and our nighttime temperatures are too cool to grow bountiful tomatoes, but this year I did dry out some delicious tomato seeds on paper for my son as he lives in an area that is warmer. He has a green thumb and grows a beautiful vegetable garden every year.
How thoughtful of you Pat! Thank you for reading & stopping by!
Stay Well,
Suzan
I think this looks so fun and rewarding. And it would let you continue that great line of tomatoes that you have enjoyed so well. A very interesting read. Thanks. You do make me want to garden.