
 (1)")
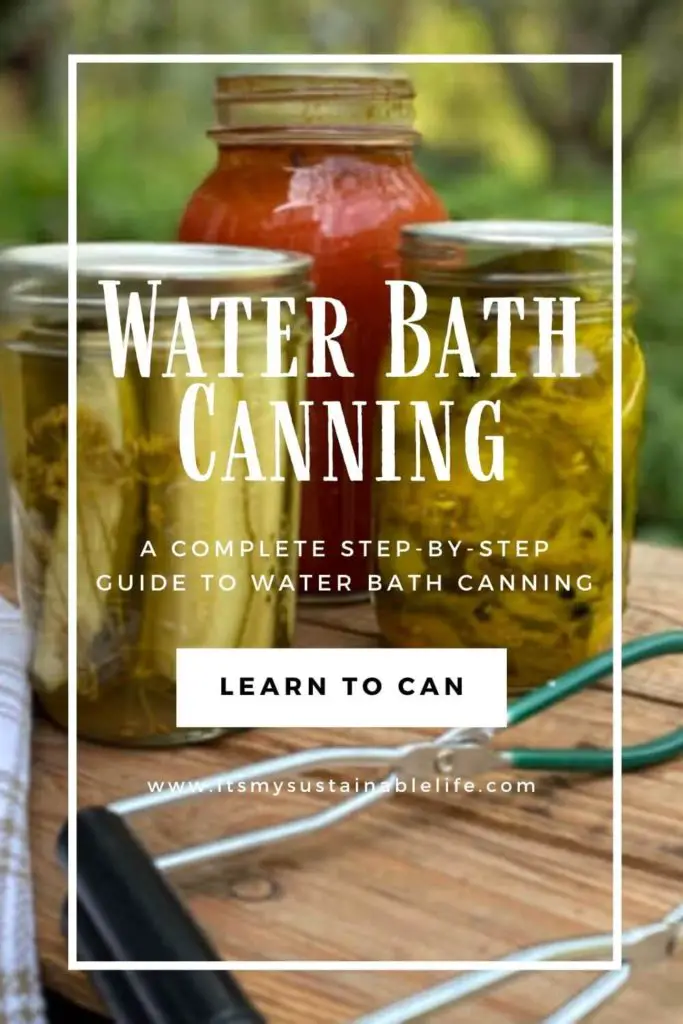
Water bath canning. This method of canning, especially for beginners, is an easy gateway into preserving your favorite high acid foods in the height of their growing season. It’s simple to learn, safe to do, and rewarding to say the least.
This post may contain affiliate links at no additional cost to you. By making your purchases through the links on this website, IMSL may make a small percentage at no direct cost to you. IMSL only promotes products we use & truly believe in. Please refer to my Privacy & Disclosures for further information. IMSL thanks you for your support!
Any avid canner will tell you, the first method of food preservation they learned was water bath canning. Why? Because it needs no special equipment initially, it’s easy to learn, safe when following safe canning methods, and nothing tastes better than foods you have prepared & jarred with love 🙂
WHY PRESERVE YOUR OWN FOODS
Often times we hear from many wondering the “why” about what we do. Why spend so much time growing & preserving your own food when you can just easily buy what you need at the local grocers? Why put all that energy, time, & effort in? Well, there are many reasons why.
We first began our journey to homesteading when we wanted to take control of our food. After all, it plays a major role in maintaining a healthy lifestyle.
We wanted to reduce the amount of chemical exposures found in most conventional foods. We wanted to know EXACTLY what was in our food sources.
We wanted to decrease our monthly food bill. Eating organically can be expensive, especially for families & supplementing our food stores with homegrown preserved items greatly reduced our costs.
We wanted to reduce the carbon footprint of our food by “bringing it home”. Can’t get much more eco-friendly than by having your food already in your own pantry 🙂
We wanted to be prepared in emergencies by being a bit more self-reliant. We are by no means “preppers” but we do rest easy knowing we can survive for a bit should anything happen.
By canning & preserving our foods, time spent in the kitchen having to prepare certain items is greatly reduced as it’s already prepared!
The sense of accomplishment is par none when you go to your pantry in the midst of cold winter months, crack open a jar of your favorite jam or pickles, and enjoy a bit of summer’s flavor.
Home canned goods make the most wonderful gifts! A gift to be savored, enjoyed, and reminded of who made that product with love.
There are so many reasons to begin preserving your own food. Whether you are looking to begin canning or are a seasoned canner, following the safe practices of water bath canning outlined below will get you on a path with no turning back 🙂 You’ve been appropriately warned, LOL!
DEFINITION OF WATER BATH CANNING
All this talk about water bath canning, but what is it? Is this the only method for canning? What foods can safely be canned in a water bath?
For beginners, it can be a bit overwhelming when you think about the art of canning. After all, most likely you are feeding a family and certainly don’t want any health issues come from foods you’ve preserved! Botulism anyone?
It sounds scary, right? It shouldn’t be!! The good news is, there really is no reason to be afraid. Following the safe food preservation methods, sticking to safe canning recipes, and understanding what foods need to be canned using certain methods is really what is of concern.
There are two processing methods used for safely canning foods. Water bath canning, described below, and pressure canning, a topic for another day 🙂
So what is water bath canning? It’s simply a process. A process by which filled jars, sealed with lids & rims, are placed in a pot of boiling water for a prescribed length of time to reduce food contaminants which cause natural spoilage & removes air from the jars. As the jars cool, a vacuum seal is created sealing the lids to the jars & prevents recontamination by destroying the mold, yeast, and enzymes that cause the spoilage.
DO YOU HAVE TO USE A WATER BATH WHEN CANNING
When canning foods, as home food preservationists, we have the two choices, water bath canning & pressure canning. So how do you know which method is best to use? It all lays in the type of food your are preserving & the pH level of the foods being preserved.
Many recipes call for the addition of vinegar, lemon juice, or citric acid to increase the pH level(s) of the foods being preserved, making them safe to process in the water bath canner.
If you are new to canning, I highly recommend you not only grab your own copy of our FREE “Beginners Guide To Canning” (look to your right 🙂 ), but also invest in the Ball Book Of Canning & Preserving. This resource will provide all the safe canning recipes you will need to begin your canning journey.
CANNING HIGH-ACID FOODS
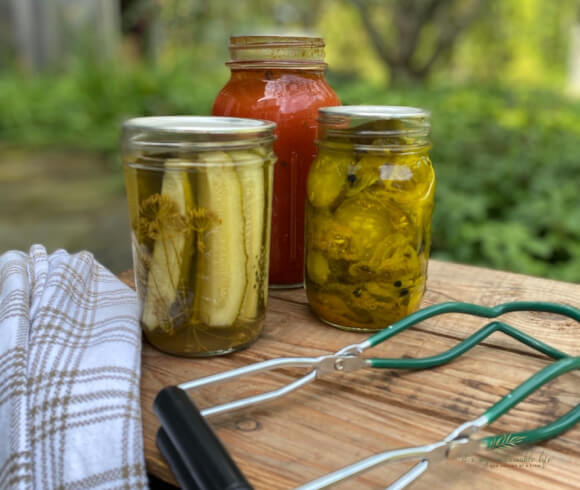
High acid foods can safely be processed using the water bath canning method, using safe, tried & true recipes. These acidic foods consist of the following (according to Ball’s Fresh Preserving):
- Fruit, fruit juices, jams, & jelly
- Salsas *always follow recipe’s directions for processing guidelines
- Tomatoes
- Pickles & relishes
- Pie filling, chutney’s, sauces
- Vinegars
- Condiments
Water bath canning is the easiest way to preserve these foods, making them shelf stable for long periods of time.
CANNING LOW-ACID FOODS
There are instances with some foods that water bath canning is not enough. Water bath canning cannot replace pressure canning with some low-acid foods. Pressure canning has the ability to heat foods at high enough temperatures (240/250 F or higher) to make these low-acid foods shelf stable. These high temperatures kill the spores that produce the botulism toxin.
These foods include…
- Meats
- Poultry
- Salsas *always follow recipes directions for processing guidelines
- Vegetables
- Chili
- Seafood
Learning the differences between low acidic foods and high acidic foods is probably the most important lesson any home canner needs to learn, so choosing the right process to use is most important. After all, it makes all the difference between safe canning and risky.
HOW DO YOU CAN PICKLES IN A WATER BATH CANNER
This may be the number one question we receive when it comes to safe canning. As shown above, pickles and relishes are both high in acid type foods and can be safely processed using a water bath canner. Simply follow the safe water bath canning steps below, use the appropriate processing time listed in your recipe such as our recipe for dill pickles & rest assured you can enjoy the labors of your efforts for months to come!
WHAT’S NEEDED TO START CANNING
Really no special equipment is needed when you water bath can. You may have all you need right in your kitchen cupboards as we speak. However, that being said, there are a few tools of the trade that will make your life so much easier as well as a few must have’s to begin. Take a peek at our “Gifts For Canners” list for a few fun idea’s as well 🙂
NOTE: When choosing the right equipment to use or purchase, take your stove into consideration. Those will glass top stoves will want to confirm that your stove has been rated by the manufacturer for canning. If it is not, you will want to seek alternative sources for stand alone burners like the one below.
Let’s start with what will make your life easiest first.
WATER BATH CANNERS
Obviously, you will need a very large stockpot for water bath canning if you are canning more than 5-8 jars at a time. You can get away with using what you have on hand, however, when water bath canning small batches! When first beginning, give this process a try using what you have on hand, see if it’s something you would like to continue, and then consider investing in larger equipment.
This canning kit is the creme de la creme of canning kits. We love our stainless steel options as they last. Traditional enameled water bath canning pots rust, rendering them unusable within just a few years time. Stainless is our best option and the one we highly recommend in investing in if you are planning to continue home processing.
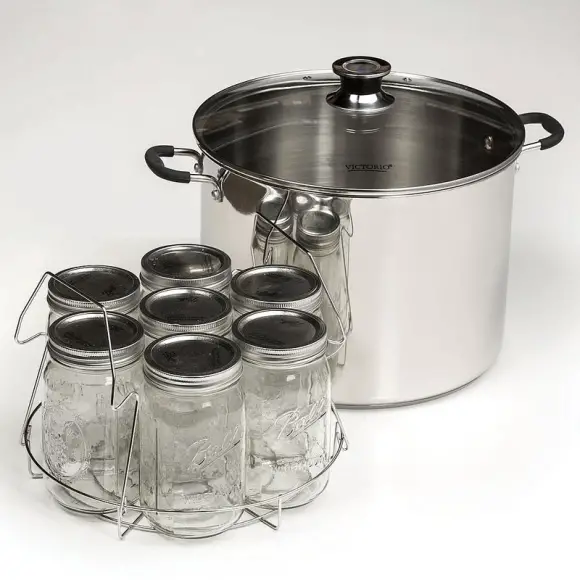
This water bath canner from Lehman’s Hardware, a favorite source for high quality canning equipment and supplies, has a 20 qt capacity and will hold 7 quart sized jar (8 pints) at a time.
When a larger water bath canner is needed, if like us you have to process in batches (taking much longer to do), this Amish water bath canner should be on your wish list. It’s on ours 🙂

According to Lehman’s Hardware, these made in the USA canners will hold up to 15 qt jars or 18 pints with the option of increasing its capacity to 36 pint jars with an additional shelf, and when used as a stockpot will hold a whopping 50 qts! Now that’s my kind of canner 🙂
“Our stainless steel stovetop water bath canners are handcrafted locally by the Amish and built with large gardens in mind. They are the largest, most durable stainless water bath canners we’ve found. Perfect for peaches, tomatoes, pears, pickles and more.”
Lehman’s
A word of caution from Lehman’s however with this option. “Note: Cannot be used on induction burners. Always follow USDA recommendations when canning.“
For an economy water bath canner, enamel or granite ware is the most popular choice. A reminder, these types of canning pots don’t last forever, but will get you through a few years for sure. We still use these in addition to our stainless steel options.
The above shown enamel pot comes in varying sizes including 4 qt, 6 qt, 7.75 qt, 12 qt, and 16 qt. Larger pots are also available with different options. No matter which you choose, you will need to purchase a rack to hold the jars off direct contact with the bottom of the pot or plan on using a cooling rack to do so.
WATER BATH CANNING TOOL KIT
Although you can water bath can with just a large stock pot and mason jars along with lids and caps, & a few kitchen utensils, there are a few optional canning tools that make the work much easier. Other kitchen items you will need for processing time are kitchen utensils (knives, spoons, ladle), kitchen timer, & fresh kitchen towels either purchase or made yourself 🙂
In addition to the stock pot and jars/lids/bands, these canning tools make all the difference.
The most economical way to initially purchase these canning tools is in a convenient canning tool kit as shown below. Just about everything you need in one fell swoop!
Obviously, when canning any product you will need jars (re-useable), lids (one time use) and bands/rims (re-useable only as long as they remain un-rusted, dented, or damaged). There are a few options, but here in the states the most popular and readily available is made by Ball. You can get as fancy or not with your jar choices, some more appropriate for use when you are planning to give as gifts as they can tend to get pricey.
CANNING MANAGEMENT PLANNER PRINTABLES
An optional addition to any canning kitchen is utilizing some sort of organizational tracking tool. We’ve created just that! Our Canning Management Planner consisting of 15 printable pages that have been beautifully crafted will assist you in planning, tracking, journaling, and labeling all your canning efforts in one easy to create binder.
And did I mention how cute these are? To grab your copy or order as a gift, visit our Etsy Shop today!
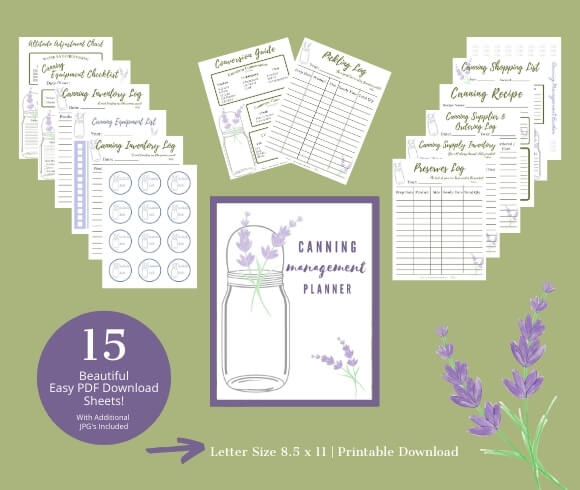
Tracking all my preserving each year allows me to know what I have on hand at any given moment, especially at the end of the year. Knowing what we’ve eaten and used allows for future planning of what we would need to preserve the following year as well.
CANNING CHECKLIST CHEATSHEET
Another tool I’ve created with the beginner canner in mind (I admit, I still utilize this cheatsheet as well 😊) is a canning checklist cheatsheet.
To help you along with your processing efforts, I’ve created a unique FREE Canning Checklist cheatsheet listing all three methods of processing; pressure canning (article coming soon as well!), steam canning (instructional tutorial coming soon!), and water bath canning.
Print and laminate your copy of the Canning Checklist cheatsheet to use over and over again when processing! Simply use a washable marker to check off the list as you go! Once complete, wash the laminated list and you are ready for the next time you process!
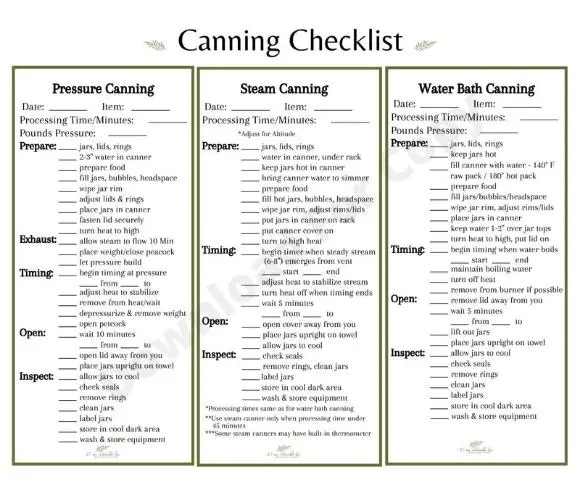
Be sure to grab your FREE copy by clicking the button below 😊
Although it does take a bit of cash upfront to get set up, the beauty is once you’ve purchased what you need, most is re-useable year-to-year.
STEPS REQUIRED IN WATER CANNING PROCESS
So you have gathered all you need, including your foods you will be processing and are ready to can! These following steps are for water bath canning on a stovetop.
PREPARING THE RECIPE
FOOD PREPARATION – Prepare the recipe for safe canning practices that you will be using, utilizing a tried & true recipe, that means the recipe has been tested and is safe. As much as we love Grandma’s recipe, often they cannot be adjusted to safe canning procedures. Keep the food hot and ready to jar once prepared.
As you prepare your food, place a large stock pot (large enough that you can cover the jars you will be using by 1-2 inches of water), place the canning rack on the bottom of the pan (use a cooling rack or even lids tied together will work in a pinch), & fill half-way with water. Pre-heat the water to 180 F.
CLEANING SUPPLIES & EQUIPMENT
CLEANING EQUIPMENT – Wash your jars, new lids (never re-use), and rims/bands in hot soapy water and dry. Check for knicks, cracks, rust, dents, or any other damage on the jars, lids & rimbs than can disrupt proper & safe processing.
Lids should have even, seamless sealing compound on the underside of the lid without any scratches etc.
Although the bands/rims are reuseable, they don’t last forever. Any rust, scratches & dents causing them to not fit the jars easily may cause issues with proper sealing. Time to re-purpose them when they reach that state.
STERILIZATION – Place washed jars (empty here) into the canner, right side up. Bring the water back to a simmer, 180 F, and simmer for at least 10 minutes. This helps to sterilize the jars, but also heats the jars to the appropriate temperature for filling, reducing the likelihood of breakage during the “hot pack” process (filling the hot jars with hot product). Keep the jars in the hot water until directed below.
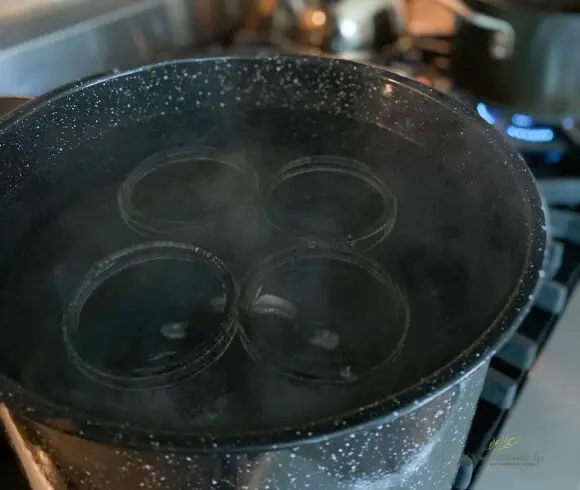
NOTE: Some utilize the dishwasher for sterilizing and heating the jars. We have found a higher rate of breakage using this method and is not one we recommend.
CREATE A FILLING STATION
ORGANIZING – Set up your “filling station” 🙂 Place an old towel, one you won’t care that it gets soiled, & it will 🙂 , beside the cooked food you will be filling the jars with.
On this towel, I place my washed rims, bubble remover, jar lifter, and funnel, along with any other required ingredients (citric acid, lemon juice, and/or salt) required for the recipe, any kitchen tools you will need, and a very clean cloth for wiping the jar rims.
PREPARING THE LIDS
LID PREPARATION – In a small saucepan, place your new, washed lids shiny side up for easy removal, and cover with water. Bring the water to a very low simmer, then reduce the heat to low to keep warm. Place your magnetic wand on top of one of the lids, ready to go.
NOTE: Many are now foregoing this step as the Ball company determined it was not necessary. However, this is what I’ve always done, it doesn’t hurt the lids in any way, and now many are experiencing jars unsealing at a later date. Coincidence? Not sure, but I recommend you don’t skip this step as we have not (knock on wood) experienced any un-sealing of jars stored.
FILLING THE JARS
FILLING JARS – Working quickly, remove 2 hot jars from your water bath canner and place on the filling station towel. Place the funnel on top of one jar. Add any further ingredients (salt or acid) as determined from your recipe to the jar with the funnel.
Our goal is to keep the rim of the jar as clean as possible during this process. Using a ladle, fill the jar with your product, leaving at minimum 1/4 inch headspace ( the space at the top of the jar between the product and the top of the jar rim). Your recipe will state the amount of headspace needed for safe canning.
Remove the funnel and place on the second jar at your filling station.
Remove any air bubbles within the product by gently running the bubble remover tool around the outer edges of the product. Check your rim for any water, food, or other particles that may interfere with proper sealing. If need be, using your very clean towel, wipe the rim of the jar to prepare it for the lid.
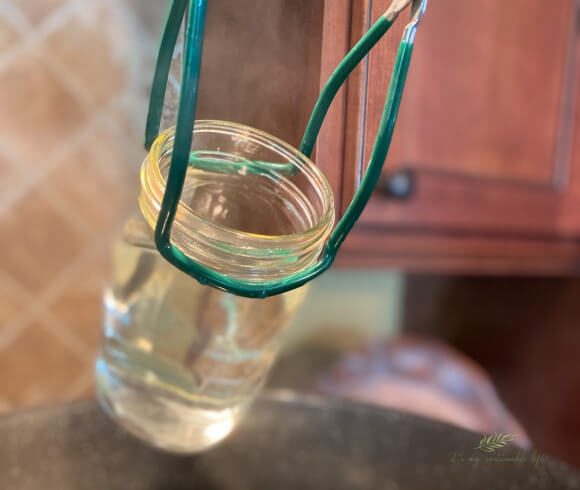
Remove a lid, using the magnetic wand, without touching it, and lay it on top of the jar. Using a rim to hold the lid down, remove the magnetic wand and place on a new lid in the saucepan, ready for use. Screw on a rim/band only finger-tight. Do not over tighten! You want them tight enough to hold your product in, but loose enough to allow air to escape during the water bath canning process. A complete demonstration of how to properly place your two part lids is shown below.
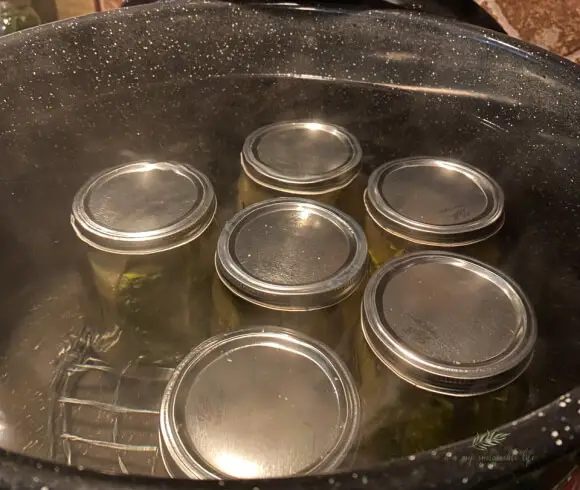
Place the filled jar into the water bath canner and remove another hot jar behind the jar with the funnel on it on your filling station, creating an assembly line if you will 🙂 Repeat filling process until all jars are filled and you are ready to begin processing.
HOW LONG SHOULD YOU WATER BATH CAN
PROCESSING – Once your filled jars are in the water bath canner, leaving small space in between all jars, you should have between 1-2 inches of water covering the jars. Adjust the water level up or down if needed to reach this level. Cover the canner, turn the heat up to bring the water to a rolling boil. Begin the processing time determined in your recipe once the water is at a full boil.
Once your processing time is complete, turn off the heat, uncover the canner, and leave the jars in the canner for 5 minutes. Remove the jars, using your jar lifter, and place upright on a thick towel or cooling rack on a counter or surface that cannot be damaged by moisture or heat. Do not tighten rims or bands!! Tightening the loosened bands can create a “false” seal. Let them be 🙂
NOTE: Speaking from experience here. I once processed so much in one day that I had to place the hot, processed jars on my island. As many of you know, my island top is one we made using trees we fell while building. Although these hot jars were on a thick beach towel, the heat and moisture from the jars left unwanted rings on my wood. Not a happy camper here for sure!
DETERMINE IF JARS SEALED PROPERLY
SEAL – Pretty quickly you will begin to hear the “ping” sound of the tops sealing. I call this the sound of safety 🙂 Leave the jars to cool completely before testing for proper seals. This can take between 12-24 hours, so patience is a virtue here.
TESTING SEALS
TEST SEAL – Once the jars have completely cooled, test for proper sealing. Run your finger GENTLY, do not push the lid down, across the top of the lid. There should be no give, flex, or “bubble” in the center of the lid. Remove the band and try lifting the jar using the edges of the lid only. The lid should remain sealed to the jar.
STORING SEALED JARS
STORING PROCESSED JARS – Once you have tested your jars and determined they are properly sealed, write the date/year and product name on top of the lid, remove the bands (for re-use!), wipe the outer portion of the jar to remove and residue left from the canning process, and place the sealed jars in a cool, dark area (we have pantry shelves set up in our basement). These sealed jars will keep for up to 18 months, but realize that the quality and/or taste may lessen the longer they sit.
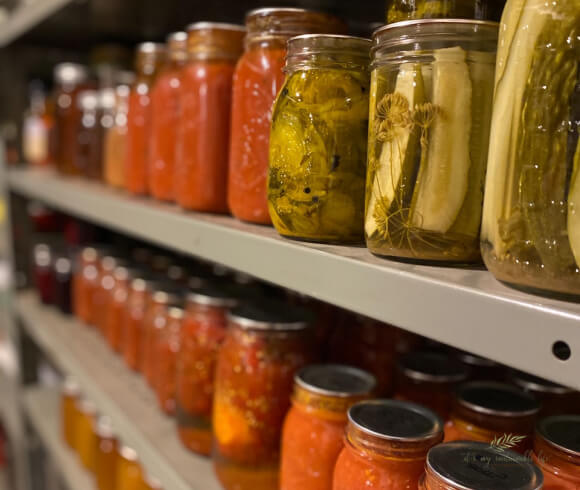
The above is the beauty of canning your own fresh goods! How rewarding to see the vibrant colors & fruit(s) of your labor stored neatly on the shelves! Even better? Cracking open those preserved jars & enjoying the flavor of summer 🙂
TIPS FOR WATER BATH CANNING
If you follow safe water bath canning procedures, problems and issues rarely present themselves. However, there is always the possibility for issues to arise. Hopefully these tips can help your traverse any issues you may encounter.
UNSEALED JARS
If after waiting the 24 hour wait period jar(s) have not sealed fully don’t be concerned! All is not lost! You have several options here.
- REFRIGERATE – If you feel like the product is something you can use right away, refrigerate the jar and use!
- RE-PROCESS – Should you not want the product right away, check the lid and jar for any issues (food, nicks, scars on the sealing compound), make sure you have the appropriate headspace, and re-process the jar(s) within a 24 hour period following all the guidelines above and in the recipe.
- FREEZE – The amount of the product within the jar can be reduced leaving 1.5 to 2 inches headspace, sealed, labeled and placed in your freezer.
TROUBLESHOOTING UNSEALED JARS
There are a few reasons why your jars may not have sealed correctly. Check the following if you have this issue.
- Use of jars other than official canning jars and/or lids.
- Chipped or uneven rim on jar.
- Screw bands are rusty or bent, causing poor contact.
- Bands not screwed down tightly enough before processing. (Turn until you meet resistance, then turn it one-quarter turn.)
- Rim on jar not clean. (Wipe rim well before putting lid on.)
- Liquid leaks out of jar during processing, leaving food particles on the sealing edge.
- Insufficient heat during processing – air not removed from jar so a vacuum seal never forms. (Remove air by inserting a rubber spatula or plastic knife inside the jar gently lift food to remove any trapped air.)
- Lids were improperly prepared before placing them on rims. (Follow manufacturer’s directions to prepare lids.)
- Rapid, forced cooling of a pressure canner can cause a rapid pressure and temperature change inside the canner, causing the liquid to “boil” out of the jars, leaving particles on the sealing rim and unsealing the jars. (Canners should not be forced into cooling rapidly by submerging them in water.)
- Insufficient processing of raw-packed food; the air may not have been completely driven out of the food, leaving residual air in the jar so the seal does not form.
- Use of canning procedures which are not recommended, such as open-kettle canning and oven canning.
- Incorrect amount of headspace.
PROPER ALTITUDE
Typically, most canning recipe processing times are listed for those above sea level of 1000 Ft. Don’t know your sea level? Check HERE to find out yours. Should you live within a different sea level higher than 1000 Ft, follow the chart below and adjust your processing times accordingly.
- Up to 1000 ft – follow the recipe guidelines
- 1000 ft to 3000 ft – increase the processing time by 5 minutes
- 3001 ft to 6000 ft – increase the processing time by 10 minutes
- 6001 ft to 8000 ft – increase the processing time by 15 minutes
- 8001 ft to 10,000 ft – increase the processing time by 20 minutes
HEADSPACE MATTERS
Although it may be easy to just want to add a bit more to use the last of your product up when filling the last jar, don’t do it! Proper headspace matters for the jars to seal properly. Stick with the guidelines within the recipe to ensure a proper seal!
SPOILAGE
Providing you have followed the guidelines listed above for safe canning procedures, spoilage within the jars is rare. However, that being said, any time I open a jar of our home processed food(s) I look for the following:
- BROKEN SEAL – Should the seal is broken the product will not be safe to eat
- BUBBLES – I’m not talking a few air bubbles left during the processing here. I’m speaking of bubbles as though the product is fermenting or when the product spurts out of the jar when opened. This has never been an issue in the 16+ years of my canning experience. However, you never know 🙂
- MOLD – Pretty obvious spoilage has occured if there is mold on the product within the jar
- SMELL – I always smell my product before using once opened. Again, it will be a distinct unpleasant odor should this occur
SAFE WATER BATH CANNING RESOURCES
Any new endeavor can seem overwhelming. Between the resources here at IMSL for canning and the following should answer all your canning questions. Always feel free to reach out to me should have any further ones!
USDA National Center For Home Food Preservation
The All New Blue Ball Book Of Canning
Storing Home Canned Foods NCFHFP
It may seem like a lot of information here to get you started water bath canning. Take it a step at a time, follow each step to the letter, and you can rest assured your product will be safe & delicious to enjoy.
Have questions, need help troubleshooting, or just want to share your successes and/or failures? Join our conversation below!
Love, Light, & Laughter ~

33 comments
Excellent articles on both salsa recipe and canning for beginners. My only question is: On you salsa recipe, and wanting to water bath can , how long do I boil the jars after filling them
Hi Glenda~
I utilize safe canning practices by both the NCFHFP & Ball canning. It’s recommended that salsa be processed via water bath canning for 15 minutes (adjusting for altitude). Once completed, I shut the canner off and let the jars rest for 5 min prior to removing them from the canner to cool completely.
Hope that helps!
Goals! This would be a great first step for canning.
I learned to can many years ago and this was my method. I did some pressure canning but not a ton and then I stopped as motherhood took over.
I was just thinking of the difference between canning applesauce in a water bath vs pressure canner. I’ve always used my pressure canner but I’m going to compare processing times with the water bath this time around.
Anyway…always learning.
Thanks for sharing at the Homestead Blog Hop!
Laurie
This is such a thorough and helpful guide – thank you! I think a lot more people are getting into gardening and this is a useful next step to that.
Very detailed post! I’m slowly learning how to do some of my own canning!
This is a great explanation of water-bath canning. I did it some a few years ago, but it’s been a while. I feel like I want to get back into it. Thanks for the inspiration
I love seeing the picture of all your canned goods lined up. So pretty and impressive. My grandmother and step mother can everything. I wish I lived closer so I could join them when they can. It’s such a great way to limit your exposure to harmful chemicals.
Great instruction! Very thoroughly explained!
I love the idea of taking control over the food we eat. And yes, eating organic gets very expensive. I have it as a goal to start canning once we get space for the jars.
Wow, that’s a lot of information. I don’t can due lack of space or time. My sister-in-law does and I always enjoy her canned items.
Great information. I am very new to canning. So far I have only done pickled peppers but intend to get more into it when we get established in Colorado. Will definitely be using you as a resource.
Learning so much about canning!
What a terrific tutorial! I haven’t canned anything in years, but I always enjoyed it.
What an awesome guide! very through post!
Thank for all of this great information! Love the beginner guide, great for me who is just starting out.
I love the idea of knowing exactly whats in you food, I have started a bit of canning myself. Thanks for all the information, its been really helpful!
You have some great tips in your posts. My mom was always good about canning, she did the water canning also. So, now I do it, too! I echo the other comments- We want to see an ebook!
This is a goldmine of canning info! I never knew what you had to pressure or bath. My garden is long gone now, but this will be great for next season or grocery store items that are still in season!
Have always wanted to learn about canning. Your post explains the process so well. Thank you, for sharing!
I had no idea that all stoves were not canning friendly- Thanks for pointing this out!!!
A great resource for newbies like me!
What a wonderfully thorough post! Water bath canning will be something for next year when I have a better harvest. I’m so excited to try this and will pin your post for when the time comes!
This sounds like it’s so much healthier and cost efficient. Thank you for this guide I’d love to attempt this.
I remember my mom canning this way!
Fantastic guide for canning! Thank you so much! I agree with Beth this is a great and you should do a book with all your knowledge!
Thank you Holly! There may just be!
Great tips! I have been wanting to learn how to can, and will especially want to when we start our garden in a couple years. I’ll be saving this post for later!
I enjoyed reading your article so much with its many practical tips. I have done some canning but it was a while ago when I had a prolific garden. I can imagine that a glass-topped stove might not get hot enough for water-bath canning, which is partly why I enjoy those burners for lower-heat cooking. When I taught chemistry, I always included a lesson or two on the relative acidity of foods and I’m so happy you mentioned pH here!!
What a great resource! I enjoyed doing a little canning this summer and used this method!
Hi Suzan – do you have any books about canning that you have authored? Or collaborated in? Thinking about Christmas….thanks. Pinned this. Your post is great and I am forwarding that now. Thanks,
I am working on a series of eBooks, but unfortunately, will not be ready for the Holiday season this year. Hopefully you’ve grabbed your FREE copy of canning for beginners already! It does give a quick guide to water bath canning. Thank you for reading and thinking of IMSL for your Holiday book giving. I do, however, have products available for purchase if you are interested 🙂