

What is the one pie that our family chooses to make every holiday season? Cherry cheese pie. This cherry pie recipe is one that has been converted from a childhood favorite (originally made with dream whip) to one that suits our wholefood organic way of eating. But what makes it so special?
This post may contain affiliate links at no additional cost to you. By making your purchases through the links on this website, IMSL may make a small percentage at no direct cost to you. IMSL only promotes products we use & truly believe in. Please refer to my Privacy & Disclosures for further information. IMSL thanks you for your support!
Growing up in the ’60s, we ate a LOT of easy, “convenient” foods. You may have heard of them…spam, deviled ham, anything, and everything canned. Even white bread that’s basically air with no nutrient value 🙂 . You get the picture…certainly not the nutritious diet we strive for today.
Fast forward a few decades and our dietary goals have changed drastically. Here at IMSL we strive to eat whole foods, foods that are in their most natural state and are sourced as locally as possible if not from here on our homestead.
This pie is the absolute favorite pie to make here on the hill. The original recipe called for using Dream Whip. Dream Whip is made up of the following ingredients according to heb.com;
Sugar, Dextrose, Partially Hydrogenated Vegetable Oil (Coconut and Palm Kernel Oils), Modified Cornstarch, Propylene Glycol Monostearate (Emulsifier), Sodium Caseinate (from Milk), Contains Less than 2% of Cellulose Gel, Cellulose Gum, Hydroxypropyl Methylcellulose, Natural and Artificial Flavor, Acetylated Monoglycerides and Mono- and Diglycerides (Emulsifiers), Sodium Silicoaluminate (Anticaking Agent), Yellow 5, Yellow 6.
HEB
No offense to Dream Whip, but with our dietary goals firmly in place, making cherry cheese pie using dream whip just didn’t cut it. Always trying to adjust recipes to suit our needs, with a few tweaks and adjustments, this pie is as good if not better than the original…just sayin’ 🙂 .
CHERRY CHEESE PIE
Making this pie is quick, easy, and guaranteed to be one your family will love. We have provided a printable recipe card for your convenience below, but you are encouraged to read through as there are a few tips along the way 🙂 .
IT’S ALL IN THE CRUST
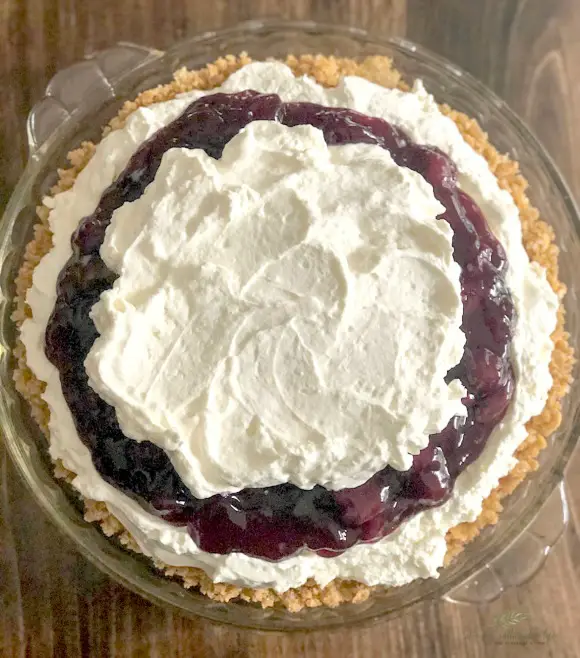
Most versions of cherry cheese pie utilize a graham cracker crust (not our favorite) or a blind-baked pie crust (tutorial on how to make the perfect pie crust from scratch coming soon). This recipe uses an organic corn flake crust that takes this pie over the top in flavor and texture!
HOW TO MAKE CORN FLAKE CRUST
To make the corn flake crust simply take the following;
- 1 C Organic Corn Flakes – My favorite brand can be found HERE. Place into either a plastic baggy and crush using a rolling pin or into a food processor and pulse until bread crumb sized. Place crumbs into a bowl.
- Add 2 Tbl Sugar – Our organic brand can be found HERE. Add to corn flakes.
- Melt 1/3 C Butter – Our organic brand can be found HERE. Mix into corn flake and sugar mixture well.
- Press the mixture into a 9-inch pie plate. Using the back of a spoon press down evenly, into corner crease and up the side of the pie plate.
- There are two schools of thought for the crust…either bake or not. Baking is not a necessary step. Depending on the texture of the crust you wish to have. Baking as per the directions below will result in a firmer, more crunchy crust that will remain crunchy. Not baking the crust will result in a semi-firm crust that we find does not remain crunchy as long under the cream cheese filling. If a no-bake crust is preferred, chill the crust at least 30 minutes to 1 hour prior to placing the mixtures into it.
- Place into a 350 F oven and bake for 12 minutes. Remove and cool.
HOW TO MAKE WHIPPED CREAM
In lieu of the dream whip, I make homemade from scratch whole whipping cream. Easy to do, just take the following and complete the following;
- 16 oz container (approximately 1 1/2 C) of heavy whipping cream of your choice, put it in a mixer (not blender as it will not incorporate the air needed), either a hand held unit or a stand mixer using the whisk attachment.
- Add 1 tsp of vanilla extract (my favorite brand can be found HERE or learn to make your own with an upcoming tutorial).
- Have ready 1/2 C of powdered sugar, organic powdered sugar can now be found readily at most markets.
- On medium-high speed begin mixing the heavy whipping cream and vanilla until soft peaks are formed.
- Slowly add the powdered sugar and turn the mixer to high speed and whisk until stiff peaks are formed.
- Remove the whipped cream and place it into the refrigerated to keep chilled.
PRO TIP: Chill the heavy whipping cream AND the bowl being used to whip it in prior to whipping the cream. The colder the better (the bowl and whisking utensils are placed in the freezer for about 15 minutes prior to whipping) to create a wonderful whipped cream.
HOW TO MAKE THE CREAM CHEESE FILLING
To make the cream cheese filling, simply take the bowl of the mixer you used to make the whipped cream, and add 8 ounces of softened cream cheese. Whip or whisk the cream cheese until light and fluffy. Carefully fold the whipped cream into the cream cheese mixture. Be sure not to over mix as the texture should remain fairly light and fluffy.
PUTTING THE CHERRY CHEESE PIE TOGETHER
Putting it all together is a simple task. Place the cream cheese/whipping cream mixture into the cooled corn flake pie crust. How much depends on how you want to present your pie, either with only cherries on top or a bit of the cream cheese mixture on top by keeping about 1.5 C of the cream cheese mixture aside.
Spread the cream cheese mixture as you did the pie crust. It’s sometimes helpful to create a bit of a valley to hold the cherry pie filling.
As no cherries were available on our tree this year (the wildlife are having a feast) it has not been possible to make our own cherry pie filling. Hopefully, this year will be the charm and we will have a good crop…let you know when we do! Thus, a can of 21 oz organic cherry pie filling is used for this pie and can be found readily at most markets. Simply add the cherry pie filling on top of the cream cheese.

Chill this pie well prior to cutting and enjoying. It’s difficult, speaking from experience, but it can be done 🙂 .
That’s it! Our version of cherry cheese pie that is to die for and one that is traditionally made every year here on the hill for the holidays. This may be one of the easiest pies to make and one of the most favorite ones to devour. Do you make cherry cheese pie? Love to hear about it by joining the conversation below!
Love, Light, & Laughter ~


Ingredients
- 1 Corn Flake Pie Crust
- 8 ounces softened Cream Cheese
- 1.5 C Whipped Cream
- 1/2 C Powdered Sugar
- 1 tsp Vanilla
- 1 Can Cherry Pie Filling (21 oz)
Instructions
- Make whipped cream by adding 1.5 C heavy whipping cream and 1 tsp vanilla to the mixer. Beat until the mix has reached soft peaks. Set aside.
- Whisk 8 oz softened cream cheese until light and fluffy.
- Fold cream cheese and whipped cream together.
- Pour into the pie crust of your choice. Spread mixture evenly over crust.
- Pour cherry pie filling on top.
- Chill 30 minutes to 1 hour prior to serving.
This recipe was shared on the Homestead Blog Hop, Family Homesteading & Off Grid Blog Hop, and Farm Fresh Tuesdays AND featured at Simple Homestead Blog Hop, & Thursday Favorite Things!
11 comments
This looks delicious. And I love that you adjusted to use whipped cream instead of Dream Whip or whatever. And a cornflake crust – haven’t had one in years but will soon. Have pinned this recipe. Thanks.
Thank you for sharing at #OverTheMoon. Pinned and shared. Have a lovely week. I hope to see you at next week’s party too! Happy Holiday!
Yum, I love that you updated a recipe from the past into a healthier one. How does the whipping cream hold up? How long can you keep it?
Pinned!
Merry Christmas,
Kippi
The whipping cream worked beautifully and held up a rich & creamy filling. It will keep in the refrigerator covered for up to a week…I think. It’s never lasted that long in our house 🙂
Congratulations! Your post was my feature pick at #ThursdayFavoriteThings this week. Visit me at https://www.marilynstreats.com on thursday morning to see your feature! All hosts choose their own features from the comments left on their blog so be sure to return to my blog to see your feature. I invite you to leave more links to be shared and commented upon. Please don’t forget to add your link numbers or post title so we can be sure to visit!
Thank you so much for the feature, Marilyn!
Thank you for sharing at #ThursdayFavoriteThings. Pinned and shared. Have a lovely week. I hope to see you at next week’s party too! Happy Holiday!
Yummm! Your cherry cheese pie looks divine!
This pie looks amazing, Suzan! Pinning!
Thanks so much, Lisa! It’s all that and more 🙂
My mom started a new diet last week and just gave me several cans of pie filling. This looks like the perfect way to use a couple of them. Thank you for sharing to the Homestead Blog Hop.