
")
Learning how to make homemade butter {and buttermilk} may be easier than you think. With just a few kitchen staples, no special kitchen equipment needed, follow these simple steps to enjoy your own fresh homemade butter & buttermilk!
This post may contain affiliate links at no additional cost to you. By making your purchases through the links on this website, IMSL may make a small percentage at no direct cost to you. IMSL only promotes products we use & truly believe in. Please refer to my Privacy & Disclosures for further information. IMSL thanks you for your support!
Love butter? I know I do! Everything is better with butter after all 😊. You know, here on the hill, we love eating whole foods. Foods with as little processing as possible. In moderation. And butter is definitely one of those foods.
So when I’m cursed, I mean blessed, to have excess fresh organic raw milk which needs using up, I make butter.

Kudos should you have access to milk from your own farm! No matter if it’s cow, sheep, goats, buffalo, you are fortunate (& I’m a bit jealous).
Don’t worry if you don’t have access to organic raw milk, you can certainly used purchased organic heavy cream instead!
BENEFITS OF MAKING HOMEMADE BUTTER
I know, I hear y’all loud and clear. With everything we have to do in a day you may be asking, “why add another chore to my growing list”? Why make your own butter or buttermilk when I can just go to the store and pick up a pound? Oh, let me count the reasons why I choose to make mine.
BRINGING IT HOME
What do I mean by “bringing it home”. If I’ve learned nothing in the last year and a half, is that we need to create our own food security. Have we already forgotten the great toilet paper shortage and empty grocery shelves already? I hope not!
By learning how to make our own food(s), butter included, brings with it a sense of accomplishment, of pride. Learning to make your own, whether it be butter, bread, jams, or even homemade marshmallows, brings with it a sense of ease knowing that you can make your own if you need!
By bringing it home as far as butter goes, sourcing locally produced organic raw milk (2 miles from home 😊) reduces our overall carbon footprint. It’s estimated the true cost of miles traveled from farm to plate average 1,500 miles!
This huge cost to our planet, in fossil fuels, in carbon dioxide emissions, and even in loss of nutrients just can no longer be supported. At least here on the hill.
CONTROL OVER INGREDIENTS
If you are anything like myself, you know your food is only as good as the ingredients used in the making. And that includes homemade butter.
By making butter yourself, you have the control. Control to use only the finest ingredients, hopefully organic, that your budget allows. Who wouldn’t want to avoid ingesting pesticides, hormones, or food colorings that many commercial butters contain?
Sharing Is Caring!

And speaking of ingredients, control over salt. Conventional butter on average contains 1/3 tsp of salt per stick of butter. By making your own, you take control over the amount of salt that suits your taste buds or for those bakers out there, leaving it out completely.
Having access to a local organic producer (for me I choose raw) is just healthier. Especially when grass-fed. According to Mother Earth News, homemade butter made from the cream of grass-fed cows offers more essential fatty acids (the healthy fats), more vitamins (A & E), and more beta carotene (anti-oxidants anyone?) than conventional butter.
TASTE
Although a personal choice, I believe homemade butter just tastes better! Though some will not be able to distinguish the differences between homemade or store-bought, I prefer homemade.
There is just something about spreading this golden, rich, salted to perfection condiment on many of my homemade bakes that just satisfies. Maybe it’s knowing I’m amongst the masses who’ve made butter for the last 4,500 plus year’s. Or maybe it’s just that amazing flavor.
BAKERS & PASTRY MAKERS DELIGHT
Homemade butter produces simply amazing pastries, pie crusts (recipe coming soon!) and baked items.
Why? Because homemade butter has less uniform texture than that of conventional due to its higher fat concentration.
Like every pastry chef knows, the more fat layers in the pastry, the flakier the product.
BUTTERMILK
The watery by-product, very similar to whey but much higher in protein, you get from making your own butter is pure buttermilk. It may not look like the over-processed stuff you purchase at your local market. But it sure is heaven.
Containing slivers of fat that shines & mixes in with a pale yellow liquid, is nothing but pure gold for any recipe that calls for it.

Your buttermilk will make a great addition to homemade biscuits, pancakes, and even as a batter for fried vegetables. So no matter what you do, save this golden treat!
KITCHEN HINT – Don’t want to use your buttermilk anytime soon? Freeze it for future bakes or uses!
IT’S FUN!
Making your own butter is just fun to do! Should you have littles, consider making it in a jar (how-to below), pass it around, and see the delicious, edible transformation!
Or for the older ones, make it a science project, getting into the nitty-gritty deets on why & how the cream is transformed!
Once completed, make some popcorn & enjoy your work 😊
As with anything in life, we get the bad with the good. The only drawbacks I can think of for making your own butter is fat and shelf-life.
Homemade butter is high in butterfat. So eat in moderation. Quite honestly, it’s so rich, I do this naturally anyway!
Homemade butter has a shorter shelf-life than that of conventional. Typically, your homemade butter will last at a minimum 5-7 days but often I’ve had mine last upwards of 2-4 weeks when refrigerated if all the buttermilk is removed. Should you not remove that buttermilk fully, plan on it turning rancid much faster.
That being said, once again, homemade butter freezes well and can last 4 months or longer when stored properly.
CAN YOU MAKE BUTTER FROM MILK
Well, kind of. How’s that for an answer 😂. It’s actually the cream from the milk that we will be using to make our homemade butter.
Farm fresh milk is best, and in my opinion raw is even better. Store-bought milk is typically processed (often with high-chemical treatments) and has very little fat. If the milk doesn’t contain fats, you won’t be successful in making butter, well good quality and quantity of butter anyway.
If you cannot get your hands on farm fresh milk, whole fat milk, purchase milk with the highest fat content you can, and as always, you got it, keep it organic if the budget allows. Or just start off with a purchase organic heavy cream.
HOW TO MAKE HOMEMADE BUTTER
Follow these simple steps and you’ll be enjoying homemade butter on your toast in minutes!
COLLECTING THE CREAM FOR MAKING HOMEMADE BUTTER
Depending on which cream you will be using for making your butter, you may need to actually gather the cream. When using raw organic milk such as I am, this is an easy task!
Cream will naturally float to the top of any jar. As you can see by the cream/milk line in the image below.
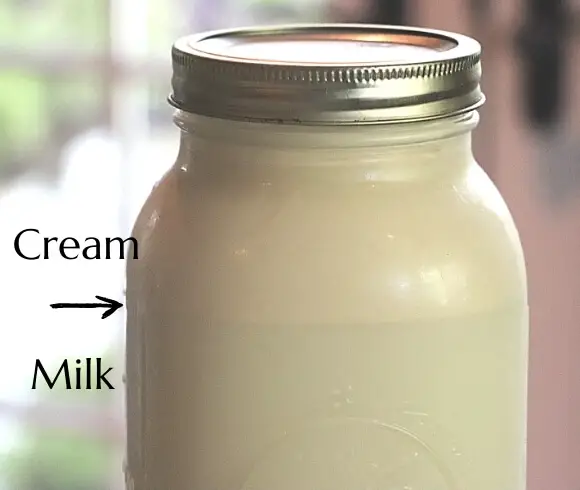
Simply skim off the cream from the top. Don’t have enough available right now? Start saving it! Skim some off (I always leave a bit for shaking into the milk as well) the top with each jar, place the cream into another air-tight container, and store in your refrigerator until you have enough to make your butter.
PROCESSING THE CREAM FOR MAKING HOMEMADE BUTTER
To process the cream and see the magic happen you have some options. It can be made using a good ole arm workout by using a mason jar {instructions below & great fun for kids}, or avoid that workout like the plague {I may be speaking from experience here} and use a blender, food processor or mixer, or hand held mixer. All will work just fine.
MAKING HOMEMADE BUTTER
To make your homemade butter is a simple process. A printable recipe card is available below for your convenience! I have used my Vitamix blender to make my butter and the following instructions reflect this.

STEP 1 – Pour 2 Cups of cold cream {or any amount you have on hand for that matter} into your processor of choice. Mason jar instructions are listed below.
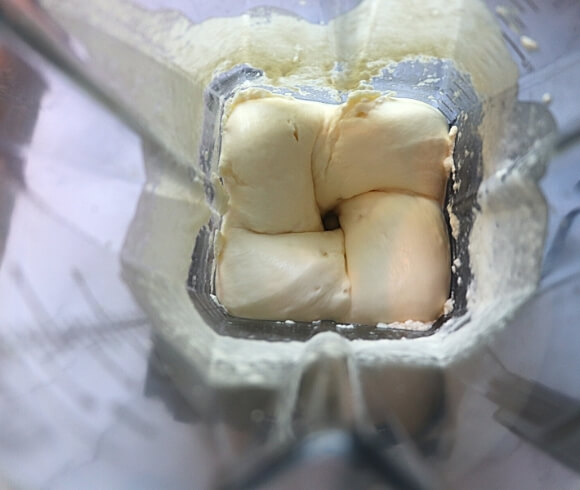
STEP 2 – Begin to blend on medium-high setting. In no time flat, literally under a minute, you will begin to see the cream turn to a thick, whipped cream.
STEP 3 – Don’t stop here! Keep whipping and it will quickly begin to separate the buttermilk from the fats {butter}. You will begin to see little fat globules splash against the sides of the container.
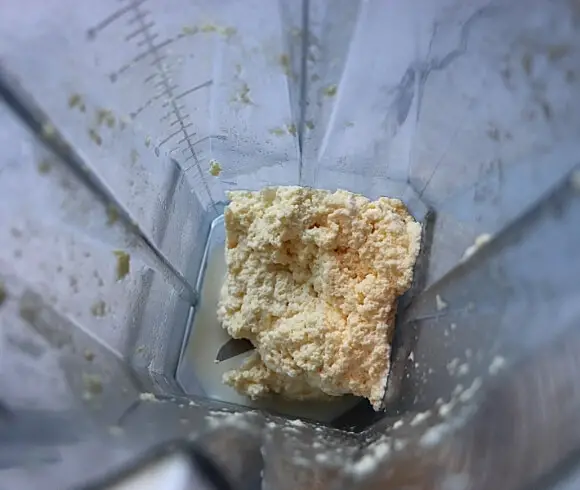
STEP 4 – Continue for several minutes until it becomes a watery mixture of both fat solids and liquid.
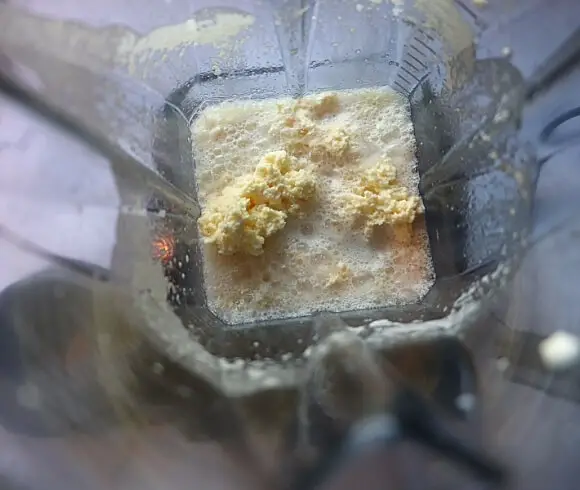
STEP 5 – Strain the fat solids from the buttermilk. I used a fine mesh strainer for this but cheesecloth would work just as well.
NOTE: Don’t forget to save that buttermilk for future use! FYI, your buttermilk will need to be prepared for use as it’s not comparable to store purchased. Plan on adding vinegar or lemon juice to get the buttermilk to work with your baking soda.
STEP 6 – Knead or squeeze the fat solids, aka butter, to remove even more buttermilk prior to the washing process.
STEP 7 – The washing process will aid in removing all the buttermilk from the solids & aid in prolonging the shelf-life of the butter.
Using a bowl of very cold water, you can even use ice water if you like, begin to squeeze and knead the butter in the water. Change your water and repeat for 4-6 times further or until the water remains clear.
STEP 8 – You’ve made butter!! Pat the butter dry using either paper towel or a clean kitchen towel.
*OPTIONAL STEP 9 – Should you be using your butter for fresh eating, I salt mine. For the 2 cups of cream that I used, only approximately 1/8 teaspoon of real salt was added, mixing it in very well. Feel free to salt to your taste preferences.
You can now leave as is or shape into your preferred shaped. I simply made a ball using parchment paper, keeping away from plastics here 😊
HOW TO MAKE BUTTER IN A MASON JAR
Although a bit more time consuming than using a mixer, making butter in a mason jar is a fun activity for kids or even the whole family by taking turns shaking the jar!
STEP 1 – Pour cream into your mason jar, filling it only to half-way full. The cream needs space in the jar to properly churn and separate. Don’t overfill!
STEP 2 – Screw a water tight lid on tight. You don’t want leaks!
STEP 3 – Begin shaking the jar vigorously and continue for 5-8 minutes {note the time will depend on the speed at which you shake the jar}. After a few minutes, the cream will begin to whip. Continue until a “lump” is formed & heard shaking in the jar, continuing for another minute after that sound is heard.
You will see the fat solids have now been separated from the buttermilk. At this point continue with steps 5 onward as listed above.
HOMEMADE BUTTER CONSISTENCY
Your finished homemade butter should be the consistency of, well, butter. It should be soft, creamy, and have a standard butter consistency.
Should it still feel a bit wet, this is an indication that you have not removed all the butterfat. Continue removing it through squeezing either with your hands or with a spoon by pressing it up against the side of a bowl.
HOW TO STORE HOMEMADE BUTTER
Your homemade butter should last for 3-5 days if kept at room temperature and 5-7 days or longer when kept in the refrigerator. The length of time it will remain good to go is largely dependent on the age of your cream when you begin the process, how much of the buttermilk you were able to remove, & how well you’ve rinsed the final product.
Although this butter will not keep as long as traditional purchased butter, homemade butter is meant to be eaten fresh! It is why we make our own 😊
For long-term storage, wrap tightly in parchment paper and place the package in a freezer container in your freezer.
HOW TO MAKE HONEY BUTTER
Have you ever heard of honey butter? Being a keeper of bee’s we have been blessed with lots of honey.
This creamy, sweet mixture is amazing to use over oatmeal in the morning, over fresh berries you have just picked, or even over our famous, old fashioned Vanilla Bean Ice Cream!
It also makes for a wonderful spread {think rolls, bagels, or my homemade biscuits here} or even on bagels and english muffins.
To make your honey butter simply combine your butter and honey in a 2:1 ratio. For example if you are using 1/2 cup of butter you will want to add 1/4 cup of honey. Mix both ingredients together well.
This ratio may be adjusted either up or down when it comes to sweetness. Need it sweeter? Add a ratio of 1:1. Less sweet? Reduce the honey.
That’s all there is to making your homemade butter and buttermilk! I hope you give it a try! If nothing else, it’s a fun, simple project that your taste buds will thank you for!
Have you given this homemade butter recipe a try?
Love, Light, & Laughter ~

Enjoy this article? Please consider sharing it on your favorite social media channel! Want more? Subscribe below for the occasional update with all the “happenings on the hill”!
")
Ingredients
- 2 Cups Cream
- Cold Water
- *Optional - Salt
Instructions
STEP 1 - Pour 2 Cups of cold cream {or any amount you have on hand for that matter} into your processor of choice. Mason jar instructions are listed below.
STEP 2 - Begin to blend on medium-high setting. In no time flat, literally under a minute, you will begin to see the cream turn to a thick, whipped cream.
STEP 3 - Don't stop here! Keep whipping and it will quickly begin to separate the buttermilk from the fats {butter}. You will begin to see little fat globules splash against the sides of the container.
STEP 4 - Continue for several minutes until it becomes a watery mixture of both fat solids and liquid.
STEP 5 - Strain the fat solids from the buttermilk. I used a fine mesh strainer for this but cheesecloth would work just as well.
STEP 6 - Knead or squeeze the fat solids, aka butter, to remove even more buttermilk prior to the washing process.
STEP 7 - The washing process will aid in removing all the buttermilk from the solids & aid in prolonging the shelf-life of the butter.
Using a bowl of very cold water, you can even use ice water if you like, begin to squeeze and knead the butter in the water. Change your water and repeat for 4-6 times further or until the water remains clear.
STEP 8 - You've made butter!! Pat the butter dry using either paper towel or a clean kitchen towel.
*OPTIONAL STEP 9 - Should you be using your butter for fresh eating, I salt mine. For the 2 cups of cream that I used, only approximately 1/8 teaspoon of real salt was added, mixing it in very well. Feel free to salt to your taste preferences.
Notes
1.Don't forget to save that buttermilk for future use! FYI, your buttermilk will need to be prepared for use as it's not comparable to store purchased. Plan on adding vinegar or lemon juice to get the buttermilk to work with your baking soda. 2. Shape into any form you like by hand or using a mold.
11 comments
It seems to be a more simple process than I thought!
I’ve always wanted to try to make this myself. I heard homemade butter (and buttermilk) are unlike anything anyone has ever tasted.
That would be so neat! I couldn’t imagine doing it, but how neat!
I love fresh, homemade butter!
I always love reading you blog post, Suzan. They are so informative. I had no idea butter was so easy to make.
I love butter and would love to have some fun with this. Loved the step-by-step instructions. Bookmarking for the near future. Thanks for sharing.
YUM! What a great fun project to try! I love it!
I’m so very fascinated by this post! I think I can actually do this!!! I rarely have buttermilk on hand, but on the occasion when I need it, this is perfect! We’ve been using our VitaMix a lot lately, and this is another great recipe to add to the mix!
I don’t think I’ve ever had homemade butter but it sounds heavenly!
Awesome! And that honey butter sounds delish! Bread and butter are a big weakness! Haha
This is fantastic and so easy to make! I love butter and use it all the time! I’m so excited to try this recipe especially the honey butter, my family will love it!