
 (1)")
Love lavender? Learning how to make your own homemade lavender oil during the height of the harvest will have you on the receiving end of its many aromatic benefits & uses.
This post may contain affiliate links at no additional cost to you. By making your purchases through the links on this website, IMSL may make a small percentage at no direct cost to you. IMSL only promotes products we use & truly believe in. Please refer to my Privacy & Disclosures for further information. IMSL thanks you for your support!
There may be nothing better than creating your own oils to use throughout the year during the height of our growing season. Lavender oil may be one of my absolute favorites.
I don’t think I’ve met anyone, although I’m sure your out there 😊, that doesn’t love the heavenly scent of lavender. For me, it brings back memories of birthing my daughter.
This homemade lavender oil, so easy to make using either purchased or harvested (how I harvest, dry, & prune my lavender tutorial is a great reference) dried lavender buds, and can be used in many beneficial homemade creations.
IS LAVENDER OIL THE SAME AS LAVENDER ESSENTIAL OIL
In a nutshell? Nope. The lavender oil we are making here is considered an infused oil. This lavender infused oil is produced by taking dried lavender buds along with a carrier oil of your choice, more on the best carrier oils to use below, and allowing it to steep for a length of time.
There are two methods of which you can use to make your lavender oil, either the solar method (considered to be a cold oil infusion method) or via a crockpot (considered a hot or heat infused oil method). The time allowed for the “steeping” process depends on the method used.
The steeping process utilizing the solar or cold oil infusion method can take anywhere from 1-2 weeks up to a month or more. The heat infused oil method, although being much faster (as little as 1-5 hours), for me, just doesn’t create as rich an oil as the solar method. I have, however, used the heat method in a pinch when I’m in a rush. Try both methods, and you be the judge.
Although this lavender oil is definitely not as concentrated as an essential oil, it still harnesses the scent & many of the benefits of lavender.
In contrast, lavender essential oil, a plant extract, is made through a distillation process using either a steam or pressing method. Very large quantities of the plant, typically using various parts of the plant (bark, leaves, flowers, or fruit) are needed when creating an essential oil.
Essential oils are usually made on an industrial level. I cannot say I know of anyone with a home distillation setup, but, again, you never know. Let me know if you do!
Although the process in which we are creating our lavender oil differs from that of mass produced essential oils, our homemade lavender oil will create a good amount of luxurious oil which we can use throughout the year.
DOES THE VARIETY OF LAVENDER USED MATTER
I don’t think so! Use what you grow, and as always, choose organic no matter if you dry your own or purchase dried lavender buds.
They do say there is a difference in lavender varieties and what they are good for, but to me they all smell amazing. Taken from my article “Harvesting Lavender” here is a breakdown of the varieties & their best uses.
- ENGLISH LAVENDER – Best to use in culinary dishes due to this varieties low camphor content
- FRENCH LAVENDER – Considered less aromatic than the English variety, french lavender is used in “herbes de provence” and used as you would rosemary in herb blends
- SPANISH LAVENDER – The scent lies in the leaves of this variety of lavender. Spanish lavender is best used in cooking, but will also make for a lovely oil
- LAVANDIN LAVENDER – This highly aromatic lavender variety, a hybrid of two lavender varieties (Lavandula angustifolia and Lavandula latifolia) are best used for oils & crafts. Not so much in cooking due to the high camphor content
Although all lavender is considered edible, those lavender varieties that are lower in camphor content will be the best choice if you are looking to use it in your cooking efforts. Think all English varieties as well as the French lavender for first choice for those uses other than cooking.
That being said, no matter what you have on hand for dried lavender, go ahead and use it!
THE STATE OF LAVENDER MATTERS WHEN MAKING OIL
When it comes to making your lavender oil, the state or condition of your lavender matters. When harvesting fresh lavender be sure to do so during the first stages of blooming. For in-depth instructions on growing, harvesting, pruning, & drying your fresh lavender, be sure to check out my article on doing just that! Harvesting Lavender.
Using only completely dried lavender buds to make your lavender oil will ensure the oil does not mold or turn rancid.
Take a look at the video below to see just how dry these buds need to be. They should be able to practically fall off the stem with just a little rubbing between fingers and thumb.
In addition to lessening chances of your lavender oil molding or turning rancid, by utilizing completely dry lavender buds for your lavender oil, will guarantee you are releasing as much of the naturally occurring oils from the lavender itself as possible. Win, win if you are looking to harness as much medicinal & healing potential as possible.
The key when drying your fresh lavender is to find that “just right” stage. Leave them too moist and they can turn your end product. Leave them too dry and you have the potential of losing a lot of the lavenders natural oils rendering your end product less effective.

I encourage you to air dry your fresh lavender for best results. I find that dehydrating them, although this can be done, can often cause them to be a bit over dry. Those living in highly humid area’s, however, may need to rely on the dehydrator or plan on using a fan when air drying to create good air circulation.
To air dry your lavender, either in small bouquets placed in your favorite vase, or tied in neat little bundles hung upside down, you will want to make sure it has good air flow, out of direct light, preferably in a darker area. Plan on leaving be for at least a couple weeks to a full month depending on humidity levels.
THE CURATIVE BENEFITS OF LAVENDER
Lavender is more than just an aromatic herb. Although this may be lavender’s ode to fame. After all, neuroscientist researchers are now exploring how just the act of smelling lavender creates an anxiolytic (reduces anxiety) effect.
In folk medicine, it has long been believed that odorous compounds derived from plant extracts can have anxiolytic effects. Among them, linalool, one of the terpene alcohols in lavender extracts, has been reported to have the anxiolytic effects.
Frontiers
Nice to have scientific backup, but quite honestly, we kinda already knew that 😊 Lavender’s long standing popularity for it’s aromatic benefits aid in “treating insomnia, creating a sense of relaxation, treating restlessness, depression, and anxiety”. Again, we kind of knew that…it’s calming to the body, mind, & soul.
Sharing Is Caring & I thank You For It ❤️
But did you also know that lavender can be used to heal both internally as well as topically? Lavender’s anti-inflammatory, antibacterial, anti-fungal, as well as antioxidant properties (now being proven scientifically) have been shown to ease pain & “have a variety of therapeutic and curative properties, ranging from inducing relaxation to treating parasitic infections, burns, insect bites, muscle soreness, and spasms. There is growing evidence suggesting that lavender oil may be an effective medicament in treatment of several neurological disorders”.
Taking lavender orally as a tea has been said to aid in digestive issues such as bloating, intestinal gas, vomiting, nausea & general upset stomach.
Lavender’s power’s don’t end there. Its ability to heal & aid all things skin related may be the biggest reason I make lavender oil. Think rashes, burns, sunburns, acne, eczema & psoriasis, dry skin, wrinkles, scrapes, general wound healing, and even lightening the skin here.
How can one herb do all this? Lavender’s essential oils which occur naturally does all the work. Specifically “linalool, linalyl acetate, 1,8-cineole B-ocimene, terpinen-4-ol, and camphor“. It’s definitely one herb that has it all!
BEST OILS TO USE FOR MAKING LAVENDER OIL
The carrier oils you choose to use for making your lavender oil largely depend on what you will be using the oil for. For all culinary uses you will want to choose an edible oil (EVOO, grapeseed, avocado & coconut) to name a few. For when you want to use it on the skin you have further choices in addition to the ones listed already (jojoba, sweet almond, & argan oil) to name a couple.
The biggest determination when choosing the appropriate carrier oil for your skin is, well, your skin. And that includes your face. Yup! You heard right. I use oil for not only moisturizing my face but for cleansing it too! Take a look at “Oil Cleansing” for all the deets as to why I choose the oil cleansing method & how I do it daily. Choosing the appropriate oil for your skin type is key to finding success in both cleansing & moisturizing.
Not all natural oils are created equal. I’ve broken down optional natural oils which can be used as the carrier oil in making your own nourishing lavender oil below to help you out a bit with your decision making & finding the perfect oil base for you.
CARRIER OIL OPTIONS FOR MAKING LAVENDER OIL
Again, determining what you will be using your lavender oil for will guide you in choosing the right carrier oil. As always, I highly suggest utilizing a certified organic option no matter if you will be using the oil for edible purposes or not. After all we are looking to “heal” & nourish here! In addition, I recommend purchasing the highest quality oil of your choice your budget will allow, and always lean toward an un-refined, cold-pressed oil.
It’s also important to note that the carrier oils efficacy for your intended use largely depends on the oils comedogenic scale. The “comedogenic scale” is a rating (rating 0-5) used for measuring the likelihood that skincare products containing oils & butters will clog pores of the skin. The lower you go on the rating score, the more non-comedogenic the oil, the less likely it will clog pores. Good to know especially for those prone to breakouts!
You may note there are several oils which will have dual purposes & can be used in both the kitchen as well as personal care. Dual purpose? Now that’s my kind of oil choice!
CARRIER OILS FOR MAKING LAVENDER OIL
If you are looking for some good edible carrier oil options for use in adding a distinctive floral flavor to baked goods, sauces, fillings, whipped cream, & ice cream, you are in the right place! Or what about a few face oils, cleansing oils, salves, or balms? Here are a few suggestions for which carrier oil to use when making your lavender oil!
EXTRA VIRGIN OLIVE OIL
IN COOKING – Rich in the healthy monounsaturated fats (oleic acid), EVOO is considered to be an extremely healthy choice for use in cooking (and on the skin, more on that below) due to its high levels of vitamins, antioxidants (HXT aka Hydroxytyrosol, anti-aging anyone?), and vitamins. Although it does not have the highest smoke point, extra virgin olive oil’s ability to resist oxidation make it a great choice for high-heat cooking.
FOR TOPICAL USE – When it comes to moisturizing & hydrating as well as overall nourishing the skin, EVOO is the oil for me. I use it in both my cleansing routing as well as my moisturizing routine. With a comedogenic rating of only 2, this heavy oil may still be a bit too heavy for those prone to breakouts. However, EVOO’s hydroxytyrosol, one of the most powerful antioxidant compounds known, make it a good choice for those with dry skin looking for a bit of relief with aging skin issues. I may or may not be speaking from experience here 😳
GRAPESEED OIL
IN COOKING – High in omega-6 fatty acids (a heart healthier choice when eaten in moderation), grapeseed oil contains high levels of vitamin E & phenolic antioxidants. This oil however may not be the healthiest of choices for use in your culinary adventures as it’s the extracted by the use of chemicals including the toxic solvent hexane. Unless you seek out hexane free organic choices. Being a medium to high-smoke tolerant oil, grapeseed oil makes for a great everyday cooking oil. However, I find it’s best when used cold or room temperature in dressings and such.
FOR TOPICAL USE – With a comedogenic scale rating of 1, grapeseed oil is a good choice for most all skin types. This extremely light oil, which is high in antimicrobial properties, is a great choice of carrier oil for making your lavender oil for use in treating acne issues, scars, and hyperpigmentation issues.
SUNFLOWER SEED OIL
IN COOKING – This nutrient dense oil boasts high levels of linoleic acids, antioxidants, vitamins K and E, & is claimed to aid in heart health due to the phytochemical content (choline & phenolic acid). Considered a high-heat oil, sunflower seed oil makes for a good choice to cook with, both in frying as well as a substitute for butter when baking cakes & muffins.
FOR TOPICAL USE – High in naturally occurring vitamin E, an amazing free radical fighter in its own right, should you be looking to repair skin damage then this is the oil for you. With a comedogenic rating of just 0, yup you heard right, 0, this gentle oil is suitable for just about any skin type. And did I mention its absorbability?
AVOCADO OIL
IN COOKING – A high-smoke oil, this un-refined oil is chock full of antioxidants and healthy fats. Abundant in oleic fatty acid, avocado oil is now being researched & is showing higher beneficial effects on blood cholesterol levels than even that of EVOO.
FOR TOPICAL USE – As with EVOO, this thick oil is highly moisturizing. With a rating of 3, however, it may not be suitable for those prone to breakouts. Avocado oil’s super powers extend beyond its moisturizing abilities. The beta carotene, vitamins (A,D, & E), lecithin, fatty acids, and even protein all assist in protecting your skin from UV exposures, increase collagen, and heal dry itchy skin.
SAFFLOWER OIL
IN COOKING– A high-smoke point, neutral in flavor oil, safflower oil is rich in unsaturated fats & boasts a plethora of healthy benefits. One 2011 study concluded that “8 g of SAF daily improved glycemia, inflammation, and blood lipids, indicating that small changes in dietary fat quality may augment diabetes treatments to improve risk factors for diabetes-related complications”. It’s important to note that this study included only women past the stage of menopause with a history of Type 2 diabetes & obesity.
FOR TOPICAL USE – For those with oily skin take notice. Safflower oil is a light oil that is absorbed quickly on all skin types, even those with sensitive skin. It boasts a comedogenic scale rating of 0. It’s anti-inflammatory properties assist this oil in treating breakouts and healing wounds. Safflower oil also high in antioxidants, and is said with regular use to smooth skin’s texture & improve overall appearance.
NOTE: Those who are allergic to ragweed should stay clear of safflower oil.
COCONUT OIL
IN COOKING – This somewhat dual purpose oil (more on that below) is high in MCT’s (fats which are responsible for many of the health benefits of coconut oil), is high in lauric acid (a saturated fat) which possess antibacterial properties. In addition, it’s believed that coconut oil boasts anti-fungal, anti-viral, and anti-inflammatory properties to boot. This oil is edible and makes a great substitute for butter (popcorn anyone?), in stir-fries & other dishes which are fried, as well as in baking.
FOR TOPICAL USE – This highly popular oil, with a comedogenic scale rating of 4, although highly moisturizing and good for treating those stubborn eczema area’s, may be difficult to use when creating lavender oil as it’s pretty much solid at normal room temperatures, unless you are using the crock-pot or heat method for infusing. Fractionated coconut oil is liquid, however, and should you be set on making your lavender oil with this carrier oil, & using the solar method, I would recommend going that route.
HEMP OIL
IN COOKING – Hemp oil is extracted very similarly to that of olive oil, through cold-pressing the hemp seeds. Hemp oil contains 3 polyunsaturated fatty acids: linoleic acid, alpha-linolenic acid, and gamma-linolenic acid. The ratio of 3:1, omega 6 (linoleic acid) to omega-3 acids (alpha-linolenic) makes for a healthy combination of health benefits. A few of which are: supports heart health, helps lower blood pressure, & reduces inflammation & pain.
FOR TOPICAL USE – Hemp oil, a comedogenic rating of 0, contains phytochemical’s which are beneficial for overall skin health. Skin conditions such as eczema, psoriasis, and dermatitis will benefit from the use of hemp oil. This oil is readily absorbed into the skin, great for any skin type, and even aids in anti-aging skin regimes.
HAZELNUT OIL
IN COOKING – Rich in omega-3’s, a multitude of vitamins, and high in protein, hazelnut oil is a great choice for even high temp cooking. Think, sautéing, baking, roasting & grilling.
FOR TOPICAL USE – With a low comedogenic rating of only 1, this oil is a good choice for most skin types. This hydrating oil can be used as an astringent (although very different from those containing alcohol), which doesn’t cause irritation to the skin, due to tannins (powerful antioxidants) within the oil. Vitamin E within the oil assists with boosting collagen production, giving your skin structure & elasticity and reducing fine lines, especially as we age. In addition to providing protection against sun damage, this oil also assists in reducing the appearance of scars and helps reduce hyperpigmentation.
SWEET ALMOND OIL
IN COOKING – Sweet almond oil is made using specifically, sweet almonds (typically used when making products & home remedies). Almond oil, on the other hand is made using bitter almonds. “Bitter almond oil has glycoside amygdalin which releases highly toxic chemicals like prussic acid and benzaldehyde. Both of these chemicals are neither suitable for consumption nor for direct application” according to this article. Unrefined almond oil should not be used in high heat cooking as the nutritive values will be destroyed. This oil has a smoke point of 430°, and is not conducive to using in homemade products.
NOTE: Those with nut allergies should not use almond oil.
FOR TOPICAL USE – Sweet almond oil is another go-to for many of my concoctions as it’s highly moisturizing for both dry skin as well as sensitive skin. With a comedogenic rating of only 2, this oil a good choice for those with dry, sensitive skin. This oil helps to reduce under eye circles & puffiness, improves skin tone, assists with acne issues, helps reverse sun damage, and reduces the appearance of scars & stretch marks.
JOJOBA OIL
IN COOKING – Jojoba oil is not edible.
FOR TOPICAL USE – This lightweight oil absorbs well due to its similar chemical structure (close to our skins) and has a rating of 2 making it a good choice for those with combination skin. Jojoba oil is full of vitamins, minerals, and nutrients that all contribute to healthy skin. Jojoba oil “has a proven anti-inflammatory effect, with potential uses in a variety of skin conditions including skin infections, (and) skin aging” according to this study. When properly stored, jojoba oil, once opened has a shelf life of 5 years. Refrigeration will increase that time frame as well!
ROSEHIP SEED OIL
IN COOKING – Rosehip oil is not recommended for internal use.
FOR TOPICAL USE – Rosehip oil is chock full of fatty acids, antioxidants, vitamin’s C, A, and E, is lightweight with a scale rating of 2. All this goodness leads to this oil’s ability to help hydrate & moisturize well, reduce inflammation from many skin issue’s (think eczema & psoriasis), protect against sun damage, and helps reduce scars and fine lines.
ARGAN OIL
IN COOKING – When using argan oil in your kitchen endeavors be sure to utilize only food grade or virgin argan oil. With a smoke point of 420°, this oil can be easily used for baking, grilling fish, and creating salad dressings and roasted veggies.
FOR TOPICAL USE – Daily use of argan oil has been shown to improve skin’s elasticity, heal skin infections, soothes dermatitis issues, has amazing anti-aging effects, and helps to prevent sun damage. All with a comedogenic rating of 0, making this oil a wonderful choice for many! Not to mention the benefits your hair would receive from use of this oil!
Certainly not a complete list of oils (do you have others you use?), these oils are some of my favorites to use when making my own products.
HOW TO MAKE LAVENDER OIL
Whew! Lot’s of info! Hopefully the above exhaustive list will help you determine which oil is best suited to you and your needs. It should be noted that you are not bound to using just one oil choice. Combinations of carrier oils are often used and loved. Now to get to what you came here for 😊
When making any infused oil, you have two methods of choice. Cold infusion, which is the longer slow brewing method, and the heat method using a crockpot.
LAVENDER OIL {COLD INFUSION METHOD}
To make your own lavender oil using the cold infusion method {solar method}, and I should say, lavender infused oil, couldn’t be easier than following these simple steps.
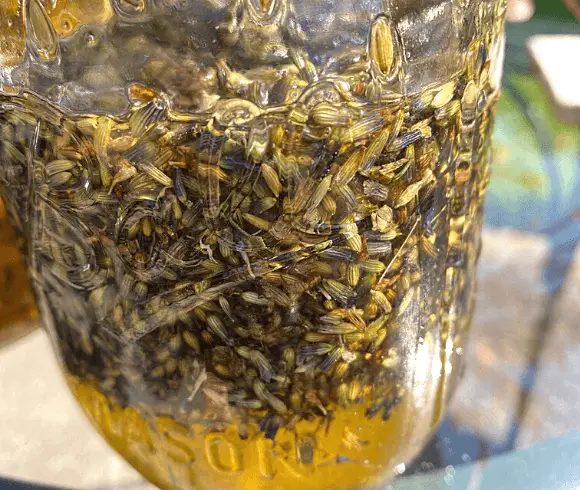
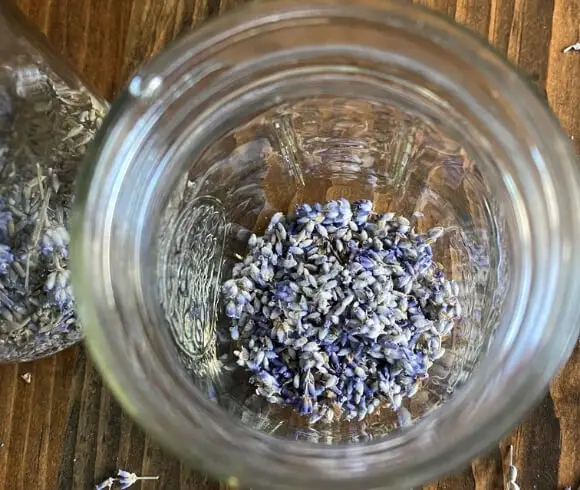
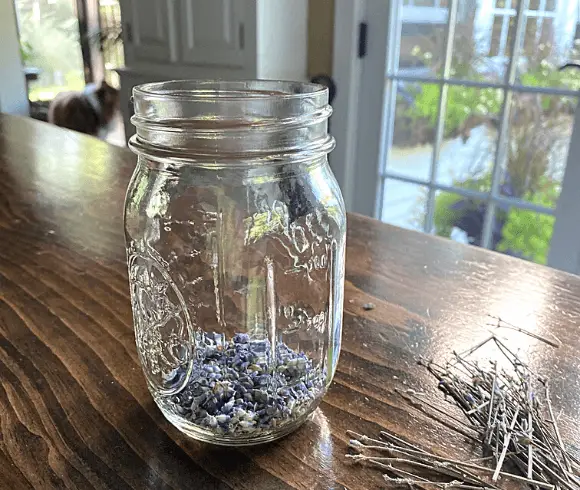
- Fill a jar of your choice, 3/4 way full, with your dried lavender buds or flowers. You can use a bit of stem and leaves if you like, but I try to keep mine strictly to the buds & flowers. What size jar you use is largely dependent on what you will be making with your oil. Should you be looking to fill only a few rollerball containers, I would recommend using a 1/2 pint jar. If you will be using this oil to make salves and balms or as an ingredient, increase the jar size.
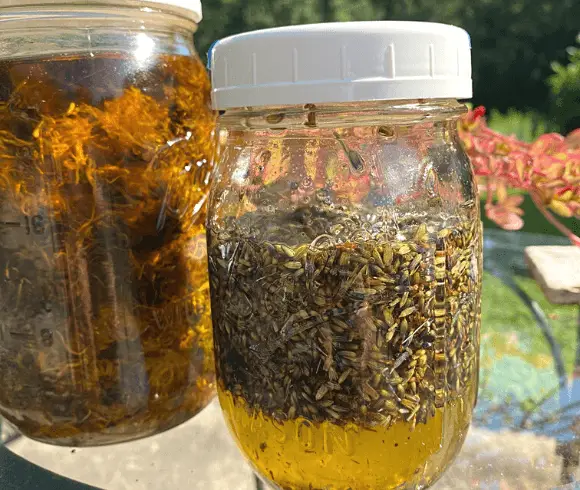
- Pour your carrier oil of choice over the lavender being sure to cover completely. The buds & material should be able to float easily allowing the oil to connect with each piece of lavender. We want to extract as much of that lavender goodness as possible!
- Cover your filled jar with a tightly fitting lid & place in a sunny, warm location. Plan on leaving the jar for anywhere between 1 to 6 weeks time. I typically will leave mine for about 1 month. Be sure to give the jar a good shake every now and then to coat all the lavender once again. Try to avoid excessively heating the oil if possible.
- Once you have steeped your lavender for your determined time, strain the lavender from the oil. Sometimes I use a fine mesh strainer for this, making sure to squeeze the lavender material well to extract all the oil possible. Alternatively using cheesecloth ( love my re-useable cheesecloth for this purpose) or even a nut milk bag will allow you to wring the material completely while keeping the oil as debris free as possible.
Now how simple is that? Making your lavender infused oil in just 4 steps! This oil will have a mild aroma, definitely not as potent or strong as straight lavender essential oil. Should you be looking for further scent, feel free to add a few drops of your favorite lavender essential oil. The common dilution rate is 12 drops per 1 fluid oz or about 2%. Totally up to you!
LAVENDER OIL {CROCK POT METHOD}
Using your favorite crock pot, making a lavender oil using the heat method is a quick way to create your oil. Although I prefer the slow, solar infused oil method, this works in a pinch when I run out & need some right away.
- Place a ratio of 1:2, lavender buds to oil respectively, in your crock pot.
- Set your pot to low and allow to steep for 3 hours. Keep the oil between 100F and 120F.
- Allow the oil to cool before following the above step 4 to strain.
LAVENDER OIL STORAGE & SHELF LIFE
To store your freshly made lavender oil, be sure you are using a clean jar with a tight fitting lid. Homemade oils prefer to be out of direct light, I store mine in my apothecary cabinet, in the dark, and often choose amber colored jars for just that reason. This oil, largely depending on which type of carrier oil used (refer to the list above), will last an average of 1 to 2 years when kept cool & dry. Alternatively, you can extend this shelf life even further by keeping it refrigerated!
LAVENDER OIL USES
Now that you have your lavender oil made, what to do with it? The following are a few of my favorites for personal use and the home & hearth. As with any homemade concoction, be sure to try it out first using only a small area as a “test” for any adverse reactions.
- STRAIGHT UP – Place the oil in your favorite rollerball for a relaxing quick perfume, use as a massage oil for sore muscles, and apply directly for sunburn relief, eczema spots, stings, bites, burns, & rashes. Rub on body to repel mosquito’s and flies.
- MOISTURIZER – Lavender oil makes for an amazing moisturizer for face & body. A little goes a long way tho! Start with using a few drops only and go from there.
- FACE CLEANSING – I love to use my lavender oil as a base oil for my oil cleansing routine. Take a look at my article, “Oil Cleansing Why & How To Do It” for a complete tutorial! It may seem counterintuitive, especially for those with problem skin, but it actually works for ALL skin types!
- FOR HAIR – For a deep oil treatment for hair, lavender oil will moisturize the scalp, reduce breakage of hair, deeply conditions, and as this study show’s, may even promote hair growth! To use, apply a thin coat to your hair and deeply massage all over making sure it’s rubbed into the scalp well. Cover with a towel and let set for at least 15 to 20 minutes, and up to one hour for severely damaged hair. Wash with shampoo to cleanse thoroughly.
- MAKEUP REMOVER – Talk about dual purpose! Lavender oil will remove the makeup AND tone & soften your skin! Use directly on a cotton ball to remove makeup, being extremely careful around the eye area.
- BABY OIL – Make your own baby oil! The addition of lavender oil’s antibacterial, anti-inflammatory, & anti-fungal properties make this the perfect oil for those tender baby bottoms! Combine with other homemade oils, such as my “Calendula Oil” for a perfect combination.
- ANTI-AGING SERUM – Make your own anti-aging serum using a few favorites {1/2 Tbl lavender oil, 1/2 Tbl primrose oil, 20 drops frankincense essential oil, 1/2 Tbl pomegranate oil , 10 drops carrot seed essential oil, and 15 drops Vit E oil}. I use this serum nightly. A few drops goes a long way!
- BALMS & SALVES – Lavender oil makes for an amazing addition to many homemade balms, salves and more! To use simply substitute any oil for lavender in your favorite recipe! Dandelion & lavender salve anyone? Or how about creating your own version of my “Healing Gardener’s Hand And Skin Salve”!
- HOMEMADE SOAP – Use lavender oil in your favorite soap recipe that calls for oil and reap all the benefits your oil has to offer.
- AS A SPRAY – Make a room deodorizer and pillow spray for a relaxing scent throughout the home or on your pillow for a restive sleep. Add a few drops up to 1 tbl to distilled water and place in a 16 oz spray bottle for use.
- HOMEMADE CLEANSERS – Utilizing homemade, natural cleansers are now part of our every day lives here on the hill in order to reduce our overall chemical exposures. Adding lavender oil with it’s natural antibacterial properties to our homemade cleansers is a no brainer. Kill bacteria & add a lovely scent? Win, Win! To use, simply add a tablespoon to your favorite spray cleanser.
- IN RECIPES – Made lavender oil that’s edible? Add to your favorite marinades, sauces, dressings, & baked goods by substituting lavender oil for any listed in your recipe. Taking this edible version of lavender oil internally will have you on the receiving end of all its bennies, reducing inflammation (the root of all disease) is a biggie for me!
- GIFT IT – Nothing say’s I love you more than a gift made with just that. Love. Place a bit in a unique bottle along with a gift tag suggesting use’s. Who wouldn’t love to be on the receiving end of this gift?
NOTE: Avoid using acidic cleansers on granite, marble & other stone surfaces. Instead try this homemade cleanser, great for stone surfaces made with essential oil.
There you have it! It couldn’t be any easier to learn how to make your own lavender oil, well, the infused lavender oil anyway 🤗 I hope you can give it a try! Already make your own lavender oil? Join in the convo below & let me know!
Will you be making your own lavender oil?
Love, Light, & Laughter ~

Enjoy this article? Please consider sharing it on your favorite social media channel! Want more? Subscribe below for the occasional update with all the “happenings on the hill”!
DISCLAIMER
Recommendations and or suggestions made by this blog regarding husbandry and or herbal remedies etc. are not meant to replace solid advice from qualified professionals. None of the information on this blog has been evaluated by the FDA. Products or remedies mentioned are not intended to diagnose, treat, cure or prevent disease. Please do your due diligence. Research, talk to qualified professionals and proceed at your own risk.
25 comments
Saving this for when my lavender thrives! pinned
I adore lavender and am in awe of your wealth of knowledge on the topic of growing and making lavender oil. Saw this post on #TFT where I shared posts #76 and 77. Have a marvelous day. Warm regards, Nancy Andres
Your post arrived at the perfect time for me. I wanted to make my own oils this month, using herbs from my garden. Now I just have to decide which carrier oil. Thanks for discussing each oil.
You’re so welcome, Cindy!
As usual, I learned something new when reading one of your posts. I didn’t realize that various types of lavender are better for cooking than others. English lavender is my favorite in my garden, but I loved seeing how the others may be beneficial. And mixing lavender with jojoba oil is one of my favorites. Whenever I see those two combined I get excited!
That looks like it’s beyond anything I could do!
Absolutely not, Melissa! So easy to do & results in a wonderful product!
So much great information here! I love the smell of lavender… especially when I have a headache! Will definitely try making this at some point! A friend had given me some lavender from her garden, but it didn’t take. Will need to grow some of my own!
Great information as usual! I would love to do.this.
So much great information! Thank you for sharing.
We just started growing lavender! As soon as I can make sure I can keep it alive this will be our next step 🤠
I love lavender oil!
This is great! I always learn so much from your posts. My lavender is gone by now, but maybe next year!
Lavender is such a great fragrance! I love all the different uses!
A wealth of information! I hope I find time in my life somewhere along the line to do cool stuff like making our own lavender oil with my children. I know they’ll love it.
This was so informative. I love lavender and we recently bought a lavender plant. I was curious how to make lavender oil. I will bookmark your blog post. Thank you so much for sharing.
So many choices. I love the versatility.
I love this! The oil looks very approachable to make and there are so many uses. I love using lavender in an epson salt bath. Can’t wait to try this.
Great post! I haven’t thought of making my own lavender oil before but I think now I’d like to give it a try since I absolutely adore the scent!
I love lavender oil. I would never have expected it looked like that. Very cool to see the process!
I love Lavender. I have lavender oil in my bedroom. As always your blogs are so informative. I think I will try to make the oil myself. Thanks for all this information.
Nice! I love to use Lavender oil in my bath.
My husband is the only weirdo I know that doesn’t care for lavender lol. I still want to grow and make lavender oil at some point anyway! Thanks for the awesome info.
I love lavender. It’s so calming! I didn’t realize there were so many varieties though!
Wow. This is a very informative post. I grew lavender in my garden for the first time this year, but I think it got suffocated by the squash. I’m not sure I will make lavender oil, but I’ll definitely pin for further reference.