

Kombucha lovers rejoice! Brewing your own kombucha is made even easier with this continuous brew kombucha method.
This post was last updated September 23, 2022.
This post may contain affiliate links at no additional cost to you. By making your purchases through the links on this website, IMSL may make a small percentage at no direct cost to you. IMSL only promotes products we use & truly believe in. Please refer to my Privacy & Disclosures for further information. IMSL thanks you for your support!
Kombucha, a trendy fermented probiotic rich fizzy drink, full of health benefits, can now be found readily at your local grocer.
But why buy when you can learn how to make this effervescent microbial drink yourself for a fraction of the cost, know what’s in it & how it was made, can create your own unique flavors by adding herbs and fruit, AND have Continuous Brew Kombucha available at all times!
WHAT EXACTLY IS KOMBUCHA?
Kombucha is a carbonated beverage composed of fermented tea, sugar, and yeast. It tastes a bit sweet and a bit tang. The perfect combo to refresh any thirst!
Made using a “SCOBY” (aka, Symbiotic Culture of Bacteria and Yeast) or as is fondly referred to as a “mother” along with “starter tea”, kombucha has been around for ages.
HEALTH BENEFITS OF KOMBUCHA
Containing an abundance of antioxidants, B Vitamins, probiotics, and glucaric acid, kombucha offers up some unique health benefits.
Although little human research on the health benefits of kombucha have been completed, there is nothing limiting you to giving it a try & accessing its effects and benefits on your own.
A few reported health benefits …
- Better digestion
- Liver detoxification
- Aids pancreatic function
- Improved mental health (anxiety/depression)
- Destroys candida (yeast)
- Aids nutrient absorption
- Improves energy levels
For me, drinking kombucha has helped increase my energy levels, aids gut health & digestion, and offers a refreshing & unique beverage every now and again.
WHAT EXACTLY IS A SCOBY?
What exactly is a SCOBY used for fermenting kombucha? Basically a SCOBY is a leathery-looking disc made up of a “symbiotic colony of bacteria and yeast”. In other words, a slimy, textured pancake 😅
Many will refer to the “scoby” as a mushroom. It is in fact, not a mushroom at all. Then what is it? According to Wikipedia, a scoby is as follows:
“A SCOBY (for symbiotic culture of bacteria and yeast) is a syntrophic mixed culture, generally associated with kombucha production wherein anaerobic ethanol fermentation (by yeast), anaerobic organic acid fermentation (by bacteria), and aerobic ethanol oxidation to acetate (by bacteria) all take place concurrently along an oxygen gradient.”
wIKIPEDIA
A few GOOD indications that the culture is viable, alive and healthy should have the following qualities:
- Good Size/Growth of “baby” or new scoby
- Rubbery In Texture
- Develops new “baby” quickly
- Taste of Kombucha Tea
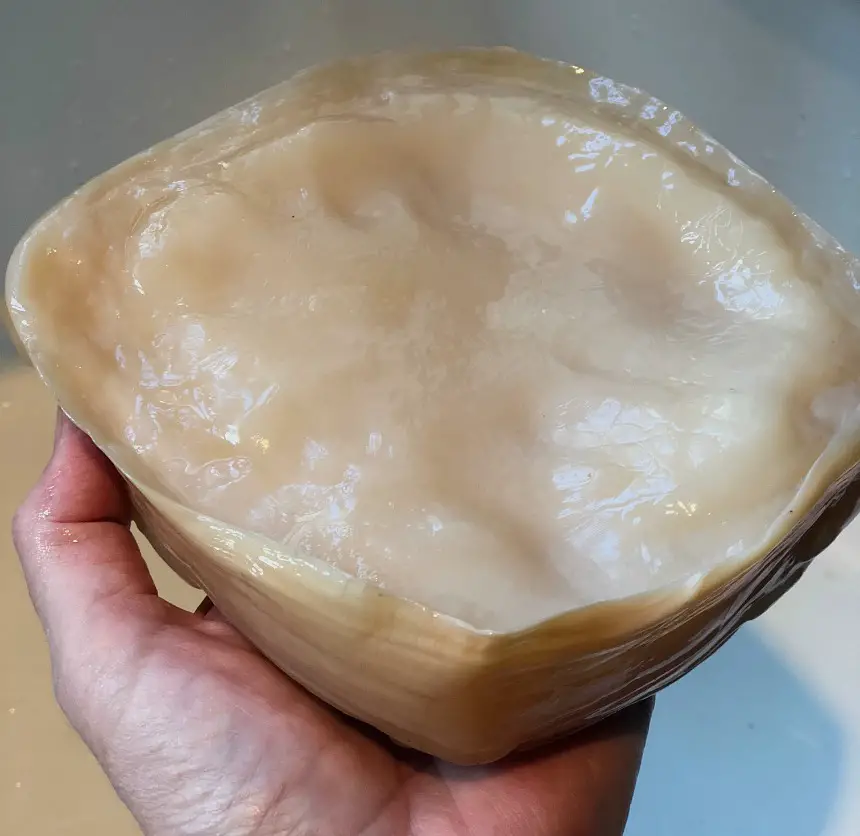
A healthy “scoby” culture that is thick just means it is able to produce a “scoby” with strong cellulose tissue. If your scoby has thin pancake-like layers like in the picture, it is still a healthy, viable culture. It just did not bind together as with a smooth thick one.
You can if you like, separate these layers into smaller levels. In essence, create new SCOBY from this existing one.
WHY BREW YOUR OWN KOMBUCHA?
The more mainstream kombucha becomes, the more readily available at your local grocer’s.
That being said, buyer beware! Not all kombucha are created equally. Store-bought, while convenient, may contain added sugars and juice’s, & lower if any beneficial health properties due to pasteurization as many brand’s do this to stop the fermentation process.
In my world, I’m always considering ways to simplify, save money, and save waste! By brewing your own kombucha, think of all the plastics & packaging you will be conserving!
So if you are looking for a fermented kombucha that’s full of all the health properties and flavor you love, brew your own, and save a few dollars in the process!
DIFFERENCES BETWEEN BATCH BREW KOMBUCHA AND CONTINUOUS BREW KOMBUCHA
When researching how to brew kombucha and the options you have, I’m sure you’ve come across the methods labeled “continuous brewing” as well as “batch brewing”.

What are the differences between batch brew and continuous brew kombucha methods?
- BATCH BREWING KOMBUCHA – Just as the name references, batch brewing kombucha is the method of brewing a single batch at a time. On the day of brewing you go through the process of making the sweet tea, adding a SCOBY plus the starter tea to as many jars as you like. It’s then left to sit for a minimum of 1 week up to 2 weeks at room temperature to allow for the first fermentation process, aka F1, to complete. The only limitations as to how many days you can batch brew would be the number of SCOBY & starter tea you have available from previous batch brewed kombucha. With batch brewing kombucha you harvest the kombucha all at once.
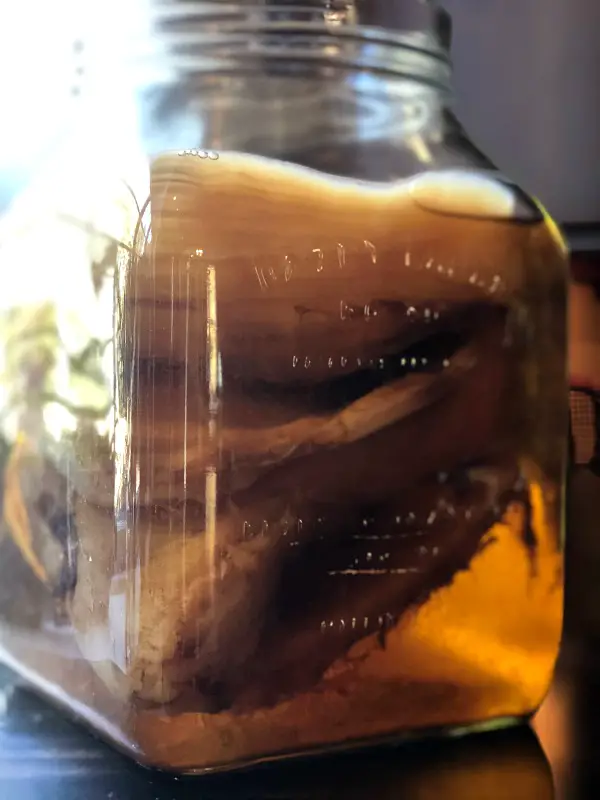
- CONTINUOUS BREWING KOMBUCHA – A continuous brew method of kombucha is where there is pretty much no beginning nor end time of brewing. It is essentially the process of continuously drawing from the first fermented kombucha overtime gradually. It’s also a process that is continuously replaced with an equal amount of sweetened tea to what is being drawn off. This process requires a larger vessel typically with a spigot for ease of drawing the kombucha off.
CONSIDERATIONS FOR DECIDING WHICH BREW METHOD IS BEST FOR YOU
As with most things in life, there are both pro’s and con’s to utilizing either the batch brew method or the continuous brew method when brewing kombucha. When deciding which brew method is best for you and your schedule, consider the pro’s and con’s of each.
PRO’S AND CON’S FOR BATCH BREWING KOMBUCHA
The pro’s of batch brewing kombucha …
- TIME IS AN ISSUE – You may want to batch brew when you have only a set amount of time to make your F1 (first ferment) and add flavorings. Think fruit juices, fruit, or purees here. Kind of a one and done process. Make a new batch and bottle/flavor the fermented kombucha all in one day.
- SCHEDULE – Batch brewing your Kombucha allows for control over your schedule. You determine when you want to brew a new batch. At your convenience. Overtime, you will begin to develop your own schedule and know when it’s time to get brewing.
- FLAVORING – With this method of brewing it’s easy to determine the flavor you enjoy most for your Kombucha. You are in control of the flavor by allowing it to ferment for a longer or shorter period of time.
- SCOBY’S – When you brew every couple of weeks, you begin to have a plethora of SCOBY on hand. Thus, creating a SCOBY hotel, basically a container where you store your SCOBY along with some of the fermented “starter” kombucha liquid. The advantage of hosting a hotel is that you have available at times a fresh SCOBY when needed. That AND it’s convenient when you want to take a break from brewing for a while. That being said, it is one more thing to maintain and keep track of.
Although few, there are several considerations for choosing to brew your kombucha with the batch brew method …
- POSSIBLE SCOBY CONTAMINATION – The more the SCOBY is handled, the higher the risk of contaminants or bacteria exposure. Ensuring cleanliness greatly reduces this risk.
- TIME – Once the fermentation time is up, you will need to set aside 1 to 2 hours for bottling and/or flavoring the harvested kombucha.
- MULTIPLE BOTTLES – As you will be harvesting the kombucha all at once with the batch brewing method, you will need to have multiple bottles ready to go.
PRO’S AND CON’S FOR THE KOMBUCHA CONTINUOUS BREW METHOD
The continuous brew method for fermenting my kombucha is my preferred method by far. Although I still utilize the batch brew method at times, by brewing continuously I’ve found it saves me time & allows a fresh brew to be enjoyed at my leisure.
A few of the pro’s for choosing the continuous brew (CB) method …
- AVAILABILITY – For those who drink a lot of kombucha, having it on tap and available at any time may be a big factor in choosing the CB method of brewing.
- LESS RISK OF SCOBY ISSUES – As you will not be handling the SCOBY often, this method of brewing greatly reduces if not eliminates the risk of contamination, mold, or other issues developing with the SCOBY. The liquid boasts an acidic habitat far superior to that of the batch brew, making it a safe environment from spoilage threats largely due to the miniscule amounts of free sugar and larger amounts of good bacteria and yeast present.
- FASTER BREW – The CB method ferments faster because this method combines both new and aged kombucha, increasing the speed at which it ferments.
- NUTRITION – As many of the beneficial acids appear and are developed later in the brewing cycle, the combination of old and new make for the perfect balance of a more diverse nutritional content.
- CAPACITY – The CB method allows for a larger volume of kombucha to ferment at once. This makes it especially beneficial when brewing for multiple people.
- LOW MAINTENANCE – The CB brew is by far less maintenance than that of the batch brew. Instead of breaking out all the supplies and equipment needed every couple of weeks to batch brew, the CB method requires only harvesting the fermented kombucha (always leaving at least 30% or so) and replacing the same amount harvested with a freshly brewed sweetened tea.
As with everything, a few cons are always factors to be considered …
- UPKEEP – Where the batch brew method is one and done until harvesting, the CB method needs a bit of upkeep. Depending on how often you draw off kombucha from the vessel, often done daily for some, you may need to brew and replace the tea often, maybe even daily 😳
- YEAST – Sediment will accrue at the bottom of the vessel from the yeast which is created during the fermentation process. This sediment will need to be stirred prior to drawing any off through the spigot.
- FLAVOR – As the batch of CB kombucha is always fermenting, the risk of the flavor turning sour is a consideration. That being said, it does take time to find the “just right” fermentation time to avoid over-fermentation which will likely result in a sour product.
- SCOBY’S – With CB the likelihood that you will host a SCOBY hotel is minimal. Typically when choosing this method of brewing, most brewers put all their eggs in one basket and maintain a single continuous SCOBY.
RECOMMENDED EQUIPMENT FOR CONTINUOUS BREW KOMBUCHA
There is really very little you need to begin brewing kombucha using the continuous brew method.
Obviously, you will need the ingredients & equipment needed for brewing.
Sharing Is Caring ❤️
INGREDIENTS FOR CONTINUOUS BREW KOMBUCHA
The initial ingredients for creating a continuous brew kombucha are …
- SCOBY – The “mother” of kombucha is the culture or SCOBY which offers the final product all its benefits
- Starter Liquid or Tea
- Sugar
- Tea Bags OR Loose Tea – Black is preferred here, but kombucha can be brewed successfully with green, oolong, and other tea’s as well overtime
- COVER – Covering the vessel is imperative to keeping pesky fruit flies at bay and still allow the essential oxygen to enter for fermentation. The cover should be made of a breathable fiber such as cotton. Specialty “brew caps” are available or can easily be made
SOURCING THE SCOBY
Many often wonder, “where the heck do I get a SCOBY?”. Sourcing your SCOBY from a trusted source is essential to brewing a healthy & viable ferment.
Look to friends who may already be brewing! As a healthy SCOBY readily creates a “baby” nearly every batch, you can be sure brewer’s will have some extra on hand to share!
Remember when sourcing the SCOBY to acquire the fermented liquid (kombucha) to use as a starter for your own batch.
I highly recommend before taking the SCOBY and the starter liquid to do a taste & visual test of their brew first. Make sure their kombucha has a pleasant taste, smells tart, and their brewing vessel looks healthy. A compromised or struggling SCOBY is not a place you want to start your fermenting journey from!
Alternatively, you can purchase SCOBY’s and even complete kombucha starter kits online. I will say, research, make sure it’s a reliable source with good reviews when doing so.
Finally, growing your own SCOBY from store-bought, raw & unflavored kombucha is always an option. Be aware that it can take patience & a LOT of trial and error at times when choosing this method.
HOW TO GROW YOUR OWN SCOBY
To grow your own is simply a matter of adding 1 C of brewed Black Tea with dissolved sugar (1 to 2 Tbl) to the raw kombucha. Cover with a breathable fermenting cover in a warm spot, ideally between 65°F to 85°F, out of direct light for at least 7 days.
After 7 days you should start to see a muted film growing on top of the liquid. This is the SCOBY development. Allow the SCOBY to continue to grow and become thicker before brewing your first batch of kombucha.
Should you not see any development after 3 weeks, or discover mold developing, discard and begin again.
CHOOSING THE CONTINUOUS BREW KOMBUCHA VESSEL
In addition, you will want to invest in a convenient brewing vessel. Preferably one that will easily hold a minimum of 2 gallons and up to 5 gallons at a time.
The larger size vessel will easily hold the liquid needed to continuously brew.
Since the CB method allows you to draw from the ferment as it brews, using one with a convenient spigot is essential.
The spigot should be of high quality & made from BPA free plastic, wooden, or a good stainless steel. Lower quality metals may leach into the kombucha ultimately compromising the quality and benefits of the ferment. Also when researching the spigot make sure to steer clear of one’s which may use epoxies, glue or any other adhesives.
One other consideration when choosing the continuous brew kombucha vessel is spigot placement on the jar itself.
As the ferment’s bacteria and yeast created overtime tends to sink to the bottom of the vessel while the lighter bacteria floats to the top, for the best flavor and health benefits, strive for a combination of both. By utilizing a vessel with a centered spigot, hopefully that issue will be met.
Otherwise, plan on giving the vessel’s ferment a quick stir prior to decanting any.
HOW TO MAKE CONTINUOUS BREW KOMBUCHA
When first beginning to make continuous brew kombucha you will need to gather the above listed equipment & ingredients.
In addition to the brewing vessel, fermentation cover, & ingredients, you will need a spoon or utensil to stir the sweetened tea as well as a pot to brew the tea in.
Be sure all the equipment is cleaned and ready to go. Some even go so far as not using soaps to clean the equipment, but instead using vinegar to ensure you have no contaminants when beginning.
I’ve never gone to those lengths, but instead rinse & dry all my equipment very well prior to beginning.
PREPARE THE TEA & KOMBUCHA MIXTURE
Follow these steps when first beginning to brew.
STEP 1
Prepare the sweetened tea by pouring 3.5 Qts of untreated, fluoride & chlorine-free water into a pot & bring it to a boil. Add tea (2 Tbl loose tea placed in either a tea ball or tied in a cheesecloth satchel or 8 tea bags) to the water along with 1 C of cane sugar. Stir to combine, cover, and allow to sit for a minimum of 15 minutes or until cooled to room temperature.
These amounts can be adjusted as needed for the amounts you will be brewing.

*NOTE: When brewing the sweetened tea, metal is ok to use. If you are using loose tea, a metal tea ball is ok as well. Refrain from using metal items once the SCOBY has been added & remove any prior to adding the SCOBY to the sweet tea.
STEP 2
Remove the tea/bags from the liquid. Make sure the sweetened tea is completely cooled to room temperature*, & pour the liquid into the brewing vessel. Leave plenty of room at the top, at least 20% or so, for the next additions.
*Sweetened tea that is not completely cooled to room temperature may harm or even kill the SCOBY.
STEP 3
Add 2 C of starter (liquid/kombucha from a previous ferment or distilled white vinegar) to the vessel.
STEP 4
Gently & always using clean hands, lay the SCOBY on top of the liquid in the brewing vessel. It may float or sink to the bottom. Either is ok. A new “baby” SCOBY will develop on the top layer of the liquid.
STEP 5
Place the cover over the vessel and secure it with a rubber band or twine to help keep away fruit flies and the like. Or you can be lazy like me and just drape a breathable cloth over the top of the vessel 😊
STEP 6
Place the covered brewing vessel in a warm area, preferably an area with a moderate to warm temperature (75°F to 85°F) away from any other fermenting items you may have brewing.
Cold is not kombucha’s friend when brewing. Too cold temperatures can cause an “off” tasting end product, & promote mold growth. Should you live in a colder climate and not maintain those temperatures, consider placing a heating mat around or under the vessel.
Within 7 days, but can be much longer depending on your environment and brew size, the kombucha will be ready for a taste test.
Ultimately, it should have a pleasant, slightly sweet & tart flavor. If not, allow it to brew a bit longer before decanting.
STEP 7
Pour or decant from the jar once fermenting time is completed. When using the continuous brew method, when harvesting be sure to leave at least 20% of the kombucha in the existing vessel along with the SCOBY as the starter for your next batch!
When using the batch brew, remember to save the SCOBY along with 2 C starter liquid from the bottom of the jar for the next brew!
If you enjoy the flavor, the kombucha is ready for a second fermentation if your goal is to add more carbonation, bottle as is, or add any additional flavorings you may like.
Print For Later ❤️

Continuous Brew Kombucha
Ingredients
- 2 cup Starter Tea (previously fermented Kombucha)
- 1 Kombucha Scoby Mother
- 1 cup Organic Cane Sugar
- 3.5 Qts Water Distilled/Bottled or Untreated
- 2 Tbl Loose Tea OR 8 Tea Bags Black is preferred
Instructions
- Boil 3.5 Qts water.
- Add to boiling water, tea and sugar
- Remove from heat and cover. Let steep for 15 minutes.
- Remove tea or leave in for a stronger brew. Bring to room temperature
- Add room temperature sweet tea to kombucha mother and kombucha starter to the brew vessel.
- Cover loosely with breathable cloth out of direct sunlight. Let ferment at least 5-7 days or longer.
FEEDING THE CONTINUOUS BREW KOMBUCHA
Once you’ve harvested the fermented kombucha, leaving the 20% needed for the next ferment, it’s time to feed it. Feeding it is a simple matter of preparing the appropriate amount (the same amount as you harvested) of sweet tea (water, sugar, tea) and adding it to the vessel.
Remember to allow the sweet tea to completely cool prior to pouring it into the vessel.
MAINTAINING CONTINUOUS BREW KOMBUCHA
Once you’ve got your continuous brew kombucha going, fortunately maintaining it is relatively simple with a little planning and maintenance.
Prior to performing any maintenance tasks, give the CB a stir. This will encourage microbial balance throughout the brew.
To do so, simply gently lift any developing SCOBY up and use a wooden spoon stir to combine the yeast and good microbes/bacteria throughout the liquid.
Remember to always aim for keeping at least 20% of the fermented kombucha in the vessel/brewer. This will allow the existing yeast & bacteria to do its job; ferment the sweet tea you will be adding.
Aim for replacing the same amount of kombucha you remove with the same amount of prepared sweet tea. Should you draw off a quart of kombucha, plan on adding a quart of sweet tea.
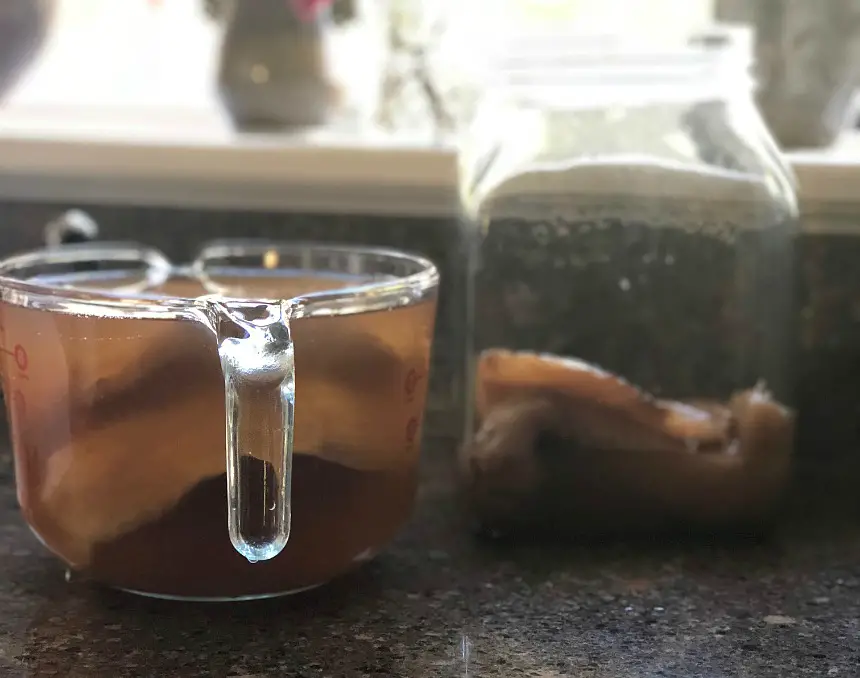
As you can see clearly from the side image of the SCOBY, it has layers. Every so often you will want to separate these layers to avoid the possibility of overgrowth. Below are some ideas of what to do with your extra SCOBY.
HOW TO CLEAN THE CONTINUOUS BREW KOMBUCHA VESSEL
Cleaning of the brew vessel and or spigot is only necessary if the vessel develops too much yeast or the spigot becomes clogged.
Kombucha, as we’ve stated, will develop strings of yeast growths which can sometimes clog the spigot.
To clean the spigot, remove all the kombucha from the vessel along with the SCOBY. Using ACV wash the spigot running a small bottle brush through until it’s unclogged completely. Rinse thoroughly, dry, and replace the kombucha & SCOBY, covering the vessel once again.
WHAT TO DO WITH EXTRA SCOBY
Similar to other ferments that utilize a starter or “mother”, think sourdough & yogurt here, you will be left with excess starter. In the kombucha world, that means SCOBY. No matter which method of brewing kombucha you choose, eventually you will have lots of left-over SCOBY.
One of the most common questions I receive is, “what do I do with all the extra SCOBY?”
First, I can tell you what NOT to do with all the extra SCOBY. Don’t throw them away! These cultures are little wonder patties filled with nutrients!
Here are a few suggestions for what you CAN do with all the extra SCOBY & practice a waste-free kitchen in the process…
- GIFT – Create a unique, delicious, and fun gift by creating your own kombucha starter kits! Place the SCOBY & starter liquid in a mason jar, cover with a plastic, leak-proof cover. Don’t forget to create a fun recipe card of how they can brew their own kombucha!
- SCOBY HOTEL – Create a SCOBY hotel for all the extra you will likely have. More on how I do that below for long-term storage.
- PLANT FERTILIZER – Encourage a healthy and robust garden/soil by creating your own SCOBY plant/soil/garden fertilizer! Either cut up the SCOBY and add it directly to the garden’s soil or whip it up with a bit of water to create your own liquid fertilizer adding nutrients & acidity to the garden. Only recommendation is that exposed SCOBY will yell out to all in the neighborhood, come eat me 😅 Make sure the SCOBY is well covered.
- EAT IT – Yes, you heard right. The SCOBY is actually edible & nutritional, offering a source of insoluble fiber (think improved gut health & digestion here) in addition to the other health benefits, and can be used in creating some unique dishes! Think sushi, ceviche (the texture is similar to that of raw squid), dehydrated to make a flavorful jerky & fruit leather, add it to your homemade dog treat recipes, puree and add to smoothies and such. Many cookbooks are available with recipes to utilize extra SCOBY.
- SKINCARE – Holistic skincare enthusiasts are utilizing this probiotic rich patty as a facial mask. Especially beneficial to those with difficult skin issues such as acne.
- HOME REMEDIES – Used for everything from irritated skin, burns, and even skin scrapes. One of the more unique uses for the SCOBY comes from my friend Laurie over at Common Sense Home has had great success using SCOBY as a cure for cradle cap!
COMMON CONTINUOUS BREW KOMBUCHA QUESTIONS
What amount should I start with when first beginning to use the continuous brew method?
When brewing kombucha size/amount matters. Especially when using this method of fermentation.
Smaller amounts than 2 gallons make it difficult to balance & maintain the bacteria to yeast ratio. This imbalance can often lead to unsavory flavor.
On the flip side, brewing too much at a time, think 5+ gallons, can lead to a whole host of other issues.
Finding the “just right” amounts may take a bit of experimentation and trial & error before you find yours. If you are unsure as to how much you will be consuming each week, best to begin with a simple batch brew and go from there.
Is continuous brew kombucha fizzy?
As stated above, the first fermentation (F1) will typically be only slightly fizzy. Should you desire more carbonation, a second (F2) fermentation is recommended.
Can kombucha brew too long?
Absolutely! The longer the fermenting period, the more acidic or vinegary the end product.
Why? Because the yeast in the SCOBY uses up the sugars and tannins in the kombucha for the fermenting process, turning them into ethanol. The bacteria then feed on the ethanol, turning it into an acidic, vinegary end product.
Although not harmful, and actually filled with more probiotics, the taste can definitely be too much for some.
What color is a healthy SCOBY?
A vibrant, healthy SCOBY will be anywhere between a white/light tan color. A darker brown SCOBY typically is just an indication that the SCOBY is older.
Should the SCOBY become black, it has definitely out-lived its life span and should be added to the compost.
Is it ok to drink kombucha daily?
As with most things, over-indulgence is not a good thing. The Center for Disease Control’s recommendation is that you keep the kombucha levels to 4 oz only 1 to 3 times per day.
What happens with the sugar added in kombucha?
Sugar is a necessary ingredient and part of the fermentation process. Sugar is what actually feeds the microorganisms within the kombucha.
A large portion of the sugar added is consumed and converted to healthy acids during this process.
Only a small amount of sugar remains, mixing with the healthy acids once the brew is completed. This marginal amount only adds to the flavor & balance between the sweet and the tart.
Can the kombucha flavor be customized?
Brewing in the larger amounts needed for the continuous brew kombucha method allows for flavor experimentation!
Flavoring kombucha, done during the F2 fermentation process, is simple to do and limited only to what you can imagine! Think fresh fruit, dried fruit, jams or jellies, herbs, flowers, spices, syrups and more!
To add flavor to the second ferment simply add your flavorings to a bottle, top it off with kombucha, seal, and allow it to ferment for an additional 1 to 3 days. Don’t forget to “burp” the jar a few times per day as it can build up in pressure!
Refrigerate once the fermenting process is complete & enjoy!
Brewing your own kombucha is simple, versatile, and an enjoyable hobby! Utilizing the continuous brew kombucha method only makes it more so.
Will you be using the continuous brew kombucha method?
Love, Light, & Laughter !

FDA DISCLAIMER
Recommendations and or suggestions made by this blog regarding husbandry and or herbal remedies etc. are not meant to replace solid advice from qualified professionals. None of the information on this blog has been evaluated by the FDA. Products or remedies mentioned are not intended to diagnose, treat, cure or prevent disease. Please do your due diligence. Research, talk to qualified professionals and proceed at your own risk.
SHOP THIS POST
Enjoy this article? Please consider sharing it on your favorite social media channel! Want more? Subscribe below for the occasional update with all the “happenings on the hill”!
16 comments
Love drinking kombucha. I tried to brew my own once, but I should really try again. Your continuous brew kombucha seems pretty doable.
We did not know how to make Kombucha. Thank you for sharing with us.
Wow, this is an increible guide for Kombucha! I learned so much! So many great options and ways to brew it!
I love Kombucha but after my husband saw what the SCOBY looked like…he hasn’t touched it since! LOL, Maybe I can talk him into trying it again so we can brew it ourselves.
This is great. My husband like kombucha for the abundance of antioxidants and additional health benefits. Lets see if he is ready to try to make our own.
Wow! Thanks for such a detailed post. I’ve toyed with the idea of making our own kombucha. Your post gives me all of the information I need to get started!
It was fascinating to read about making kombucha! I can’t drink it. It gives me acid reflux because of the sugar. But I enjoyed following the process.
Fortunately, the sugar is minimal with properly brewed kombucha. More likely it’s the acetic acid that may be irritating for you. That being said, I’m sorry you develop this issue with drinking Kombucha!
I use kombucha in my batter when I made fish and chips. Thanks for showing us how to make it!
What a great idea! Hope you can give it a go!
This is so interesting! I actually don’t care for kombucha, but I really want to like it for all the health benefits and now I’m wondering if making it from scratch would taste better (because everything is better homemade!)
You certainly can adjust the flavor as described above to suit your tastes! Hope you can give it a go.
We love kombucha, it’s good for you in so many ways. I have looked and looked for a suitable spigot vessel too. It’s always amazing that the ones that advertise themselves as “for kombucha use” are still metal, and cheap, pseudo metal at that. I like your idea of just replacing the spigot all together. Thanks for sharing this with us at the Homestead Blog Hop!
We love Kombucha! I just don’t keep up with it. I get tired of it being on the counter or we go out of town and I let it go. It is so yummy to drink with dinner. I have a dehydrated scoby I keep thinking about giving it a try again! Thanks for linking up at Embracing Home and Family again!
Suzan, thanks for this post! I’ve been making a lot of water kefir lately and love that it’s such a quick process. However…I keep thinking about brewing kombucha. I like the flavor and think it could be a good fit for me. Something like a continuous brew option would be ideal! Are there times when you take everything out and clean the jar or is the kombucha good at keeping out any bacteria, etc? If you clean, about how often? Thank you for your help!
Hi Rachel ~
Thank you for inquiring (I am updating the post to reflect this question!) Clean the vessel & spigot if you have one if the spigot becomes clogged or too much yeast & scoby develop in the jar. To clean simply remove a scoby & starter for the next batch & place into a safe glass jar. Wash the kombucha vessel & spigot with hot water, soap, and if needed a bit of distilled white vinegar. Rinse very well. Once clean add the starter, scoby, and fresh tea to begin again. Hope this helps!
Suzan